As you may notice, once finishing the capturing phase, ActivePresenter automatically transfers your recording to the edit screen. Depending on the recording mode (software simulations or video demonstrations), what you’ll see is a screencast (also a recorded video) or a slide-based project. But in any case, the app lets you edit the recorded project the way you want. This is necessary if you want to enhance your project.
The below tutorial walks you through some ways to edit recorded videos. The editing techniques for software simulations will be saved for another article.
Before going into details, there are some important things you should know:
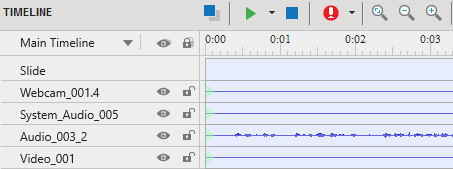
- After recording, ActivePresenter will automatically create different objects. If you record screen without audio and webcam, there’s only the video object. In case you record screen, system audio, microphone audio, and webcam at once, there are four objects in total.
- You have full access to all video editing features even you are using the free ActivePresenter version. There is no time limit, watermark, and pop-up ad at all. See the Feature Comparison page for more information.
Basically, ActivePresenter provides you a wide variety of features to edit recorded videos. These features appear in the Tabbed Toolbar, Timeline pane, and Properties pane. So you can use them to edit the timing, change cursor effects, and even enrich your recorded videos with a lot of annotations and effects. These tasks can be done in a couple of minutes.
Edit the Timing
When recording video, chances are your recorded video includes unwanted information, especially in its beginning and end. You can also have to adjust the duration to match the video with voice and annotations. Sometimes, you may want to split or join videos, slow down or speed up the video to create special effects. With these in mind, it’s vital to edit the timing for video. You can apply commands to the whole selected object or just a specific range of that object.
Select Range and Objects in Timeline
ActivePresenter lets you easily edit the timing for video. To do this, access the Timeline pane and work with commands.
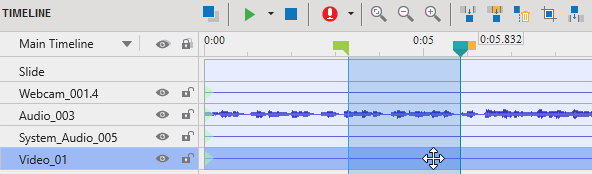
The Playhead shows the current timestamp of the objects displaying on the Canvas. That is, it has a green Start Marker and yellow End Marker. You can drag them along the Timeline to select a range. After that, you can apply any command (such as cut, crop, change speed, etc.) to that selected range.
Note: When you specify a range without selecting any object, ActivePresenter will automatically apply the command you choose to that range along with all the objects inside.
On the other hand, if you select a range, and select one or some objects, the commands you use will, in fact, apply to that range along with those selected objects only. Other unselected objects will not be affected.
Video/Audio Editing Tools in Timeline
Let’s take a look at video/audio editing operations in details:

(4) Cut, copy, delete and crop the selected range of any objects in the Timeline.
(5) Insert Time: Add more freeze time for your videos so that you can add some clarifications or explanations.
(6) Split and Join Videos: Split a video into several parts or join multiple videos into one.
(7) Change Playback Speed: Speed up or slow down the playback speed of the whole video or specific parts of it.
(8) Insert Blur Area: Hide sensitive information in videos by blurring moving and static (non-moving) objects.
Note: Ensure to select the video object whether on the Canvas or in the Timeline pane to enable the blur effect feature. Otherwise, the blur icon will not be available to use.
(9) Adjust Volume: Increase or decrease the volume for the whole audio/video or just some parts of it.
(10) Audio Fade In/Out: Make the audio gradually increase or decrease the signal level. It’s useful especially in smoothing the beginning and end of an audio track.
(11) Audio Noise Reduction: Help fine-tune audio by eliminating unwanted background noise like electric fans, hums, or honking of horns.
(12) Audio Normalization: Apply a constant amount of gain to an audio recording to bring the amplitude to a target level (the norm). For example, you can normalize audio during the recording phase when you cannot speak at the same volume level.
You can zoom in/out the Timeline to work more easily and exactly with objects and their timestamp. The easiest way is to hold CTRL while scrolling the mouse up/down to zoom in/out. Also, right-click in the Timeline and select Waveform Bar Height to set it larger.
Edit Cursor Effects
A mouse cursor is an object you can use to depict a moving mouse effect. It lets you simulate mouse movements, which is useful for software simulations and training videos.
In the recording process, if you choose to record mouse cursor and turn on cursor effects previously, you’ll see cursor effects in the recorded videos. You can change these cursor effects for better visibility using a cursor highlight, click sounds, and click effects. Even if you turn off cursor effects before recording, you are also able to add them to your recorded videos the way you want.
To change cursors effects for the recorded video, work with the Cursor Effects section in the Properties pane. See Change Mouse Cursor and Mouse Clicks in Captured Videos for more details.
Note: You can’t add multiple mouse cursors to a video.
Add Annotations
ActivePresenter gives you a vast number of annotations, such as shapes, text caption, spotlight, zoom-n-pan, and closed captions. You can add them to the recorded video, style them, and add animation effects as you want. Make use of these practical features to create a professional screencast. With annotations, you can explain complicated concepts, add more details to what you are saying, “talk” to the audience, etc.
For example, you can use zoom-n-pan effect when you want your audience to focus on a specific part instead of the whole screen.
Apply Green Screen Effect
Also known as chroma-keying, green screening is the technique of blending a video with another layer of video. It can be done by keying out a color from a video, then replacing that color with another video. You often see this technique in movie stunts or in weather forecast where a presenter stands in front of a moving weather app. This can be helpful when you want to remove background of a webcam video placed at the corner of the tutorial one.
For information about how to use green screen effect, see Use Green Screen Effect.
Now you’ve learned how to edit recorded videos in ActivePresenter 8. Hope that it helps. Don’t hesitate to contact us if you have any problems.