Closed captions make videos and eLearning courses more accessible for the deaf or hard-of-hearing audiences/learners. In this tutorial, you’ll learn how to add closed captions and work with them in ActivePresenter 8
Add Closed Captions
Closed captions (so-called CCs) are a text version of the spoken part of televisions, movies, videos, or presentations. The qualifier term “closed” means that the user has the power to display or hide the closed captions.
In ActivePresenter, you can easily add CCs to videos or courses by doing the following steps:
Step 1: In the Timeline, choose the timestamp that you want to add a CC. Zoom in the Timeline to get a better view if needed.
Step 2: Click the Insert tab > Closed Caption. Alternatively, in the Timeline pane, click Insert Caption.

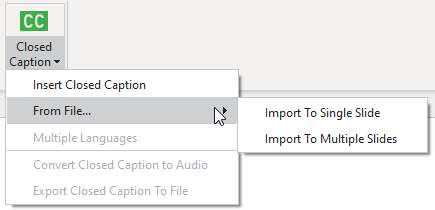
Note: You can either insert closed captions on your own or import closed captions from a caption file with the *.srt file extension.
In the Insert tab, click the arrow on the Closed Caption button > From File… > Import To Single Slide or Import To Multiple Slides > select the file that you want to import.
After that, both ways insert one CC node (1) at the position of the Playhead. On the Canvas, a CC editor (2) appears, allowing you to type the CC.
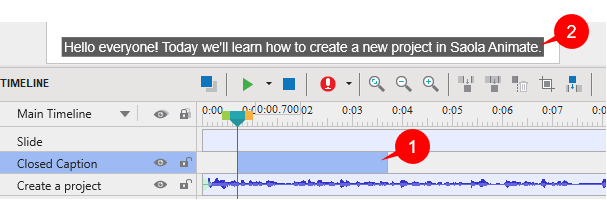
Step 3: Type the caption in the editor. Then, position the Playhead to another timestamp and repeat the cycle. All CC nodes in the Timeline are put in the same line and considered as one CC object.
Step 4: Drag the CC node or either of its ends to change its timing and duration. You should display each CC for adequate time so that your audience can read it comfortably.
Besides, take note of the following:
- If you don’t specify the timestamp, ActivePresenter will append the new CC node to the end of the previously existing CC node.
- The CC nodes are arranged in time order. There is no overlapping in time between CC nodes, meaning that only one CC node can be displayed at a time.
- You cannot switch the order of the CC nodes.
Add More Languages to Closed Captions
ActivePresenter 8 now enables you to add more than one language to your closed captions. It can be done through a very few simple steps:
Step 1: Select one CC node in the Timeline.
Step 2: Go to the Insert tab > click the drop-down arrow on the Closed Caption button > Multiple Languages.
Or, in the Properties pane > Size & Properties > General > click the Edit Language ![]() button.
button.
Step 3: Add and edit as many languages as you want in the Edit Language dialog that appears.
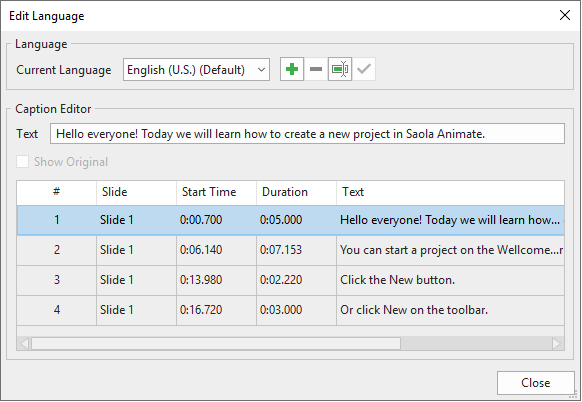
You can choose all other CCs and edit a new language of them right in this dialog without reselecting them in the Timeline.
To see more clearly about working with this dialog, refer to Add Multiple Languages for Closed Captions tutorial.
Format Closed Captions
The style of all CC can only be set globally in the project. This means you cannot set a unique visual property for each CC. In other words, if you change the style of one CC in a slide, the change will affect all CCs in that slide and in other slides in the same project.
To format a CC, do the following:
Step 1: In the Timeline, place the Playhead at the timestamp that the CC appears. This makes the CC visible on the Canvas.
Step 2: Edit the text or the fill style of the CC using commands and options available in the Home tab, Format tab, or the Properties pane.
Convert Closed Captions to Speech
ActivePresenter lets you convert closed captions to speech using the Text to Speech feature. After being converted, all nodes of a CC object produce a combined single audio object.
For details about this, see How to Use Text to Speech.
Toggle the Closed Caption Button in the Player
You can give viewers control over seeing the closed caption or not by enabling the CC button in the player. Using this button, viewers can toggle closed captions as they wish. Also, this CC button enables viewers to switch between the languages of closed captions if they want.
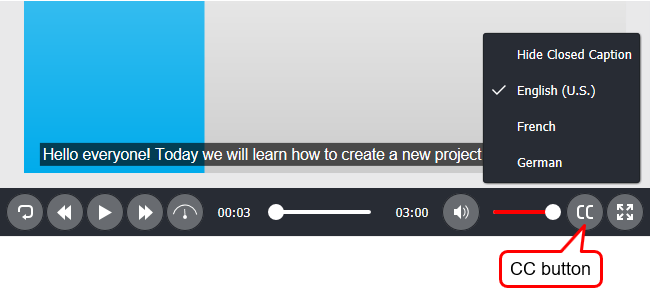
To enable the CC button, first, open the Player Settings window by clicking the Export tab > Player Settings. Then, in the General tab > General Parameters > Toolbar, select the CC Button check box. Don’t forget to click OK to save changes.
Note: ActivePresenter allows you to customize the player for each operation mode separately or all of them together. Click the Operation Mode combo box and select the mode you want. See Customize HTML5 Player Settings for more information.
Use Actions to Toggle Closed Captions
It’s possible to control captions via actions. ActivePresenter provides the apCCVisible variable to help you show or hide the CC. Set the variable to true to turn the CC on, and false to turn it off.
For example, you can create your own CC button that allows users to show or hide the CC:

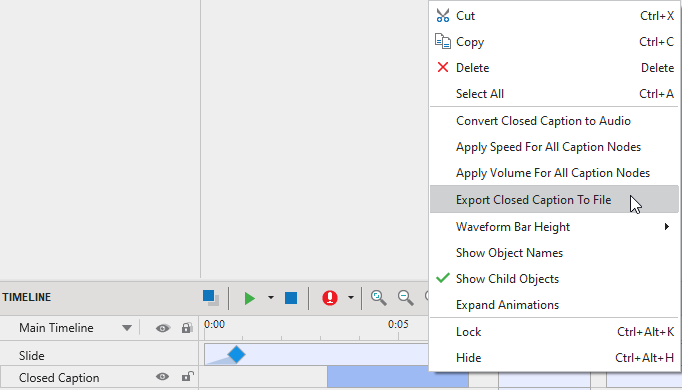
Export Closed Captions to File
Now, ActivePresenter 8 gives you a chance to easily and quickly export just CCs to *.srt file without exporting with the whole video. To get it done, you simply right-click a CC node in the Timeline pane, or click the drop-down arrow on the Closed Caption button in the Insert tab > Export Closed Caption To File.
Delete Closed Captions
To delete one or more CC nodes, select them in the Timeline and press DELETE.
To delete all CC nodes, click the Closed Caption name to select all the nodes and press DELETE.
That’s all about the steps to add and work with closed captions in ActivePresenter 8. Download and try this feature now. Don’t forget to visit our tutorials page to get ActivePresenter 8 tutorials up-to-date.
Related topics: