The Main Timeline, the interactive timeline, and the Click Sequence timeline are three different types of timelines that ActivePresenter 9 offers you. Let’s take a closer look at an overview of multiple timelines through today’s article.
You may become familiar with the Main Timeline and interactive timeline in the previous version of ActivePresenter. With the 2022 release, ActivePresenter 9 brings users the Click Sequence timeline. In general, each timeline is used for specific tasks. Thanks to that, managing complex interactions and animations for objects become much easier. Each type of timeline will be discussed in more detail in our next tutorials. This post will offer you basic information about these multiple timelines and how we can apply them.
Table of contents:
Now, let’s dive deeper into each part.
What is the Timeline?
On a slide, a timeline represents the timing of all objects. In other words, it defines how multiple objects in a slide show, hide or animate against time.
That’s not all, it is possible to edit the object timing and its animations here. ActivePresenter 9 offers you tons of animation effects to attract viewers’ attention. Just access the Animations tab and select any type of entrance, exit, emphasis, or motion path effects there.
Multiple Timelines in ActivePresenter 9
In this part, you will have an overview of 3 timeline types in ActivePresenter 9. These are the Main Timeline, interactive timeline, and Click Sequence one. Keep reading to learn more!
1. Main Timeline
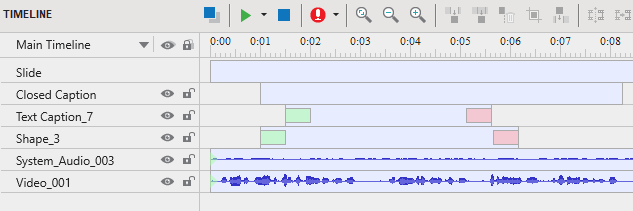
By default, each slide has only one Main Timeline. Once the slide plays, the Main Timeline, and its animations automatically run. You can see the Main Timeline is placed in the Timeline pane which is right under Canvas. In case the Timeline pane doesn’t appear when you open the project, access the View tab and select Timeline.
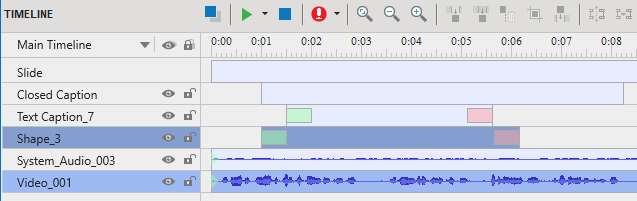
The image above shows the Main Timeline in ActivePresenter 9 and its existing objects. The selected objects are highlighted in blue color. For example, Shape_3 and Video_001. The video or audio objects display with waveform within their object time bar. In the Main Timeline, you can edit audio/video objects with built-in editing features in a few clicks. Also, record audio from your microphone in real-time, preview and play slides, and add, remove, or rename the timeline. All the changes will be displayed right after the actions you made.
Note: You cannot add, remove or rename the Main Timeline. Besides, objects in this timeline may include many emphasis and motion path effects but only one entrance and exit effect are accepted.
2. Interactive Timeline
Suppose you want to create a traffic light with three different traffic colors that appear and disappear repeatedly. In other words, you have to apply the entrance and exit effects to a traffic color many times. It seems that the Main Timeline doesn’t help in this case. You need to use another type of timeline to achieve that. So, now, it’s time to explore the interactive timeline in ActivePresenter.
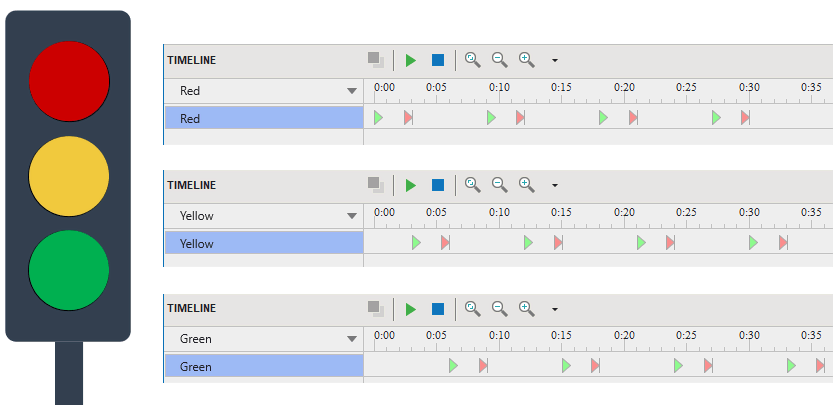
Generally, interactive timelines are added timelines that contain animation effect time bars of the objects. You can add multiple interactive timelines as you want, or remove these ones when needed. With this timeline, creating, editing, and controlling object animations, especially complex ones, become much easier and more effective. Have in mind that an interactive timeline must be activated by using events-actions.
Note: Interactive timelines enable users to add all the effect types many times to an object.
For your reference, get an inside look at the blog How to Create Interactive Solar System and How to Create Way Back Home Game with ActivePresenter. They will provide you with real examples of using multiple timelines in the app.
3. Click Sequence Timeline
As mentioned above, Click Sequence is one of the multiple timelines that ActivePresenter offers you from the latest version. This timeline has some differences from these two timelines above. The Click Sequence timeline allows controlling objects’ start time flexibly as you wish by clicking the mouse, pressing the arrow key, or coordinating them with other effects on the slide. Regarding this point, it works the same way in ActivePresenter as it does in Powerpoint. Therefore, this timeline is best suited for teachers, lecturers, or instructors who present directly. They can control the display time of each slide by themselves or provide more time for learners to absorb information in each part.
Note: Adding many animation effects of all types per object is applicable.
So, that’s an overview of multiple timelines in ActivePresenter 9. Hope that the provided information helps you work efficiently. Feel free to contact us in case you need any assistance.
Click the below button to download the latest version of ActivePresenter!


More Articles: