ActivePresenter 9’s Click Sequence timeline is one of the most amazing features. It helps users to manage and animate objects more effectively depending on their needs. Let’s learn how to create and work with this timeline in today’s article.
Besides interactive timelines, ActivePresenter 9 now offers you a Click Sequence timeline. Thanks to this feature, you can not only control the object animations’ timing but also arrange their orders. For teachers, lecturers, or instructors presenting information directly, this timeline is ideal. Basically, it works the same way as the Animation Pane in Microsoft PowerPoint. When importing a project from PowerPoint into ActivePresenter, all the animations will be placed in the Click Sequence timeline, instead of the main timeline. If you are familiar with adding and managing animations in PowerPoint, you will find it very easy to use the Click Sequence timeline in ActivePresenter 9.
Download the app to try out this amazing feature!


This tutorial covers:
- Overview of the Click Sequence timeline
- Create a Click Sequence Timeline
- Manage Object Animations in the Click Sequence Timeline
Now, read on to learn more!
Overview of Click Sequence Timeline
In general, Click Sequence is also a timeline in ActivePresenter 9. While the main timeline automatically activates its object animations when the project runs, the Click Sequence one offers you two options to start an object animation. These are Start On Click and Start With Previous. Thanks to that, you can start an animation by clicking the mouse or pressing the arrow key. When a Start On Click sequence activates, the first Start On Click animations and all the following Start With Previous ones starts. Besides, it is possible to coordinate the animation with other effects on the slide depending on your needs. If the first animation is started with previous, it will automatically run as soon as the project starts.
When using a Click Sequence timeline in a slide, be sure to deselect the Auto Advance checkbox in the Properties pane. This prevents the slide from advancing to the next slide automatically when the Main Timeline ends. In case all the animations in the Click Sequence timeline are executed, press the arrow key or click the mouse to make the slide navigate to the next one.
Note: If the mouse click or keypress is already handled by the slide or the object in the slide, they cannot be used to control animations in the Click Sequence timeline. In this case, using events – actions to trigger the Click Sequence timeline is the solution.
Create a Click Sequence Timeline
Suppose that you want to teach the kids the letter A in Alphabet. Watch the video below for detailed information.
Now, take the following steps to create a lesson slide using the Click Sequence timeline in ActivePresenter 9:
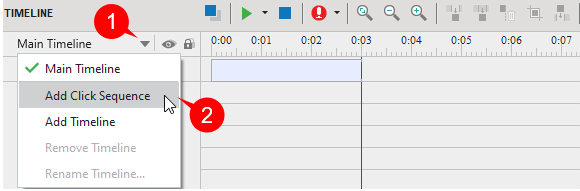
Step 1: Click the main timeline drop-down arrow (1) > select Add Click Sequence (2).
Step 2: Select one or more objects in the Canvas > Animations tab > choose any type you want in the animation gallery.
If you want to add animation effects at an exact time, just place the Playhead in a specific position and then select the desired effect.
Step 3: Toggle the type of animations’ start time. Just click the icon in the Timeline pane to achieve that.
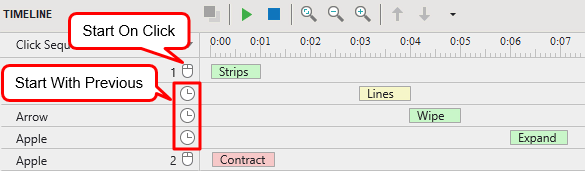
- Start On Click : Start the object animation when you click the slide or press the arrow key.
- Start With Previous : Start the object animation at the same time as the previous effect.
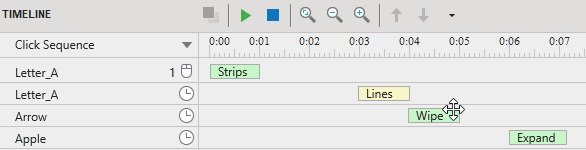
As shown in the above image, the Strips animation starts right after you click on the slide or press the down/right arrow on the keyboard. The other animations will automatically start since they are set to start with the Strips. However, they appear at different seconds since their start time is different. For example, the Lines motion path effect has a 2-second delay after the Strips ends, so, it starts at 03:00. The Wipe entrance effect starts at 04:00 when the Lines ends. Next, one second later than the Wipe ending time, the Expand effect appears. In other words, the Expand effect appears at 06:00. After that, the Click Sequence timeline stops. It will continue to play when the next Start On Click is activated. To put it differently, the Contract exit effect starts once you click the mouse or press the down/right arrow.
Note:
ActivePresenter Click Sequence timeline works as Powerpoint, but keep in mind the things below:
- If the first entrance effect in the Click Sequence timeline is set with Start On Click, when the slide is previewed in HTML5, the effect won’t display. To make it start with the slide, add another entrance effect for it in the Main Timeline. Alternatively, change its start time in the Click Sequence timeline to Start With Previous.
- Import PowerPoint into ActivePresenter: animations in slides will be transferred into ActivePresenter Click Sequence timeline. And ActivePresenter will directly show slides containing effects with the Click Sequence timeline.
- Export ActivePresenter projects to Powerpoint: the animations’ start time will be transformed equivalently.
Manage Object Animations in the Click Sequence Timeline
It’s time to check out some ways to fine-tune the project’s animations.
Set up the Delay Time
The start time of an object animation is not from the start of the timeline, but from the moment you click the mouse or press the arrow key. ActivePresenter 9 enables you to add time before an effect runs called the delay time. So, to delay the start time of any object, do either of the following:
- Enter a new value into the corresponding animation effect’s Start Time spin box in the Animations tab.
- Hover the mouse over the effect time bar until the mouse turns into a four-way arrow, and drag the bar horizontally. Then, drop it anywhere you want.
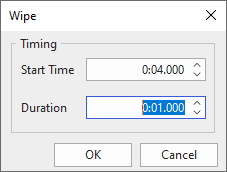
- Double-click or right-click one or more object animation time bars > Effect Settings > enter a new value to the Start Time spin box of the pop-up dialog.
Modify Animations’ Speed
You are free to run your animation effect at a slower or faster speed. To achieve that, let’s change the object animation’s duration. Now, do one of the following:
- Enter a new value into the corresponding animation effect’s Duration spin box in the Animations tab.
- Hover the mouse over the end point of the effect time bar until the mouse turns into a double-headed arrow. Next, drag it horizontally to extend or reduce its duration.
- Double-click or right-click one or more object animation time bars > Effect Settings > enter a new value to the Duration spin box of the pop-up dialog.
Change the Effects’ Order
To change the order of an animation effect, first, select it. After that, perform any of the ways below:
- Click the Move Effect Up/Move Effect Down icon (3).
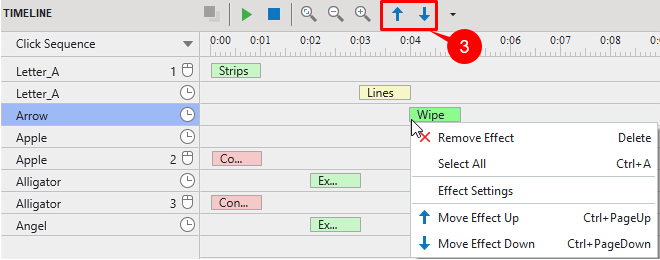
- Right-click it > select the Move Effect Up/Move Effect Down commands in the menu context.
- Press the hotkeys CTRL+PAGEUP/CTRL+PAGEDOWN.
Remove Animation Effects
Lastly, to delete object animation(s), just select it and do one of the following:
- Press DELETE on the keyboard.
- Right-click it > choose the Remove Effect in the context menu.
As mentioned above, there are some cases in which you cannot click the mouse or press the key to trigger the Click Sequence timeline. Therefore, ActivePresenter offers you two new action types to trigger this timeline. These are Click Sequence – Go Forward and Click Sequence – Go Back. Let’s learn more about them in the next parts.
Use the Click Sequence – Go Forward Action

This Click Sequence – Go Forward action (4) allows you to:
- Complete the current animation immediately (if any).
- Run the next Start On Click animation and all subsequent Start With Previous animations.
- Move to the next slide if the current slide doesn’t have the next animation and the current animations are completed.
Tip: Clicking the mouse executes this action automatically. Besides, press the right/down arrow keys to achieve the same result.
Use the Click Sequence – Go Back Action
This Click Sequence – Go Back action (5) allows you to:
- Reset animations if they are running (Seek to start these animations).
- Go back and stop at the previous Start On Click animations.
- Go back to the previous slide if there is no previous action.
Tip: Pressing the left or up arrow keys on the keyboard executes this action automatically.
Note:
- A Click Sequence timeline can help to go forward to the next slide or go back to the previous one by clicking the mouse or pressing the arrow key without adding buttons and events-actions.
- If you create a Click Sequence timeline in the master layout (View tab > Slide Master), all the custom layouts will inherit this timeline. A Click Sequence timeline created in the custom layout will be inherited by the slides in the normal editing view.
That’s all. Make use of the Click Sequence timeline in ActivePresenter 9 to manage object animations as you wish. Feel free to contact us if you have any questions.
See more: