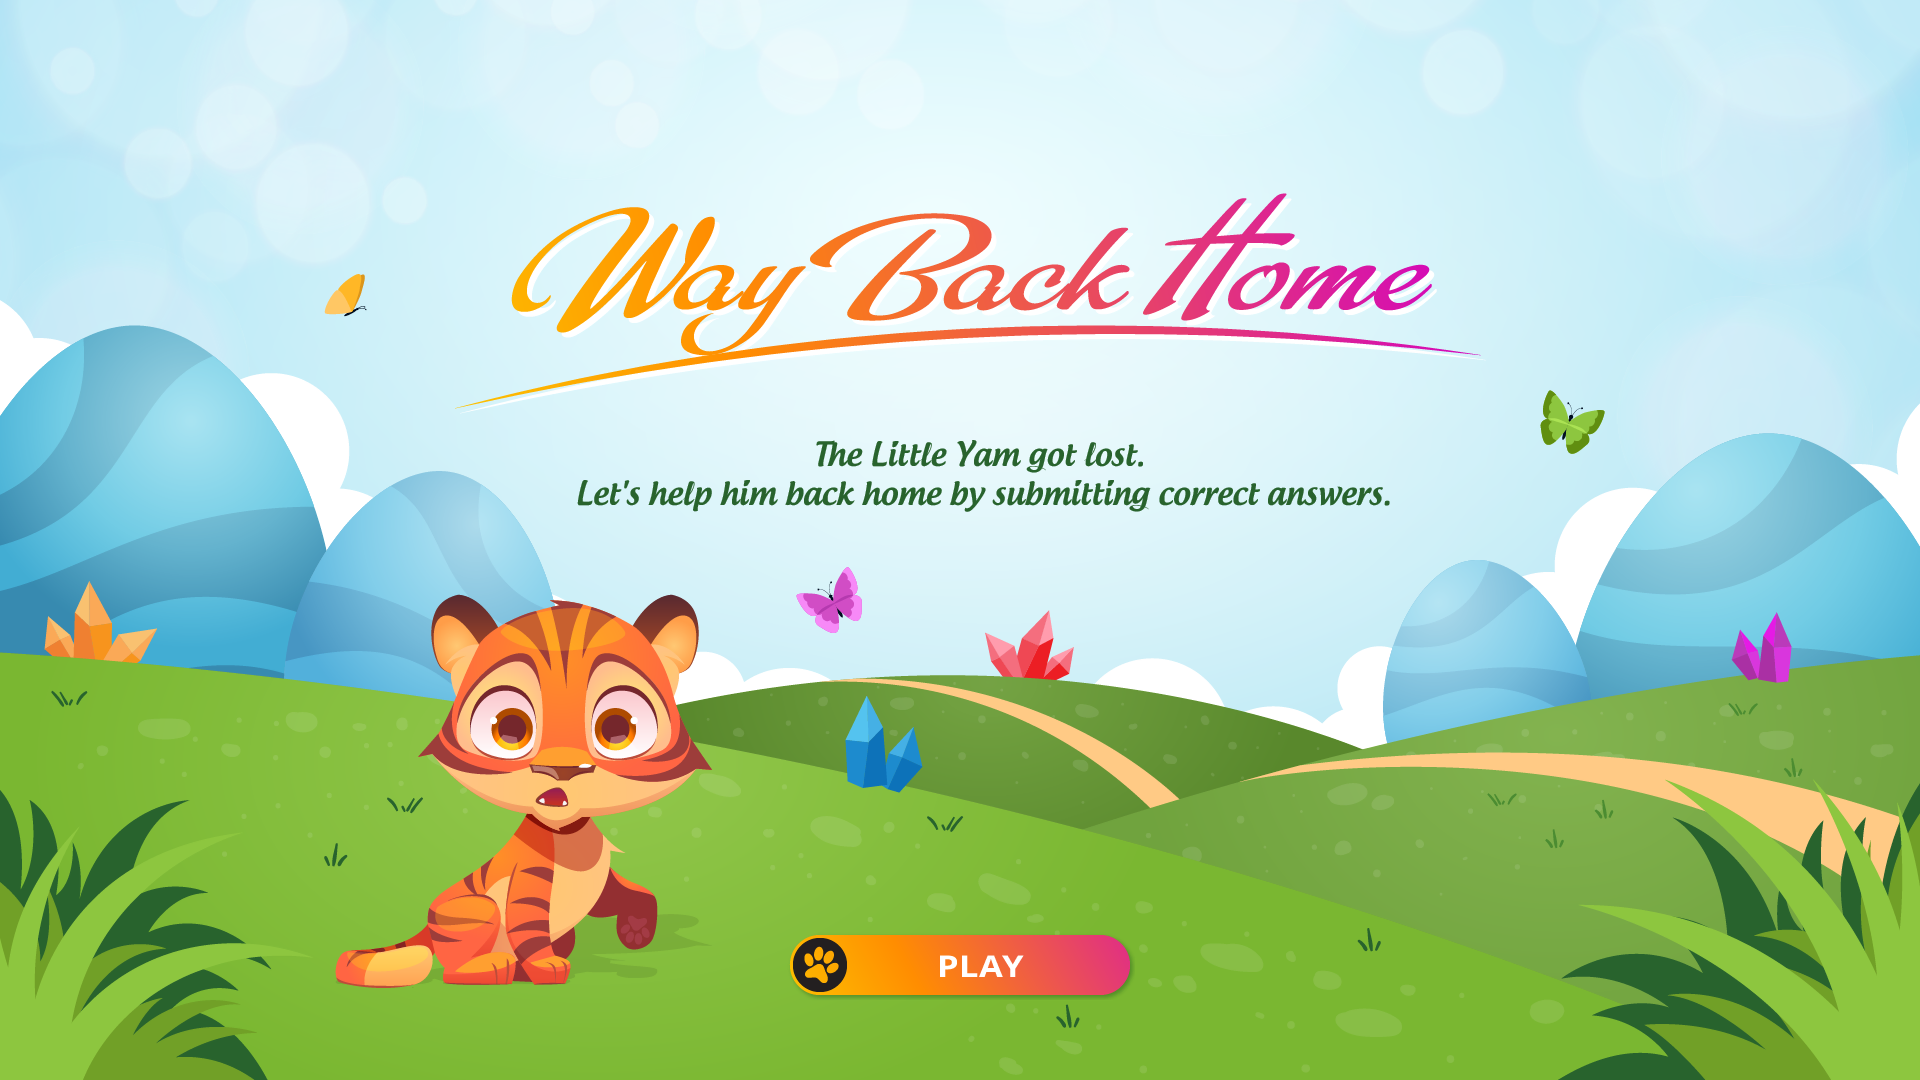
Are you looking for a lovely, engaging, and interactive game that can be used to check or reinforce students’ knowledge? If so, the following game called Way Back Home is right for you. Are you ready? Let’s learn how to create the Way Back Home game with ActivePresenter 8 in today’s article.
Click the Play button below to start playing the game.
We’ll walk you through the four main content about creating the Way Back Home game in turn:
- How to Play the Game?
- How about the Preparation Stage?
- What is the Game’s Layout?
- How to Create the Game?
Download ActivePresenter and feel free to experience it!

Then, click to download Way Back Home sample here.
How to Play Way Back Home Game?
Before learning to create the Way Back Home game, let’s check out the way to play it. On the way back home, the character will encounter many obstacles. To overcome the obstacles, the character has to answer all the questions correctly.
In the Content slide, when the character encounters an obstacle and clicks on it, the game will navigate to a random question. With a correct answer, feedback will appear on the screen. Click the Continue button to navigate the interactive game to the Content slide and continue playing.
If that’s an incorrect one, the game will move to Game over slide and finish. Players can click the Replay button to restart the interactive game.
After submitting all correct answers, the game will navigate to the Congratulations slide.
Watch the video tutorial below to know the full steps to create the Way Back Home game :
How about the Preparation Stage to Create the Way Back Home game?
We need some preparations before exploring the detailed steps to create the Way Back Home game with ActivePresenter 8.
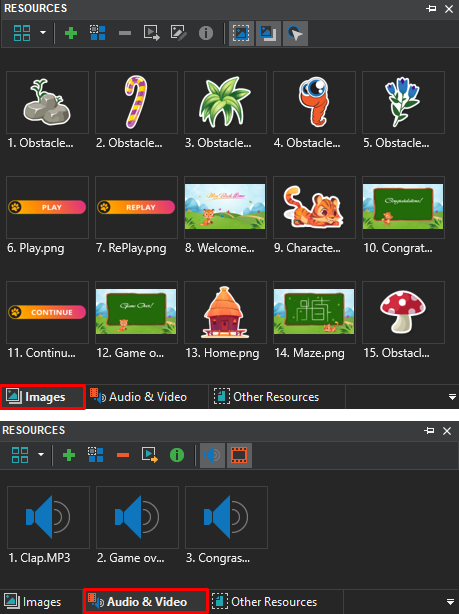
Firstly, import all the resources used in the game to the Resources pane. (Open the View tab > Resources to open the Resources pane > drag and drop all the prepared images and audio to this pane). In this way, you can select objects directly from the pane without looking for them from your folder many times.
Secondly, customize the slide layouts in the Slide Master to create the Way Back Home game(View tab > Slide Master).
- Set background image for slide layouts. (Properties pane > Slide Properties tab > Background Fill > Image Fill > Select an background image from project and select an image from the Resources pane).
- Adjust the Question layout. Here, you are free to set up the question font type, size, color, and other properties as you want.
- Disable the Auto Advance feature. Select all the master layouts > Properties pane > Slide Properties tab > General section > clear the Auto Advance check box. This step prevents the slide from jumping to the next slide automatically without players’ interactivity.
- Create transition effects between slides. Select all the master layouts > Transitions tab > Uncover > Effect Options > From Right.
- Close the Master view to save the changes.
Thirdly, insert slides to your project and name them. This interactive game is built up of 10 slides in total. If you are in a blank project, go to the Home or Insert tab > New Slide to add 10 slides respectively. Then, access the Properties pane > Slide Properties tab > General section > enter a meaningful name for each slide. Alternatively, right-click the Slide pane > Slide in Titles > double-click any slide name to change the name.
What is the Game’s Layout?
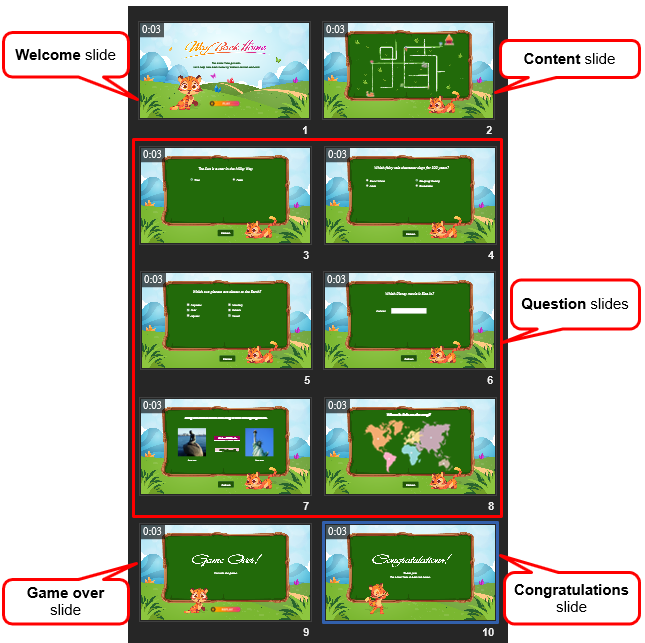
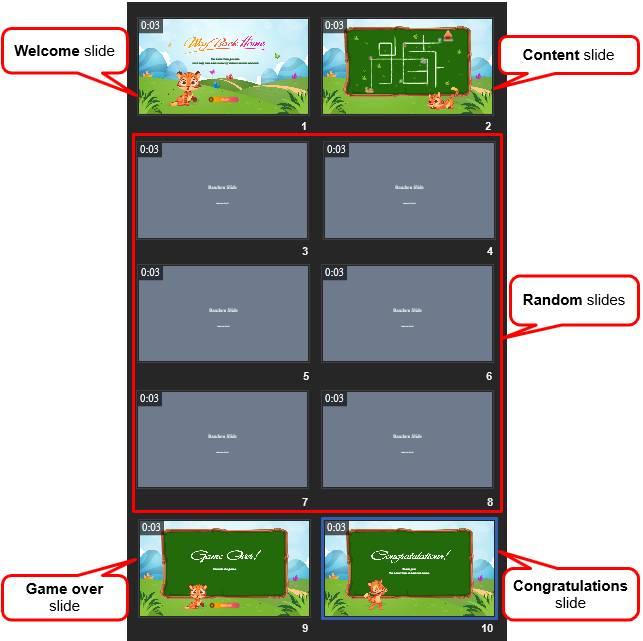
Let’s take a closer look at the interactive game’s layout:
- Slide 1, 2: Welcome, and Content.
- Slide 3: Q1 – True/False Question. See Create True/False Questions to know more.
- Slide 4: Q2 – Multiple Choice Question. See Create Multiple Choice Questions to know more.
- Slide 5: Q3 – Multiple Response Question. See Create Multiple Response Questions to know more.
- Slide 6: Q4 – Fill in Text Entry Question. See Create Fill in Text Entry Questions to know more.
- Slide 7: Q5 – Drag-n-Drop Question. See Create Drag-n-Drop Questions to know more.
- Slide 8: Q6 – Hotspot Question. See Create Hotspot Questions to know more.
- Slide 9, 10: Game over, and Congratulations.
How to Create Way Back Home Game?
In general, this part covers:
- Create Question Pool & Random Questions
- Create Welcome Slide
- Set up Content Slide
- Create Game Over Slide
- Create Congratulations Slide
- Customize Feedback Master
- Preview & Export Way Back Home
Now, let’s explore the first stage!
1. Create Question Pool & Random Slides
As said earlier, the Way Back Home game contains 6 question slides. To make questions appear in unpredictable order each time playing the game, we need to create a question pool and random slides. This is an important stage to create the Way Back Home game.
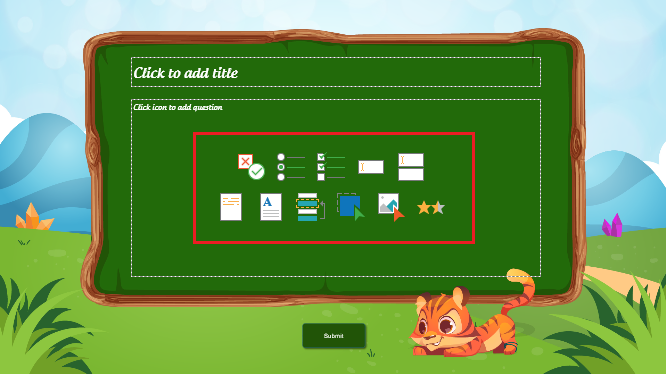
Step 1: Create desired questions. If you’ve selected the Question slide from the New Slide list, let’s click the question icon to add the corresponding question type.
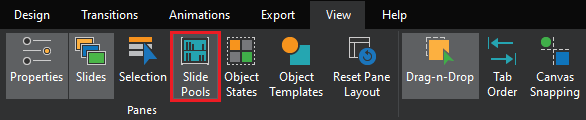
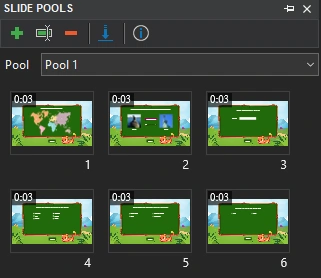
Step 2: Access the View tab > Slide Pools. Then, the Slide Pools pane comes up on the right side of the Canvas.
Step 3: Select 6 question slides in the Slide pane > right-click them > Move Slide To > Pool 1. After that, 6 question slides moved to Pool 1, and you no longer see them on the Slide pane.
Note: The value of the Points and Attempts sections of each question is 1, by default. (Slide Pool pane > select each answer area of the question > Properties pane > Interactivity tab > Score & Reporting > Points and Attempts). This means players have only one chance to submit the answer. And they will get 1 point for each correct answer.
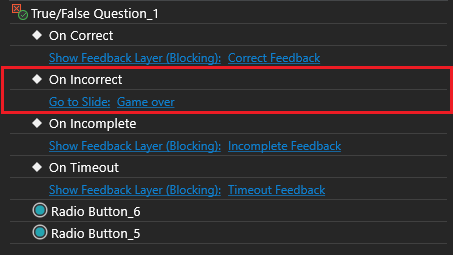
Step 4: Add events – actions to navigate to the Game over slide when players answer incorrectly. (Select a question in the pool > select the answer area > On Incorrect event > delete all the default actions > add Go to slide action > Game over).
Note: Repeat the performance for other questions.
Step 5: Insert 6 random slides right after the Content slide. Select the Content slide > Questions tab > click Random Slide 6 times. These random slides are linked to Pool 1.
As a result, we have 10 slides with 6 random slides replacing 6 original question slides.
2. Create Welcome Slide
To create the Way Back Home game, we cannot ignore the Welcome slide. In this interactive game, the Welcome slide includes the game’s name, description, and the Play button.
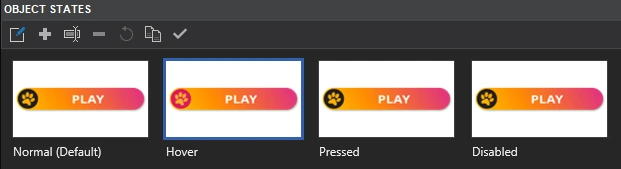
If you prepare a nice image representing the Play button, you can directly drop the image into the Canvas. However, you need to create its states and events – actions to show the states manually. In this case, you can insert a button to remain in its available state.
Next, follow the guidelines below to create the Welcome slide in the Way Back Home game:
- Enter the name and description to the slide. (Insert tab > Text Caption).
- Add a button. (Insert tab > Button > click anywhere on the Canvas).
- Edit the button’s state. (View tab > Object States > click Edit States > select the Normal state > Properties pane > Style & Effects tab > Fill section > Image Fill > choose one image from the Resources pane). Then, select another image for the Hover state.
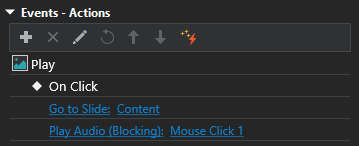
- Add events – actions to the button. (Properties pane > Interactivity tab > Events – Actions > On Click event > Go to slide action > Content). Thanks to that, when clicking the button, the game will navigate to the Content slide.
- Add sound when clicking the button. (On Click event > Play Audio action > select Mouse Click 1 from the built-in list).
3. Set up Content Slide
This is the main slide which shows all the obstacles and character’s motion paths of the interactive game. So, keep reading to know how to create this slide in the Way Back Home game.
3.1. Add Character and Obstacle Images
- Drag desired images from the Resources pane into the slide.
- Add the new state “Change direction” for the character image. (Size & Properties tab > Image > select another source from the Resources pane).

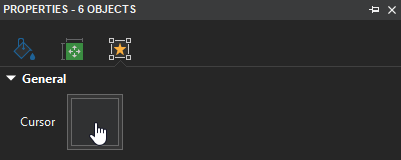
- Change cursor type when hovering the mouse to the obstacles (select obstacle images > Properties pane > Interactivity tab > General section > change cursor type).
3.2. Create Multiple Timelines
In ActivePresenter, using multiple timelines will help to organize and control specific tasks. So, do as follows:
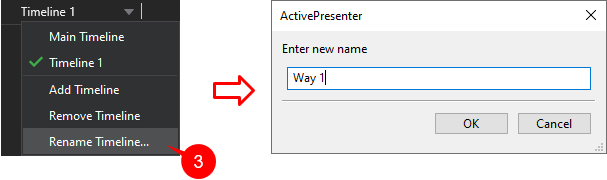
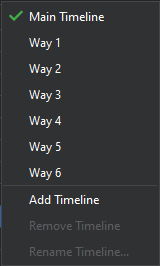
Step 1: Click the drop-down arrow (1) on the Main Timeline > Add Timeline (2). The default name of the newly added timeline is Timeline 1.

Step 2: Rename the new timeline by clicking the drop-down arrow (1) on the Main Timeline > Rename Timeline (3). Then, in the pop-up dialog, enter a new name: Way 1 > OK.
Step 3: Create a motion path for the character in the Way Back Home game. On the Canvas, select the character > Animations tab > Add Animation > Motion Path > Lines.
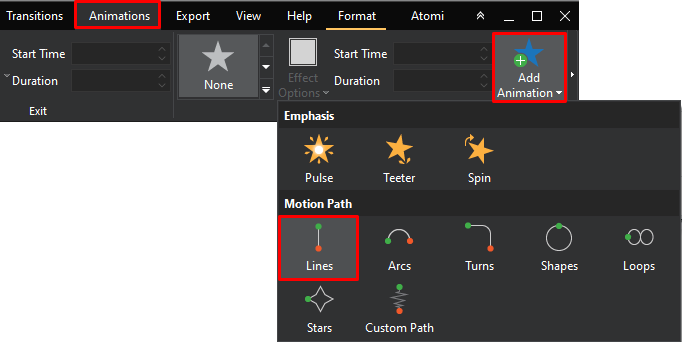
Then, you can drag/drop or free to customize the effect as you want.
With regards to obstacles, adding effects for them may bring more curiosity to players. Thus, let’s implement that now.
Step 4: Place the playhead at the end of the previous motion path effect. Select the Obstacle 1 > Teeter.
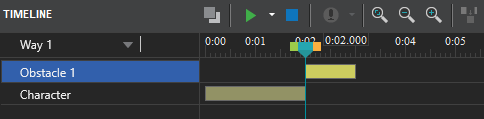
Note: Repeat 4 above steps to create 5 additional timelines on the way back home. In each new timeline, create effects for character and obstacles.
After completing this task, it’s time to set up events – actions for the slide and obstacles.
3.3. Add Events – Actions
We need to set up a lot of events – actions on this slide. Now, do as follows:
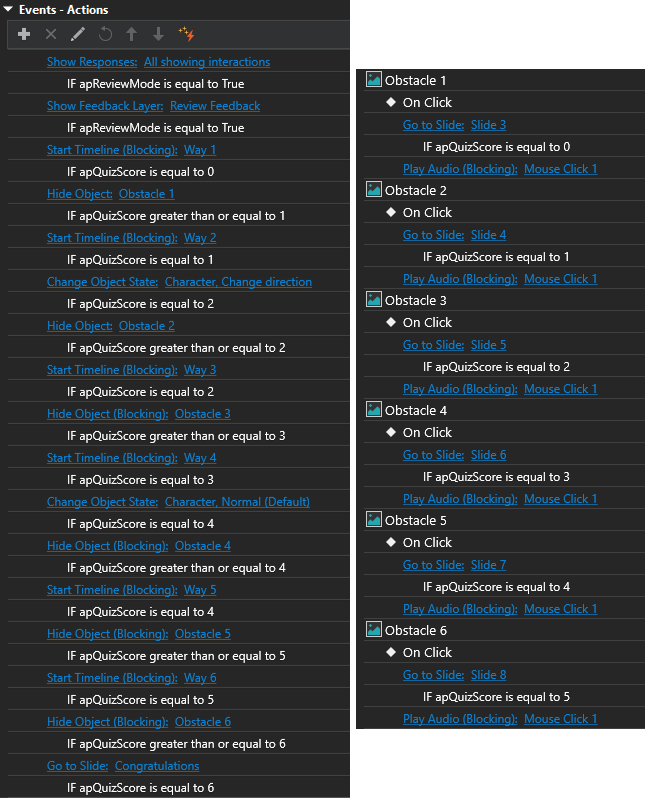
Step 1: Set up action and condition for the slide On Load event.
- Open the Properties pane of the slide > Interactivity tab > On Load event > Start Timeline action > select Way 1.
- Set up the condition IF apQuizScore is equal to 0 to start the timeline.
By doing so, the Way 1 timeline starts if the total score equals 0. In other words, the character starts moving at the beginning of the slide.

Next, when the character encounters Obstacle 1 and clicks on it, the game navigates to a random question.
Step 2: Set up events – actions and conditions for the obstacle.
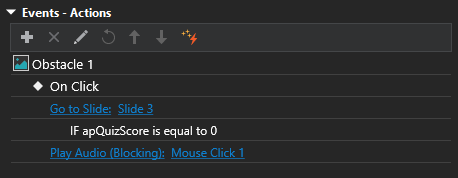
- Select the Obstacle 1 > Events – Actions section > select On Click event > Go to slide action > Slide 3.
- Add the condition IF apQuizScore is equal to 0.
- Add Play Audio action > select Mouse Click 1 from the built-in list.
When getting one correct answer, players will get 1 point and the corresponding obstacle disappears.
Step 3: Set up action and condition to hide the corresponding obstacle when players give one correct answer.
- Add Hide Object action in the slide On Load event > Obstacle 1.
- Add the condition IF apQuizScore greater than or equal to 1 as below:

At the same time, Way 2 will automatically start. Therefore, repeat the above steps to set up events – actions, conditions for the slide, and obstacles. Using the hotkeys CTRL+C and CTRL+V is a great way to save your time and effort for this progress. After copying and pasting events – actions, conditions, let’s customize it exactly.
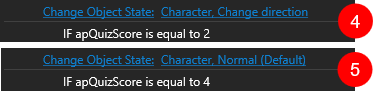
Note: After crossing Obstacle 2 and getting 2 points, the character will change direction and continue moving on Way 3 (4). However, when overcoming Obstacle 4, the character returns to the Normal state (5). So, in the slide On Load event, we set up the actions and conditions as below:
Step 4: Add events – actions to navigate to the Congratulations slide.
Insert Go to slide action > Congratulations slide to On Load event. Then, add the suitable condition If apQuizScore equal to 6.
After completing 3 above steps, the result is shown as below:
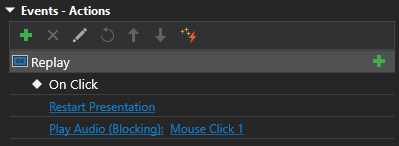
4. Create Game over Slide
The main purpose of this slide is to inform the game ends. Players can replay the game if they click the Replay button on the slide. So, perform as follows:
- Drag and drop the Game over audio from the Resources pane into the Canvas.
- Select the Replay button > add On Click event. Then, select the Restart Presentation action.
- Add Play Audio action > select Mouse Click 1 from the built-in list.
5. Create Congratulations Slide
The interactive game navigates to this slide after players submit all correct answers. Besides the text notifying the victory, you can add audio to make the player more excited. Just drag the Congrats audio from the Resources pane into the Canvas to get it done.
6. Customize Feedback Master
As can be seen, each feedback layer turns up with the harmony of color, image, and sound. Hence, to make all works as you want, and take the following guidelines:
- Open the View tab > Feedback Master.
- Adjust the layer format: select the Feedback Master Layout > access the Format tab > change line properties, font size, font, … of feedback layers and buttons.
- Add Audio: select the Correct Feedback Layer > drag and drop the audio from the Resources pane into the Canvas.
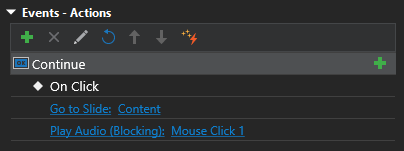
When players submit a correct answer in the Way Back Home game, the Correct Feedback Layer will appear to inform the result. Clicking on the Continue button in this layer helps players go back to the Content slide, and continue the game.
- Select the Continue button > delete the default action > add Go to slide action > Content slide.
- Add Play Audio action > Mouse Click 1 to add clicking sound for this button.
After all, close the Feedback Master view to save the changes you’ve made.
7. Preview & Export Way Back Home
After completing create the Way Back Home game, click Preview HTML5, or press F5 on the keyboard to see how the game works.
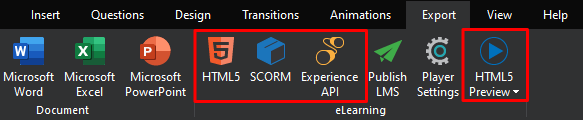
Finally, you can export your interactive game to HTML5, SCORM package, or xAPI depending on your needs.
Final Words
All in all, that’s the end of the article. Now you know how to create the Way Back Home game. Hopefully, it inspires you to create your own engrossing games with ActivePresenter free eLearning authoring software.
More Articles: