Hotspot questions in ActivePresenter 9 allow learners to interact directly with images. By identifying one or more spots on an image, learners can check and reinforce what they’ve learned. So, let’s explore how to create a hotspot quiz in today’s article.
Now, come to an example. In the above question, learners are asked to compare two pictures and pick out 5 differences. It means that the question has 5 correct answers. Basically, the number of correct answers depends on your settings.
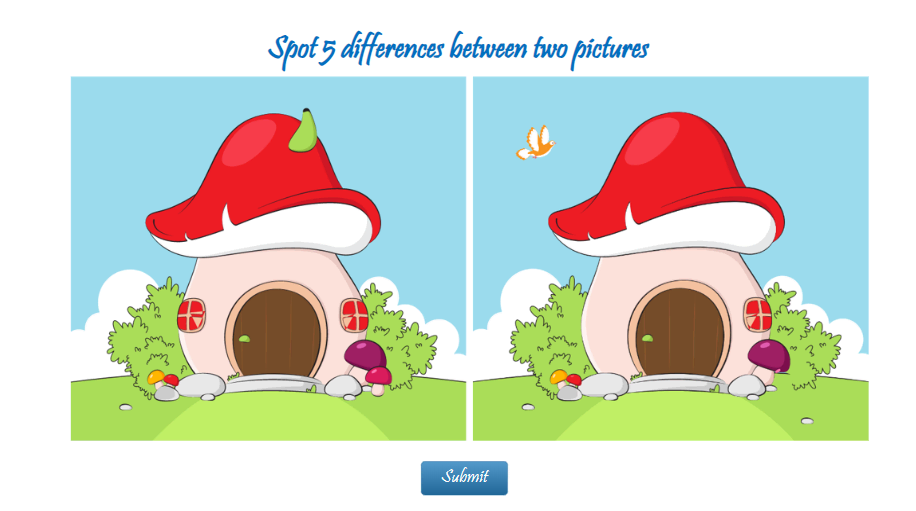
A Hotspot quiz was created in ActivePresenter 9
Download the latest version of ActivePreseter and unleash your potential:

Here are the stages to learn how to create a hotspot quiz:
1. Insert a Hotspot question into the quiz
- Change the Appearance
- Set correct answers, score and reporting
- Add events – actions
- Customize feedback layers
Let’s get started now!
1. Insert a Hotspot Question
In ActivePresenter 9, Hotspot is one of 13 interactive question types that is available. To insert it, perform either of the following:
- In the Questions tab > Hotspot.
- In the Home tab > Interactions > Hotspot.

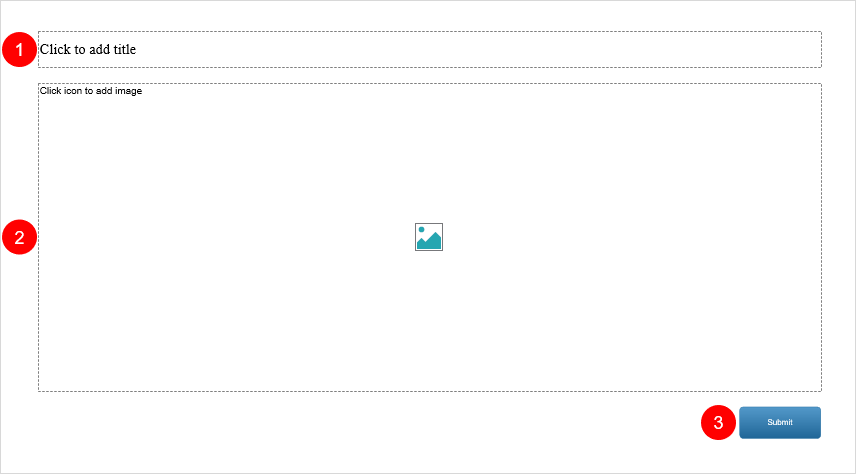
After that, a new hotspot question slide will appear as in the image below. As you can see, it includes the top text box (1), the answer area (2), and the Submit button (3).
2. Customize a Hotspot Quiz
You are free to customize a Hotspot quiz as you wish. Here are some ways to customize it:
Change the Appearance
- Add question title: Enter the question title on the top text box. After that, use the inline text editor that appears or the Font section of the Home tab to style the text.
- Upload image: Click the image icon, then, select the image from your computer or your project.
- Add hotspots: Select the answer area > click the green plus button > select either Oval or Rectangle > apply it to a specific spot you want. You can add many hotspots for one image.

- Resize hotspots: Select a hotspot and drag its anchor points. Otherwise, navigate to the Properties pane > Size & Properties tab > Transform section > enter new values in the Width and Height boxes.
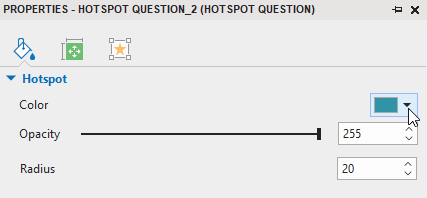
- Change hotspot color, opacity & radius: Click on the answer area > open its Properties pane > Style & Effects tab > Hotspot section > Color. Feel free to drag the slider, or enter values in the Opacity and Radius spin boxes.
- Delete hotspots: Select one or more hotspots > press DELETE on the keyboard. Alternatively, right-click one hotspot > choose Delete.
- Click on many spots on an image as correct answers: Select the answer area > navigate to the Properties pane > Interactivity > General > the Multiple Response checkbox. By default, this option is selected allowing you to give many answers to the question. Each click you made is considered an answer. In case you want the last click to be accepted as your answer, deselect this checkbox.
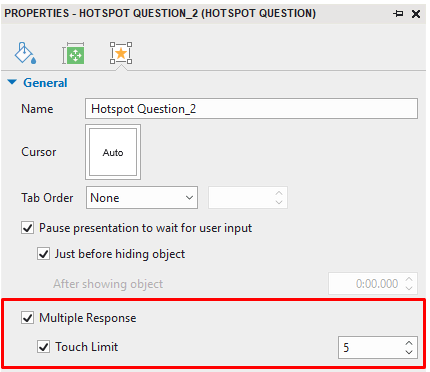
- Limit the number of hotspot touches: Select the Touch Limit checkbox and enter a value (Properties pane > Interactivity > General > Touch Limit). For example, the quiz requires you to find 5 different spots, so you enter 5. It means you can click on 5 spots on the image as correct answers. In case you click the wrong position, you can click it and click on another spot.
Tip:
To create a consistent look for your hotspots, you can customize the hotspot quiz in the Object Settings before adding questions from the Questions tab. See How to Work with Object Settings for more information.
Set Correct Answers, Score and Reporting
Keep reading this part to know how to set correct answers, score and reporting for a hotspot question.
- By default, a hotspot you insert into the image is set as a correct answer. Nevertheless, you can change it into an incorrect answer. To get it done, go to the Properties pane > Interactivity > General > deselect the Correct check box.
- To set scores and reporting for a Hotspot question, select the answer area. After that, go to the Properties pane > Interactivity > Score & Reporting.
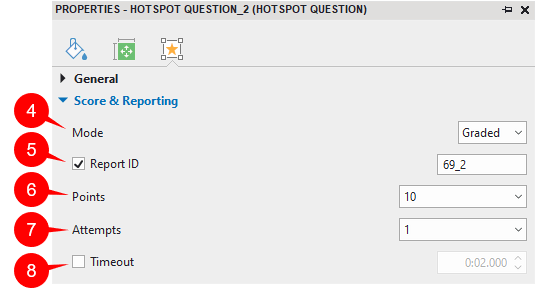
As can be seen, this section provides you with a lot of useful options to:
(4) measure learners’ performance (select the Graded mode) or collect learners’ feedback or information (select the Survey mode);
(5) track learners results;
(6) set points for correct answers;
(7) set the maximum attempts that learners can interact with the question;
(8) set a time limit that only allows learners to respond to the question in the given period of time.
For more details, see How to Create Interactive Quizzes.
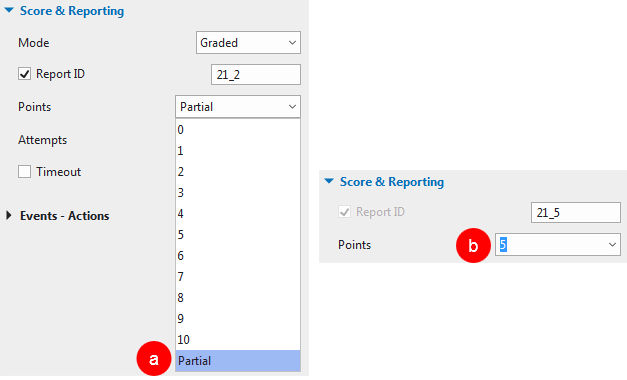
Besides setting scores for the entire hotspot question, it is possible to set scores for each spot. To achieve that, select Partial scoring for question (a). Then, go to the Properties pane of each spot > Interactivity > Score & Reporting > Points and specify the score that you want (b).
Note: In case a hotspot question has many correct answers and Multiple Response is allowed, if learners make even one wrong click, they will get a zero score. Otherwise, if learners click correctly, (even if the number of correct answers is not enough) they will achieve the total score from the correct spots.
Add Events – Actions
Basically, a Hotspot question has default events and actions. Particularly, in the Graded mode, a Hotspot question has four events: On Correct, On Incorrect, On Incomplete, and On Time Out. However, in the Survey mode, it just has three events: On Complete, On Incomplete, On Timeout.

Despite default events and actions, ActivePresenter allows you to change them, delete them, or even make them more advanced. To do that, click on the answer area. Then, navigate to the Properties pane > Interactivity > Events – Actions.
Refer to Work with Events – Actions for details.
Customize Feedback Layers
ActivePresenter 9 also automatically adds default feedback layers for Hotspot questions. These default feedback layers can be Correct Feedback, Incorrect Feedback, Try Again Feedback, Incomplete Feedback, and Timeout Feedback (for the Graded mode) or Complete Feedback, Incomplete Feedback, and Timeout Feedback (for the Survey mode). See the above image for details. Note that you can delete, change, or add more feedback layers if necessary. To open feedback layers in ActivePresenter 9, in the View tab, click Feedback Master.
See Work with Feedback Layers to learn more.
So, that’s how to create a hotspot quiz in ActivePresenter 9. Try it from now on and contact us if you need further help. Many useful articles are available for you on our website.
Visit the following links if you want to know more about other question types in ActivePresenter: