A mouse click object is one of the interaction objects in ActivePresenter 9. You can add a mouse click to a place where users must click to take the next action.
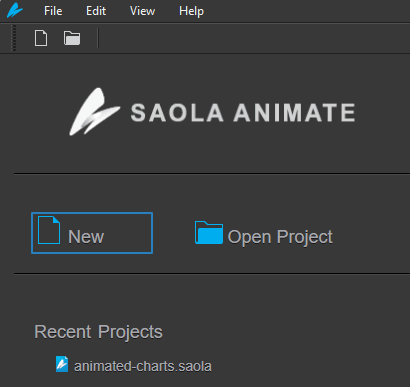
For example, you want to instruct users to click the New button to create a new Saola Animate project. So, place a mouse click on the New button.
This object is often used in interactive simulations to teach how to use an application. When you record interactive simulations, ActivePresenter 9 automatically inserts mouse clicks wherever and whenever you make a click.
In this article, let’s explore how to add and work with it.
- Insert mouse clicks
- Customize mouse clicks
- Set correct values
- Set score and reporting
- Insert and customize feedback messages
- Add events – actions
Insert Mouse Clicks
Follow either of the following ways to insert a mouse click object:
- Open the Insert tab > Mouse Click.

- Open the Home tab > Interactions > Mouse Click.
Then, it appears on the slide with three components
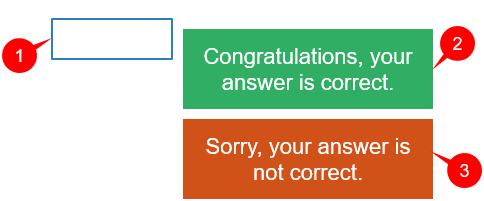
- (1) the target area
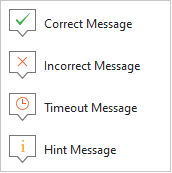
- (2) a Correct Message
- (3) an Incorrect Message
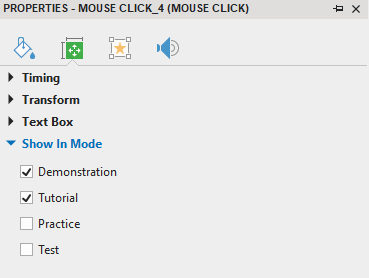
In the output, the target is set to be visible in the Demonstration and Tutorial modes and hidden in the Practice and Test modes. You can find this setting in the Properties pane > Size & Properties > Show In Mode:
If users click on the target area, the Correct Message (2) will appear. Otherwise, the Incorrect Message (3) will appear if users click outside the target area.
Customize Mouse Clicks
You can customize its appearances like Fill, Line, and Shadow as you do with shape objects. Access the Format tab or the Style & Effect tab of the Properties pane to perform this task.
Note that in the default setting, the changes are only applied to the target area in the Demonstration and Tutorial modes.
Set Correct Values for Mouse Clicks
To set correct values to mouse click objects, do as follows:
Step 1: Select the target area > Properties pane > Interactivity tab > General > Correct Values > Add Value. Then, a blank box will appear.
Step 2: Place the cursor over the blank box and left-click it.
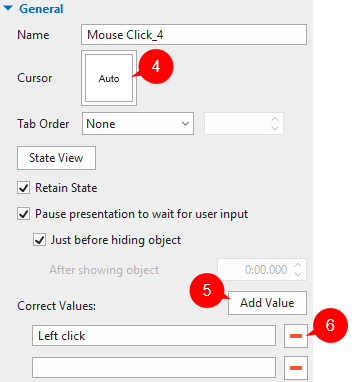
The correct values can be with or without modifier keys (SHIFT, CTRL, or ALT). For example, you want to set the combination of the CTRL key and left click as the correct value. Just hold the CTRL key and left-click the blank box.
In case you want to add more correct values, click the Add Value button (5) and repeat step 2. On the other hand, if you want to remove any correct value, click the (6) button.
Besides, you can change the image of the mouse cursor to make the clickable area identifiable when users hover the mouse over it. To do that, click the (4) button and select the hand cursor image.
Set Score and Reporting
Mouse click objects can not only validate users’ actions but also give users points for correct actions. To set points for correct actions, select the target area > navigate to the Properties pane > Interactivity tab > Score & Reporting.
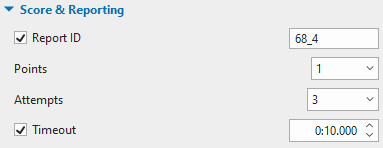
This section provides you with sơm properties to customize:
- Report ID: Track users’ activities. You can rename it to a meaningful name.
- Points: Set points for correct actions.
- Attempts: Set the maximum attempts that users can do the click action.
- Timeout: Set a time limit that only allows users to click in the given time.
Insert and Customize Feedback Messages
As mentioned above, two default messages are added to the mouse click when you insert it into the slide. Apart from them, you can add two other types of messages that are Timeout Message and Hint Message:
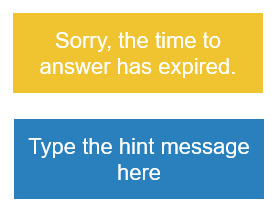
- Timeout Message: This appears when users don’t complete an action in the predefined time.
- Hint Message: This appears when users hover the mouse over the target area.
To add those messages, open the Questions tab > Message. Or, right-click on the target area > Insert > select the message you want.
Then, you can customize feedback messages as you wish.
For more information, see How to Work with Feedback Messages.
Add Events – Actions
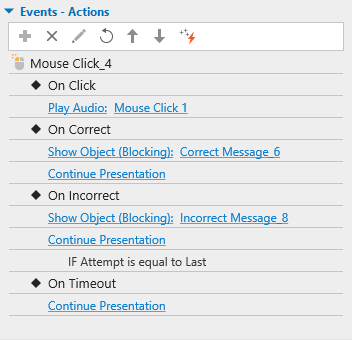
When you add a mouse click object to a slide, ActivePresenter 9 automatically add default events – actions to it as below:
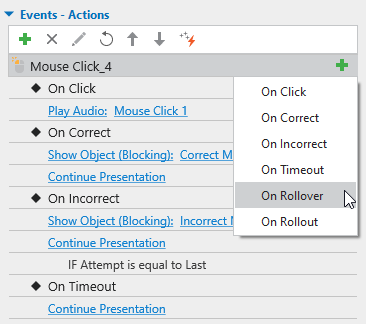
Besides, the app offers you other events to add: On Rollover and On Rollout:
Below is the explanation for the meaning of each event:
- On Click: Occur when users click on the target area.
- On Correct: Occur when users click on the target area.
- On Incorrect: Occur when users click outside of the target area.
- On Timeout: Occur when users don’t respond within the specified time.
- On Rollover: Occur when the mouse rolls over the target area.
- On Rollout: Occur when the mouse rolls out of the target area.
After adding events, continue adding actions to events, and conditions to actions if necessary.
For more details, see Work with Events – Actions.
That’s how to work with a mouse click object in ActivePresenter 9. Download this app and make your course more interactive.

Besides, follow our Tutorials page and YouTube channel for more helpful articles and videos.
See more: