In ActivePresenter 7 tutorial, you have already known about how to set default objects to reuse them in other slides in your project. Now, with the release of ActivePresenter 8, you will have one new option to optimize your work time. That is Object Settings.
So, today we will learn how to use it through this article.
Overview of Object Settings
In general, this is a new tab in ActivePresenter 8. It will appear when you open the object settings view (View tab > Object Settings). It’s very handy to help you create default objects and use them later on. After customizing objects in the view, newly inserted objects will inherit all the properties that you have adjusted. In case, they are the same object’s type.
That is to say, it helps users save tons of time to create the same objects for courses, projects, and quizzes. Besides, it keeps all information, color, and style even if you change its shape. Moreover, this feature enables you to decide the position for your object flexibly. This is the difference between Object Settings and Slide Masters.

As can be seen, the Settings View includes three main parts:
- The Objects Settings tab’s toolbar contains commands for editing default objects.
- The left pane consists of 12 object groups, namely Cursor Path, Shapes, Gesture Effect, Mouse Click, Key Stroke, Text Entry, Drop Area, Button, Check Box, Radio Button, Timers, and Questions. Each object group has its own default object.
- The Canvas previews changes when you customize default objects.
To be more precise, Shapes, Gesture Effect, Timers, and Questions have their own object types.
Customize Default Objects in Object Settings
When it comes to setting default objects, you can right-click the object on the Canvas and select Set as Default. However, in case you want to reset what you’ve done, you cannot do it on the Canvas. For this reason, Object Settings is your solution.
Now, to customize any default objects, follows these steps:
Step 1: Click one object type on the left pane. The default object will appear on the Canvas.
Step 2: Select it and change its color and appearances, add text, add events – actions, and more. Each object type will have its properties correspondingly. (Go to the object’s Properties pane or the Format tab). You can see all changes of the object displaying on the Canvas.
Step 3: Click Close Settings View ![]() , if all the changes meet your needs. All newly inserted objects type in the current project will inherit all alterations.
, if all the changes meet your needs. All newly inserted objects type in the current project will inherit all alterations.
Save Objects in Object Settings as Custom Theme
In case you want to reuse the objects for other projects, adding objects to Object Templates or saving as Custom Themes are good choices. Here’s how:
Step 1: Click ActivePresenter > Save or Save as….
Step 2: Select ActivePresenter Object Template (*.apobject) in the Save as type list. Alternatively, you can select ActivePresenter Theme (*.aptheme).
Step 3: Click Save.
Normally, your file can be saved in (C:\Users\<user_name>\Documents\ActivePresenter Templates (for Windows) or /Users/<user_name>/Documents/ActivePresenter Templates (for macOS)).
Reset Default Objects in Object Settings
After customizing, if you aren’t satisfied with the changes, it is possible to reset. ActivePresenter offers you two options:
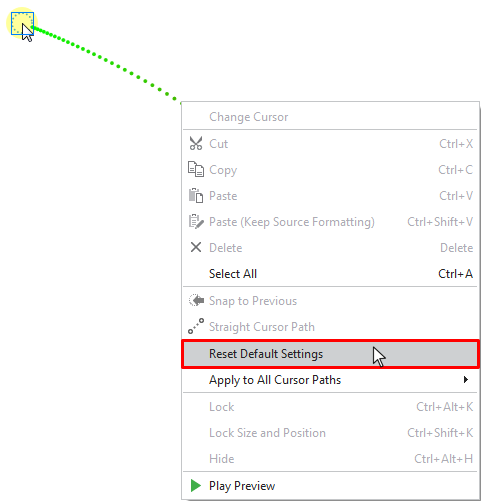
- Reset an individual object: right-click the object > Reset Default Settings.
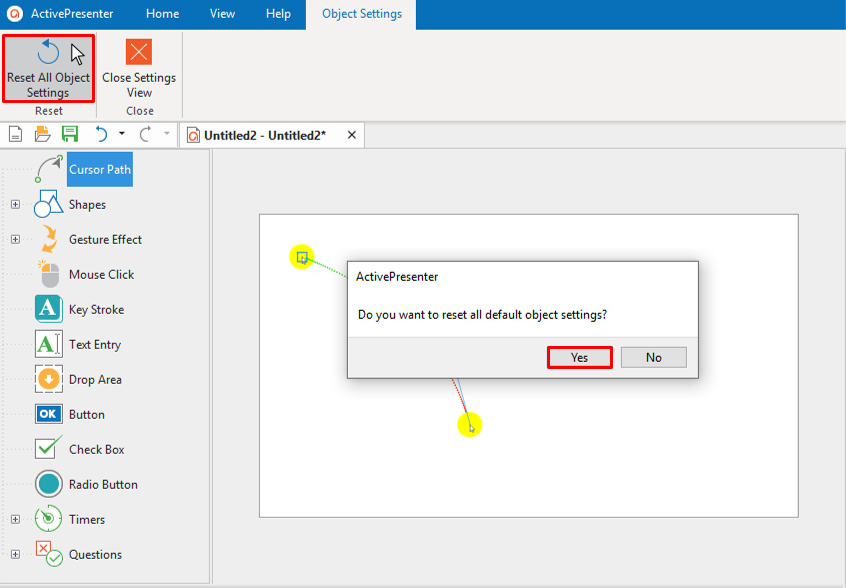
- Reset all objects to default: click Reset All Object Settings > Yes.
It is easy to use Object Settings, isn’t it? Give ActivePresenter 8 a try to speed up your workflow. Visit our YouTube channel to get more tutorial videos. Have any problems? Feel free to contact us.
Related content: