Export Projects to Microsoft PowerPoint
As you may know, ActivePresenter is an easy-to-use screen recorder, video editor, and eLearning authoring software. After creating projects, the app allows exporting them to many output formats, including HTML5, videos, PowerPoint slides, etc. So, this tutorial will guide you on how to export projects to Microsoft PowerPoint in ActivePresenter 8.
In general, you can use this feature to convert an ActivePresenter project to a PowerPoint presentation with slides converted from ActivePresenter slides. After exporting, all of the objects (including placeholders) and their properties remain unchanged and you can edit them as normal. However, you cannot edit objects inserted using Slide Master. In other words, any object inserted into Slide Master will be flattened and merged into the background image of the PowerPoint slide.
How to Export Projects to Microsoft PowerPoint?
Firstly, to export a project to Microsoft PowerPoint Presentation, open the Export tab, then select Microsoft PowerPoint.

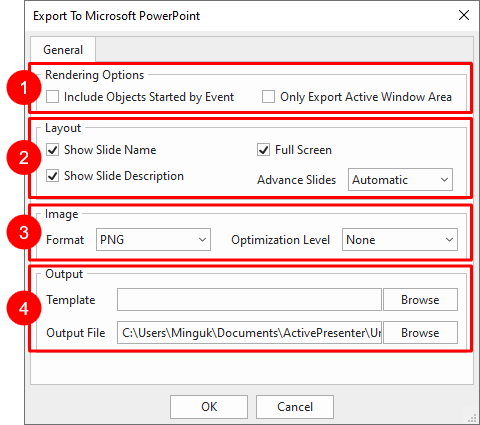
This opens the Export to Microsoft PowerPoint dialog which contains many options for the exporting.
Now, let’s explore each of these options respectively.
1. Rendering Options
As can be seen, this section consists of two exporting types. So, you can choose which types of objects to export.
- Include Objects Started by Event: The exported PowerPoint presentation will include objects started by events. Your projects may have events and actions that you assign to some objects. For example, a shape that only appears when learners trigger a particular action like clicking a particular button.
- Only Export Active Window Area: Only export Active Window areas and objects which are selected to export. In general, Active Window is a feature used in recording video demos or software simulations with ActivePresenter. It allows detecting a specified window of the application that you want to record and then saving the information in the captured slide.
For more details, take a look at Work with Active Window Feature.
2. Layout
Basically, the Layout section contains options to define the layout of the exported slides.
- Show Slide Name: Display the slide name in the exported project. Select this option makes it easier for you to view and manage the slide in the output.
- Full Screen: Open the PowerPoint presentation in full screen initially.
- Show Slide Description: Render the slide description.
- Advance Slides: Select between Automatic and Manual to view slides in the output.
- Automatic: Slides will be played automatically.
- Manual: Slide will be played manually. Users have to click to show other slides.
3. Image
In this section, you can choose the quality for the background of the exported slides.
- Format: Choose between JPEG and PNG. In general, JPEG compression is lossy while PNG is lossless. PNG retains crystal clear quality, but it does not compress well with pictures (very big file size) and its decoding (when viewing) is slower than JPEG. However, screenshots are compressed better with PNG, the file has a small size and there is no quality loss. Therefore, JPEG is best suited for pictures while PNG is best suited for computer-generated images (screenshots, drawings, etc.).
- Optimization Level: These are relative compression levels (None, Low, Normal, High, Ultra). When testing the output, you should select None. On the other hand, when exporting the final output, Ultra is good to go. Besides, this option is only available if you select the PNG image format. The higher the compression level, the longer it takes to export.
4. Output
- Template: Specify the location of the template file. If you want the exported project to have a particular template, click the Browse button next to the Template box and choose one from existing PowerPoint templates. Besides, refer to How to Use Themes in ActivePresenter 8 for more details about themes and templates in ActivePresenter.
- Output File: Specify the location to save the final output.
In short, that’s how to export projects to Microsoft PowerPoint. Download the app and let us know if you need support. In addition, visit our Tutorial page, Twitter, and YouTube channel to get more useful information.
See also: