Creating interactive learning experiences doesn’t need to be complicated. Imagine your kids actively participating in a game that challenges their pattern recognition skills using vibrant colors. With ActivePresenter eLearning creation tool, you totally can create Color Patterns Game without any coding expertise.
Color Patterns Game is an engaging activity that helps kids to practice identifying patterns and colors in a fun way. Through this game, kids learn how to make predictions and see relationships between abstract concepts.
This blog post will walk you through the straightforward process of developing your own Color Patterns game using ActivePresenter’s intuitive features. Forget about intricate programming – ActivePresenter‘s user-friendly interface allows you to design engaging and effective learning activities through simple drag-and-drop actions and logical event handling.
Before that, make sure to download ActivePresenter (free & no sign-in) to be able to practice on this step-by-step tutorial. And You’ll discover how easy it is to build engaging educational games without writing a single line of code!

This article covers:
- How to Play Color Patterns Game?
- Insert Various Shapes and Images
- Paint Blank Shapes Using the Object States Feature
- Create Interactivity for Color Patterns Game
- Customize the Feedback Layers
- Preview and Export Your Project
How to Play Color Patterns Game?
In this game, kids are challenged to identify a repeating pattern of colored shapes in a row. Then, they need to fill appropriate colors in blank shapes to complete the pattern:
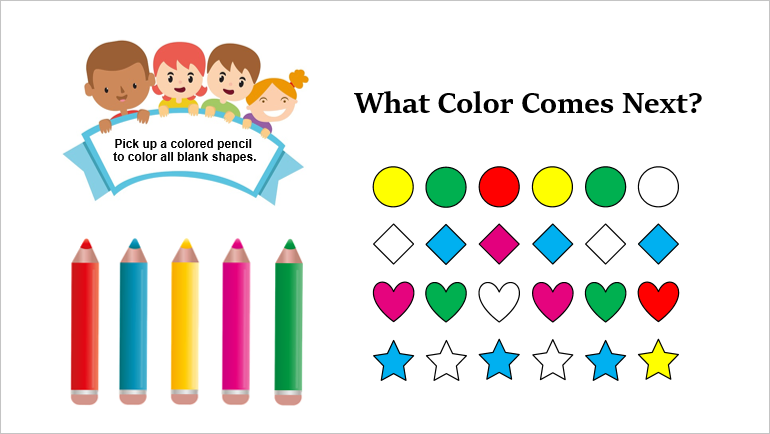
For example, in the first row, colored circles are arranged in the following order: Yellow – Green – Red. After recognizing this pattern, kids need to click the red pencil, then click the white circle to paint it.
If they select a correct colored pencil to paint a blank shape, they can continue playing. In case a wrong color is painted, an incorrect feedback layer will appear to inform them that they need to replay the game.
You can download the Color Patterns Game project from this link.
Insert Various Shapes and Images
This is a preliminary step. You need to insert all shapes and images into your project to create a game layout.
Insert Shapes and Create Color Pattern for each Row
To insert shapes, open the Insert tab > Shapes > click any shape from the drop-down menu to insert them:

In this example, let’s insert four shapes including a circle, a diamond, a heart, and a star. By default, a shape has a blue color without a border. If you want to create a border for it, in the Properties pane > Style & Effects tab > Line section > select Solid Line, then customize its properties such as width, color, opacity, etc.
Later, use the hotkeys CTRL + C and CTRL + V to copy and paste to create similar shapes.
To make color patterns for each row, you can change the color of shapes in the Properties pane > Style & Effects tab > Fill section > Color.
Tip: To align shapes quickly, select them, open the Format tab > Align > select an option to align them automatically.
Insert Images
To insert images, open the Insert tab > Image > select one or more images from your computer.
Tip: After adding images to your project, you should give them meaningful names. To do that, select an image, in the Properties pane > Interactivity tab > General section > Name > enter a new name here:
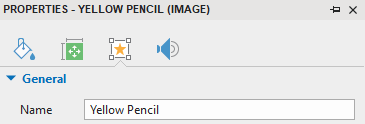
For example, in this game, you will need to insert five images of colored pencils. If you don’t give each of them a specific name, it’s difficult for you to differentiate them from each other later.
Paint Blank Shapes Using the Object States Feature
As mentioned in the game description above, players need to pick up a colored pencil to paint a shape. For example, if they select the green pencil, the shape will be colored in green. To create that effect, we need the help of the Object States feature.
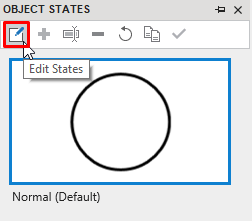
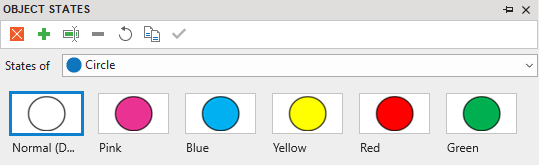
In detail, we need to create five states representing five colors for each blank shape. To do that, select a blank shape, then open the View tab > Object States > click the Edit States button to turn on the editing mode:
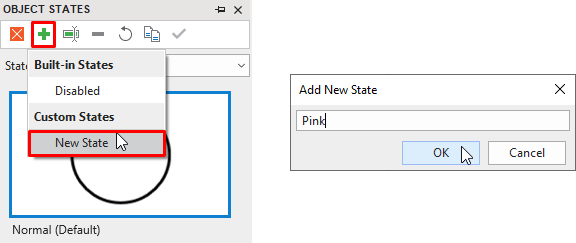
Click the Add State button, select New State. The Add New State dialog pops up to ask you enter the state’s name:
Tips:
- It’s better if you name five states after five pencil’s colors. Then, remember to change the state color according to its name (in the Properties pane > Style & Effects tab > Fill section > Color > select a color).
- It will take you much time and effort if you create five states for each blank shape. To make this process faster and more efficient, you can copy the shape with five created states and paste it on the Canvas. Drag the pasted shape to a new position, then, open the Format tab > Change Shape > select a new shape. By this way, you can create a new blank shape with all similar states quickly.
- After changing shape, remember to rename the blank shapes. This action will come in handy when you work with many objects in the next steps. The meaningful names help you to identify objects easily, especially when you create advanced actions and add events – actions.
Create Interactivity for Color Patterns Game
We’ve just finished the two preliminary steps. Now, let’s dive into the core part to create the Color Patterns Game. That is, we need to take advantage of the prominent features of ActivePresenter such as Variables, Advanced Actions, and Events Actions to create interactivity for the game.
Create Variables
You need to create five True/False variables as in the image below:
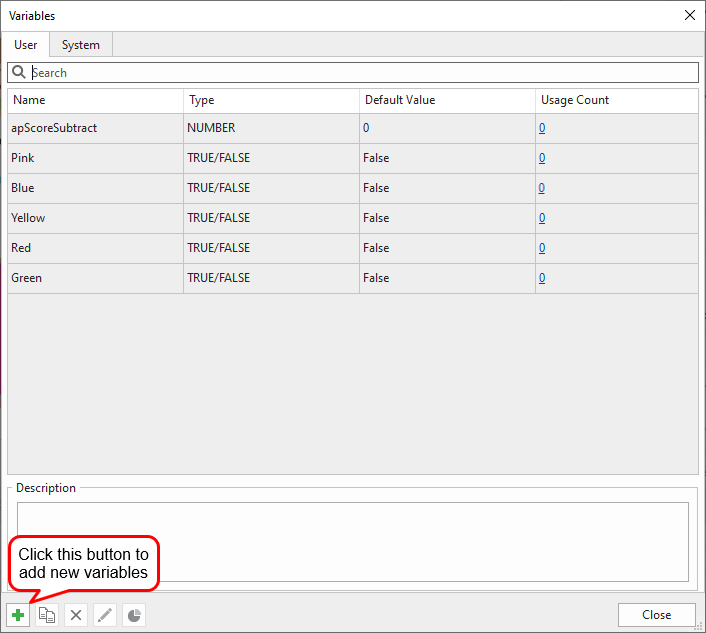
To create a variable, follow these steps:
Step 1: In the Home tab > Variables.
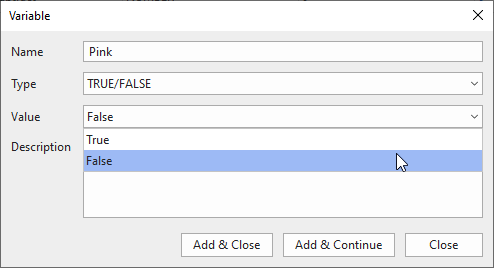
Step 2: In the Variables dialog that pops up, click the Add button at the bottom-left corner to add a new variable. In the new dialog that appears:
- Specify the variable name
- Select TRUE/FALSE from the Type list
- Select False as the default value
- Add description (if any)
- Click Add & Continue to continue creating a new variable or click Add & Close > Close when you finish creating all variables.
Create Advanced Actions
In this game, we need to create two advanced actions.
The first Advanced Action
When players click a colored pencil, they select one out of five pencils to paint a blank shape. Depending on this logic, let’s name the first advanced action SelectedPencil.
- In the Parameters section, we need to create two types of parameters:
– Slide Object (No. 1): Represent a selected pencil in a slide.
– Variable (Boolean) (No. 2,3,4,5,6): Represent a selected or unselected color.
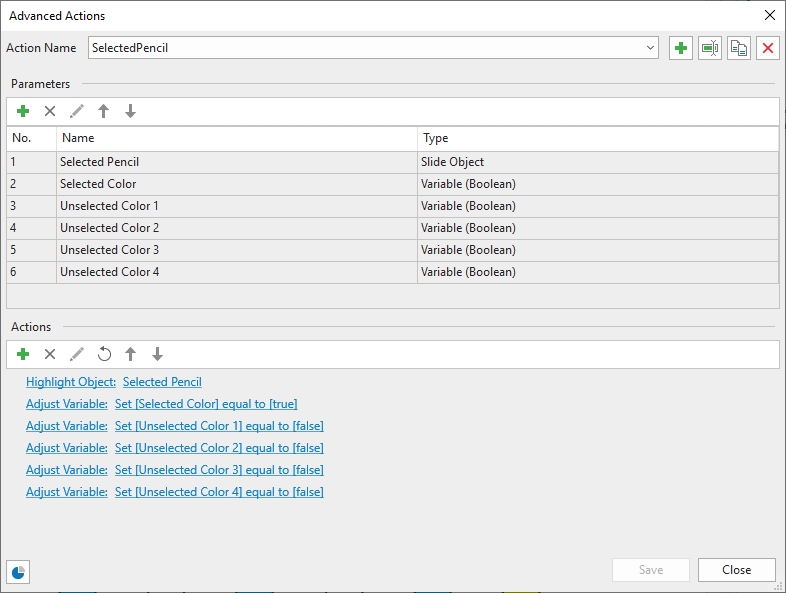
- In the Actions section, add six actions as in the above image:
– Highlight Object: Highlight the selected pencil to notice players when they click it.
– Adjust Variable: Identify which is a selected color. The color of the selected pencil is considered as the true value. The remaining colors are false values.
The second Advanced Action
When players click a blank shape to color it, the shape will be painted according to the selected colored pencil. There are two cases:
- If the shape is colored correctly, an audio will be played to inform players that they just give the correct answer. They can continue playing the game.
- If the shape is painted with a wrong color, an audio and an incorrect feedback layer will show up at the same time to inform players that their selection is false. They need to replay the game.
Depending on this logic, let’s name this second advanced action AddColorTo:
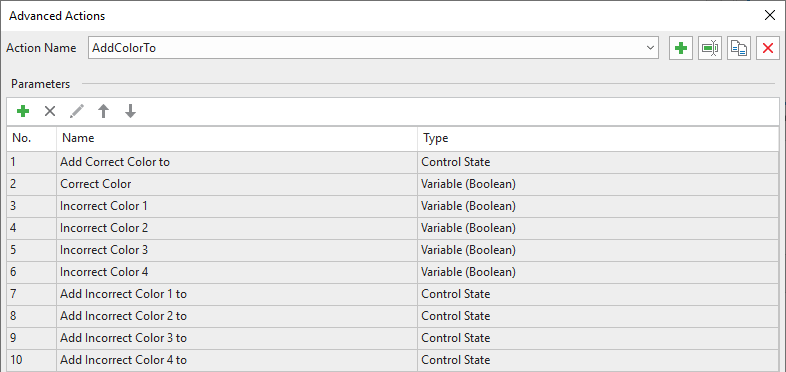
- In the Parameters section, we need to add two types of parameters:
– Control State (No. 1, 7, 8, 9,10): Add a correct or incorrect color to a blank shape.
– Variable (Boolean) (No. 2, 3, 4, 5, 6, 7): Represent a correct or incorrect color.
- In the Actions section, add the following actions:
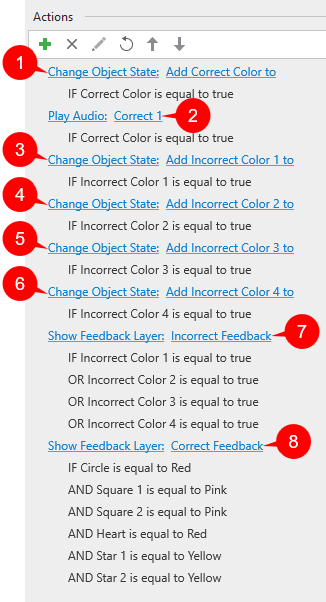
– Change Object State (1, 3, 4, 5, 6): When players pick up a pencil to color a blank shape, the shape will be painted according to the selected pencil color.
– Play Audio (2): If players paint a blank shape correctly, a correct audio will be played.
– Show Feedback Layer: (See Customize Feedback Layers for more detailed information).
- (7) If players add a wrong color to a blank shape, an incorrect feedback layer pops up to inform players of their wrong choice and let them replay the game.
- (8) If players fill all blanks shapes with correct colors, a correct feedback layer will be shown to congratulate them on completing the game.
Add Events – Actions
After creating advanced actions, now it’s time to add events – actions to each pencil and blank shape:
- Click a pencil, navigate to the Properties pane > Interactivity tab > Events – Actions section > add the On Click event > add the Advanced Action > assign specific values to parameters:
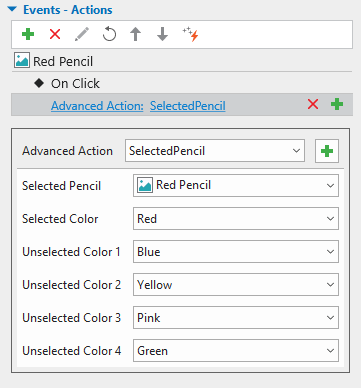
For example, if you select the red pencil, the selected color should be red. The rest are unselected colors.
Perform the similar steps to add events – actions to other pencils. Or, you can copy and paste them to make it fast.
- Click on a blank shape, then add the events – actions for it as in the image below:
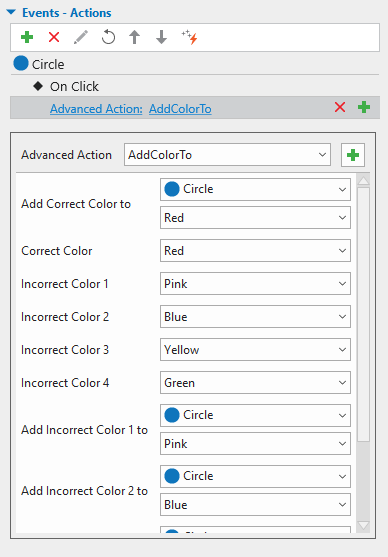
For example, if you select the circle, the correct color should be red. Other colors are considered as incorrect ones.
Perform the similar steps to add events – actions to the remaining blank shapes. Or, you can copy and paste them.
Customize the Feedback Layers
As you can see in the previous section, you add two Show Feedback Layer actions (7 & 8). By default, the correct and incorrect feedback layer will look like this:
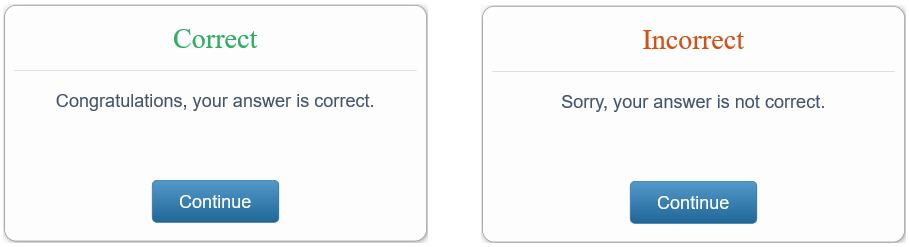
To make it look more vivid, open the View tab > Feedback Master > select Correct Feedback Layer/ Incorrect Feedback Layer to edit. Here, you can:
- Add audio: Open the Insert tab > Audio. Select one default audio from the Built-in list. Or click From File to import your own audio from your computer.
- Insert images/ icons: Open the Insert tab > Image/ Icons.
- Edit button, text, font, color: Open the Home tab or the Format tab > select command to edit.
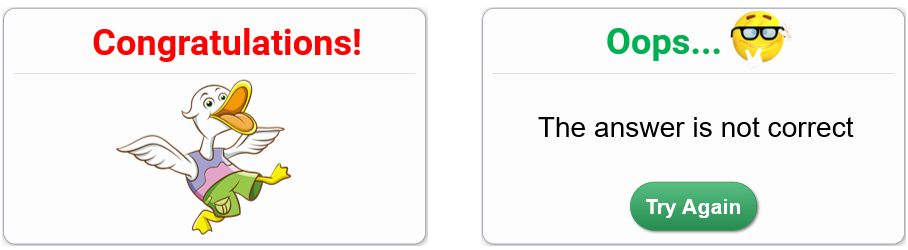
Select the button of the Incorrect Feedback Layer, delete the default action and add the following:
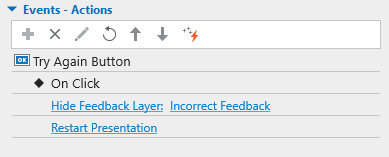
- Hide Feedback Layer: When players click on this button, the feedback layer will disappear.
- Restart Presentation: When players click on this button, the game is reset, they need to replay the game.
Preview and Export Color Patterns Game
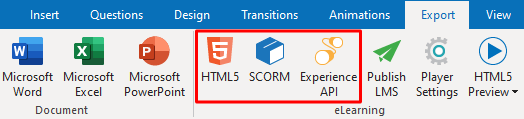
Now, it’s time to enjoy the fruits. Open the Export tab > HTML5 Preview to preview your work. If you feel satisfied with it, you can export the project to HTML5, SCORM, or xAPI package depending on your needs.
Hope you have a great time indulging yourself in creating Color Patterns Game.
You can find the detailed instructions for each feature mentioned above in the following articles: