Use Feedback Layers in ActivePresenter 8
In the previous article, you’ve learned about making use of Slide Master to create consistent eLearning courses. Today, let’s find out how to use Feedback Layers in ActivePresenter 8. Thanks to that, your eLearning projects will be more impressive with interesting and eye-catching feedback. For sure, this engages your learners and makes them much more excited.
This tutorial covers:
- Overview of Feedback Layers
- Open and Close Feedback Master View
- Use Feedback Layers
- Customize Feedback Layers
Overview of Feedback Master
In general, Feedback Layers are placed in the Feedback Master view. This master view allows creating feedback layers which are shown as pop-ups on the slide right after learners submit their answers. In other words, the layers provide learners with feedback on their results.
With this feature, you can easily show and edit feedback, even complex ones. The feedback layers also contain buttons allowing learners to decide what to do next. Plus, you can edit the text of the layers, add more objects like buttons or images to give users more information as you wish. The feedback message now is isolated from slides or slide masters so you are free to edit and customize it.
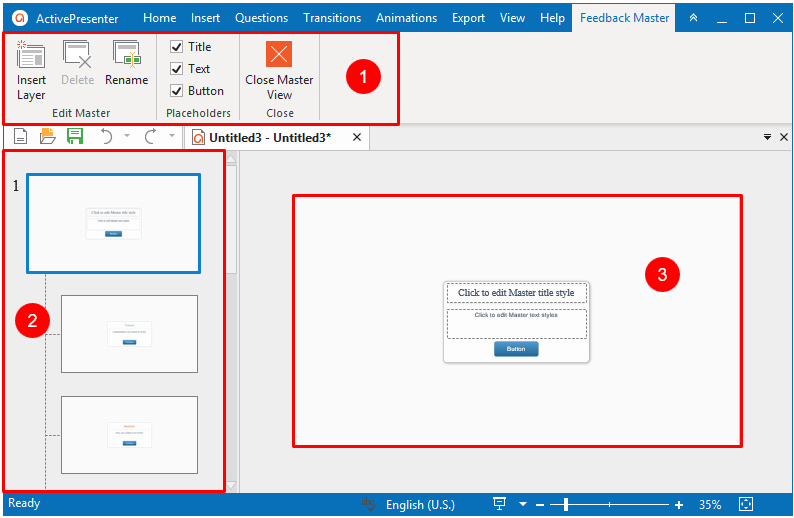
Overall, the Master View includes three main parts:
- The Feedback Master tab’s toolbar contains groups of useful commands for you to work with.
- The left pane consists of master feedback layout and feedback layers.
- The canvas previews changes of the selected layer in the left pane.
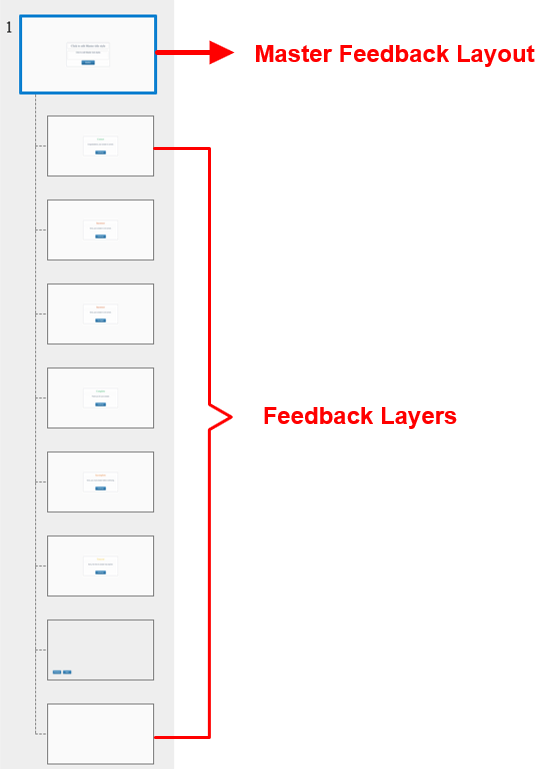
A feedback master includes 1 Master Feedback Layout and 8 built-in Feedback Layers like the below picture:
Note:
- Correct Feedback: Used in the On Correct event to let users know their answers are correct.
- Incorrect Feedback: Used in the On Incorrect event if the current attempt is the last attempt, letting users know their answer is not correct.
- Try Again Feedback: Used in On Incorrect event if the current attempt is not the last attempt. The message lets users know their answer is not correct and they can try again.
- Complete Feedback: Used in the On Complete event to let users know they have completed the answer.
- Incomplete Feedback: Used in the On Incomplete event. The message lets users know they have to complete answering the task before moving to the next one.
- Timeout Feedback: Used in Timeout event. The message appears to let users know the time to do the task is run out.
- Review Feedback: This feedback layer is used in the review mode. It is triggered in the OnLoad event of the slide. You have to use the apReviewMode variable to check if the presentation is in the review mode or not. There are two buttons (Previous and Next) in this layer. They let users navigate the presentation when reviewing a course.
- Blank Feedback: A blank feedback layer.
Open and Close Feedback Master View
Initially, to open the Feedback Master View, access the View tab > Feedback Master ![]() .
.

After customizing layers, click Close Master View ![]() in the Feedback Master toolbar to close the master view. All the changes you made will be applied to the feedback layers.
in the Feedback Master toolbar to close the master view. All the changes you made will be applied to the feedback layers.
Use Feedback Layers
On the whole, ActivePresenter uses Feedback Layers to display the feedback for each answer of learners.
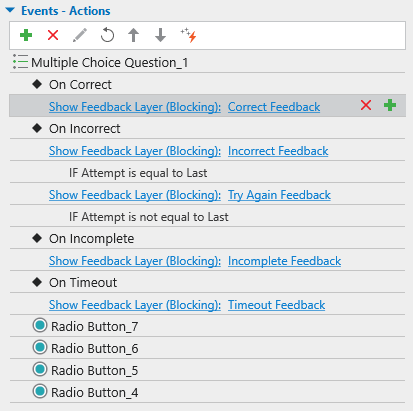
As you may know, in the previous version of ActivePresenter, the On Correct, On Incorrect, On Complete, On Incomplete, and On Timeout event shows its own corresponding feedback message. For example, when learners answer a question correctly, a correct message appears.
However, in ActivePresenter 8, those events have the default action which is Show Feedback Layer. For example, if the learners’ answer is correct, the default action Show Correct Feedback Layer of the On Correct event appears.
A Show Feedback Layer action has three options:
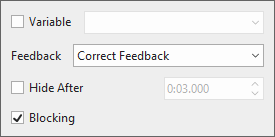
- Variable: Check this option to use variable to show feedback layer
- Hide After: Allows hiding the feedback layer automatically after a period of time.
- Blocking: Allows blocking the main timeline when the feedback layer is showing.
Customize Feedback Layers
As mentioned above, ActivePresenter provides you with useful commands to modify the feedback layers.

With this tab, you can:
- Insert new layers. The newly inserted layers will have the same style as the master feedback layout.
- Delete or rename selected layers.
- Define which placeholders will be included in the selected layers (title, text, button).
- Close the master view.
Basically, Feedback Layers inherit all the properties from Feedback Master Layout. So, it is very convenient to add or remove content. In the next parts, we will discuss how to style layers, add new layers and remove layers.
Style Layers
Like Slide Masters, every change in the layout will be applied to all the corresponding layers. Therefore, you can style the feedback master layout or customize each layer separately. It is possible to make layers livelier as you wish by using animations, adding events – actions, styling feedback information, or even more.
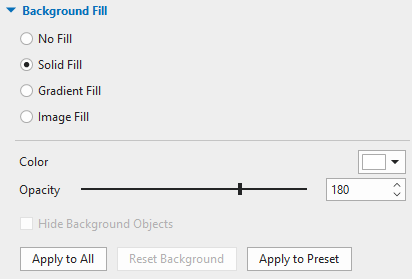
To change the background style, select the layout/ layers first. In the Properties pane > Style & Effects tab > Background Fill.
To design the button of the layout/ layers, select the button > Format tab > change the shape, styles, color, etc.

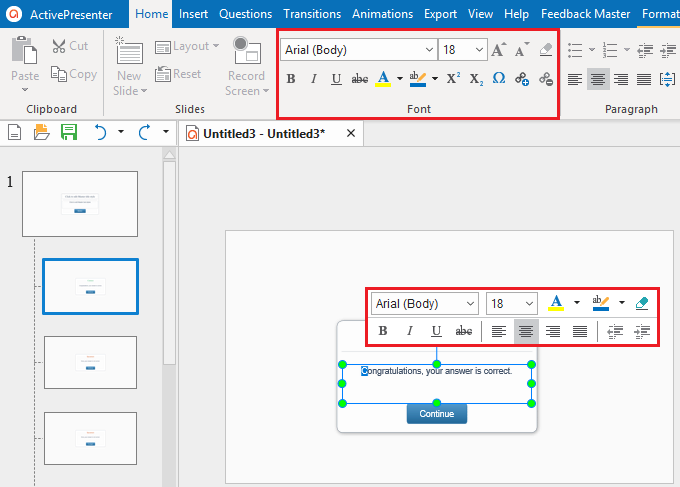
To change the text appearance, select the text. Then, you have two options. You can change the font, size, and color of the text in the Home tab or in the inline text editor.
Add New Layers
In case you want to provide feedback for each curtain question, ActivePresenter allows adding many new feedback layers as you wish. To insert an additional layer into a feedback master, do one of the following:
- In the Feedback Master tab toolbar > Insert Layer
 .
. - Right-click any thumbnail or anywhere in the left pane > Insert Layer .
Note: Each slide master has only one feedback master and you cannot add more feedback masters to it. You can only add more feedback layers.
Remove Layers
If there are any layers that you do not want to use, just remove them. However, you cannot delete the feedback layout.
To remove layers, do one of the following:
- In the Feedback Master tab toolbar > Delete .
- Right-click on any layer > Delete Layer .
- Press the DELETE key on the keyboard.
So, you’ve walked through how to use Feedback Layers in ActivePresenter 8. Try it from now on to make your eLearning project more engaging. Subscribe to our YouTube channel and Twitter for more useful tutorial videos and interesting information.
Visit the following links if you want to know more about ActivePresenter question types and some related topics: