The new version – ActivePresenter 9 now sees the addition of 3D Models. By using 3-dimensional objects, this feature comes in handy when you want to visualize scenes that are hard to imagine. Let’s learn how to work with 3D models in today’s tutorial.
A 3D model means a 3-dimensional object. It can help provide a real-world environment for your projects. You can directly insert external 3D models into ActivePresenter 9 to illustrate the perspectives of objects.
Before getting started, let’s get the free download of this new version:

This tutorial covers:
Insert 3D Models
To insert a 3D model into a slide, you have three ways to do that. Do any of the following:
- Open the Insert tab > click 3D Model > select a file from your computer.
- Drag a 3D model file directly from your computer and drop it into the app.
- Import a 3D model from PowerPoint into ActivePresenter 9 by importing the PowerPoint presentations.
Note: ActivePresenter 9 currently supports six 3D model formats, including *.fbx, *.obj, *.3mf, *.ply, *.stl, and *.glb.
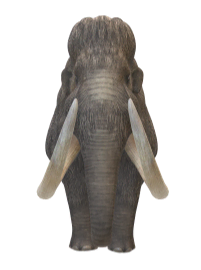
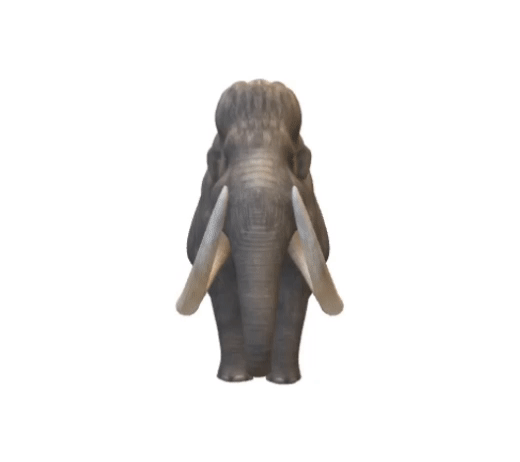
For example, your inserted 3D model may look like this:
Change How 3D Models Look
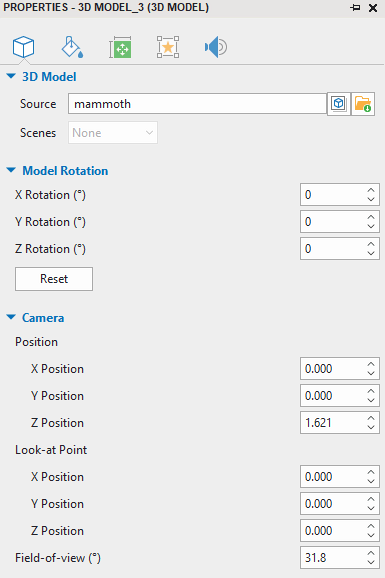
If you want to change how your 3D model is going to look, ActivePresenter 9 allows you to do that. You navigate to the 3D model Properties pane > 3D Model tab. Here, it’s possible to customize model rotation, camera position, camera look-at point, and field-of-view. Besides, with animated 3D models, you can explore their multiple scenes.
Rotate 3D Model
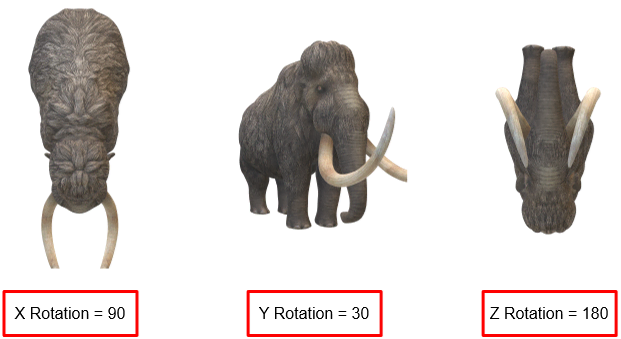
By accessing the Model Rotation section, you can rotate the imported 3D model 360 degrees on the horizontal axis (the X-axis), the vertical axis (the Y-axis), and the Z-axis.

For instance, the image below illustrates some changed values:
Change Camera Position and Its Look-at Point
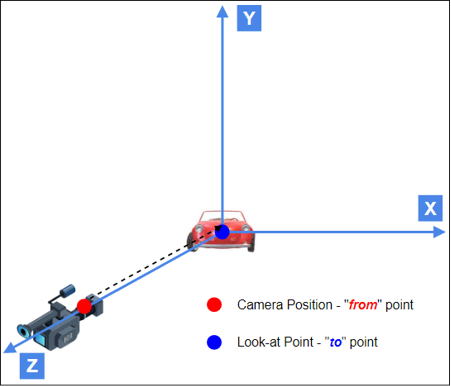
Imagine your eyes as a camera pointing to the model. Normally, the camera position is located on the Z-axis, while its X and Y coordinates are equal to 0. If the camera position is the “from” point, you can refer to the camera look-at point as the “to” point. Panning the camera at a fixed position will move its look-at point.
Adjust Camera Position
To change the X, Y, Z coordinates of the camera, you enter a number value from -50 to 50 in the corresponding spin boxes:
X Position
Change the X coordinate of the camera:
- X<0: The camera moves to the left (with respect to the origin) along the X-axis. As a result, the camera points to the left of the model. The smaller the value is, the smaller the 3D model image becomes.
- X>0: The camera moves to the right (with respect to the origin) along the X-axis. Subsequently, the camera points to the right of the model. The greater the value is, the smaller the model image becomes.

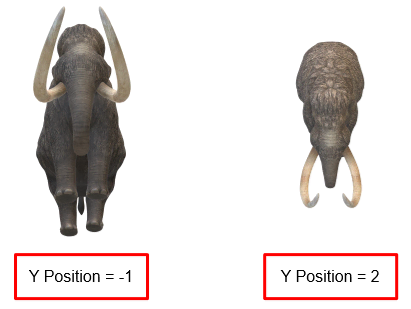
Y Position
Change the Y coordinate of the camera:
- Y<0: The camera moves downward (with respect to the origin) along the Y-axis. As a result, the camera points to the lower part of the model. The smaller the value is, the smaller the 3D model image becomes.
- Y>0: The camera moves upward (with respect to the origin) along the Y-axis. Subsequently, the camera points to the upper part of the model. The greater the value is, the smaller the model image becomes.
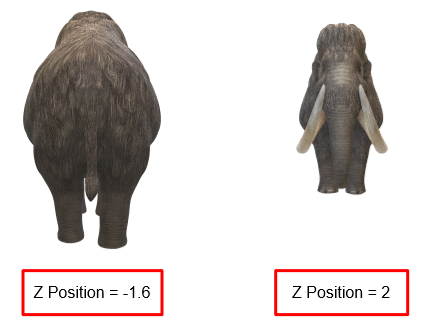
Z Position
Change the Z coordinate of the camera:
- Z<0: The smaller the value is, the farther the camera moves from the model along the Z-axis and the smaller the model image becomes. You will see the back of the 3D model.
- Z>0: The greater the value is, the farther the camera moves from the model along the Z-axis and the smaller the model image becomes. You will see the front of the model.
Change Camera Look-at Point
To change the X, Y, Z coordinates of the look-at point, you enter a number value from -50 to 50 in the corresponding spin boxes.
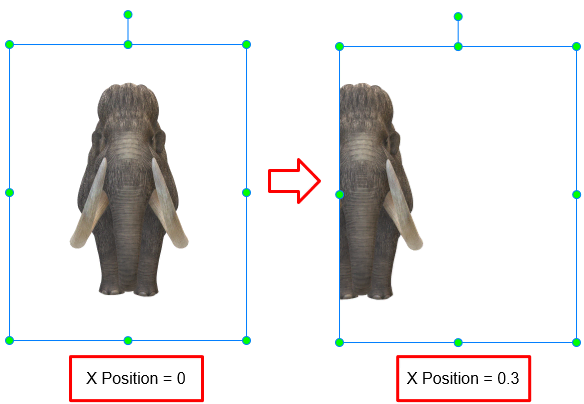
X Position
Change the X coordinate of the look-at point:
- X<0: The look-at point will move to the left side of the model. When this value decreases to a certain limit, the model will no longer appear in the field-of-view.
- X>0: The look-at point will move to the right side of the model. When this value increases to a certain limit, the model will no longer appear in the field-of-view.
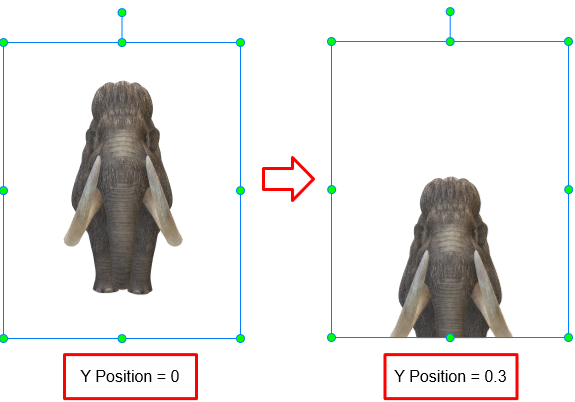
Y Position
Change the Y coordinate of the look-at point:
- Y<0: The look-at point will move to the lower part of the model. When this value decreases to a certain limit, the model will no longer appear in the field-of-view.
- Y>0: The look-at point will move to the upper part of the model. When this value increases to a certain limit, the model will no longer appear in the field-of-view.
Z Position
Change the Z coordinate of the look-at point:
- Z>=0
| If the Z value of the look-at point (Z>=0) is smaller than that of the camera position (Z>=0) | The look-at point will move along the Z-axis in front of the camera. So, the model will appear in the field-of-view. You will see the front of the model. |
| If the Z value of the look-at point (Z>=0) is equal to or greater than that of the camera position (Z>=0) | The look-at point will move along the Z-axis behind the camera. So, the model will no longer appear in the field-of-view. |
| If the Z value of the look-at point (Z>=0) is greater than that of the camera position (Z<0) | The look-at point will move along the Z-axis in front of the camera. So, the model will appear in the field-of-view. You will see the back of the model. |
- Z<0
| If the Z value of the look-at point (Z<0) is greater than that of the camera position (Z<0) | The look-at point will move along the Z-axis in front of the camera. Hence, the model will appear in the field-of-view. You will see the back of the model. |
| If the Z value of the look-at point (Z<0) is smaller than that of the camera position (Z<0) | The look-at point will move along the Z-axis behind the camera. So, the model will no longer appear in the field-of-view. |
| If the Z value of the look-at point (Z<0) is smaller than that of the camera position (Z>0) | The look-at point will move along the Z-axis in front of the camera. Hence, the model will appear in the field-of-view. You will see the front of the model. |
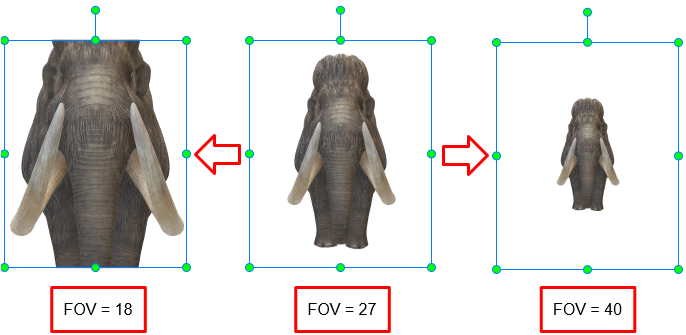
Set up Camera Field-of-View
Field-of-view is the observable range of a camera that allows it to capture all objects that appear in the range. When you import 3D models into ActivePresenter 9, the field-of-view value is predefined in degrees. You can enter a value from 0.1 to 179.9 degrees in the corresponding spin box:
- The smaller the value, the narrower the viewing angle, and the higher the magnification. Hence, the larger the model is zoomed in.
- The greater the value, the wider the viewing angle and the lower the magnification. As a result, the smaller the model is zoomed out.
Take a look at the example below. When this model is imported, its default field-of-view (FOV) value is 27 :
Note: When you adjust other values such as X, Y, Z coordinates of the look-at point, sometimes, you realize that the model no longer appears in the field-of-view. In this case, you should adjust the field-of-view value properly to make the model appear again.
After customizations, if the changes do not satisfy you, you can reset all the properties to the initial values. To do that, access the Format tab > Reset 3D Model. Or, navigate to the Properties pane > 3D Model tab > click the Reset button.
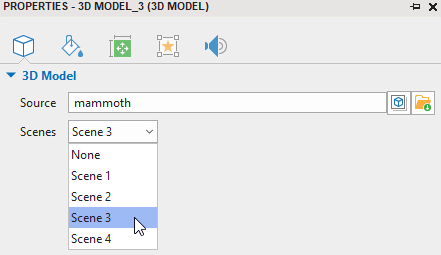
Select 3D Model Scenes
Some 3D models may include multiple scenes for animation. To explore their available animation scenes, do one of the following:
- Navigate to the Format tab > Scenes.
- Access the Properties pane > 3D Model tab > 3D Model section > Scenes.
Preview 3D Models
When previewing your projects including 3D models in HTML5 output, it’s possible to interact with the model to change its view. Particularly, simply drag the mouse left, right, upward, downward, or in a circular movement to view the model from different perspectives.
Note: These movements are not applicable to 3D models which are set as drag sources.
All things considered. Why don’t you try this feature right now? Download ActivePresenter 9 and explore your infinite possibilities.
See also: