ActivePresenter makes it quick and easy to add voice-over to your screencast and eLearning course. Apart from recording your voice, using the integrated Text to Speech feature is a convenient way to convert closed captions to speech or generate audio from text.
Convert Closed Captions to Audio
ActivePresenter lets you convert closed captions to speech using the Text to Speech feature (also TTS). When converted, all CC nodes in the Timeline produce a single audio object. This audio object works just like other normal audio objects in ActivePresenter, so you can use the built-in audio tools to edit it.
ActivePresenter also allows you to use different voices, speeds, and volumes for each CC node. This is useful when you want to make conversations, for example. Besides, using batch operations will save your time to generate audio from closed captions in some specified slides or in all slides in a project at once.
Convert Closed Captions to Audio
You can apply different settings to each CC node in the Timeline, and then convert all of them into audio. To do that, select a CC node and perform the following:
Step 1: Click the Properties pane > Sizes & Properties > Caption.
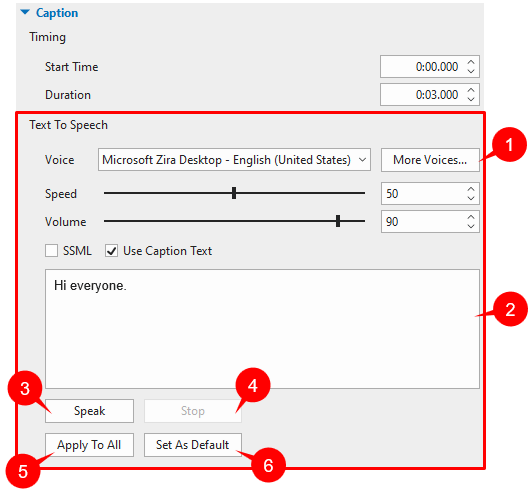
Step 2: In the Text To Speech part, specify the voice, speed, and volume for the CC node.
The latest version ActivePresenter 8.1 now gives you an opportunity to get more voices for text to speech. Click More Voices… (1) to see other external voices. However, you have to do some further settings. The details for that work will be mentioned in another article: Get More Text-to-Speech Voices from the Third Parties.
Step 3 (Optional): You can enhance your selected voice with SSML (Speech Synthesis Markup Language). SSML tags can add pauses and other speech effects such as emphasis, volume, speaking rate, pitch, and more to that voice. To enable it, select SSML check box, and then enter your plain text with SSML tags in the Preview text box (2).
Note: You can only use SSML tags for SSML-supported voices.
Step 4: Click Speak (3) to listen to the voice and click Stop (4) to stop listening.
Step 5: Optionally, you can adjust the voice, speed and volume of a CC node and apply the same settings to other existing CC nodes. For that to happen, click Apply to All (5).
If you want to apply the TTS settings of the current CC node to all newly added ones, just click Set As Default (6).
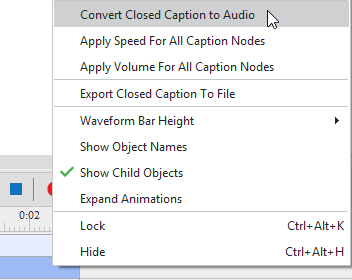
Step 6: After adjusting each CC node, go to the Timeline. Right-click one CC node and select Convert Closed Caption to Audio. Alternatively, click the drop-down arrow on the Closed Caption button in the Insert tab > Convert Closed Caption to Audio. This converts all CC nodes in a slide into speech.
Step 7: After the conversion, the object duration can be shorter than the generated audio duration. In that case, ActivePresenter will ask whether you want to extend the object duration to match the duration of the generated audio.
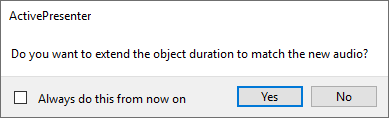
- Click Yes or No depending on your needs.
- Select Always do this from now on to remember your preferences. Thereby, your choice will be default whenever you convert closed caption to audio without displaying this dialog again. If you want to change to the other choice, just click the ActivePresenter button > Preferences > Miscellaneous > Extend object duration to match the duration of generated audio > choose either Ask, Yes, or No.
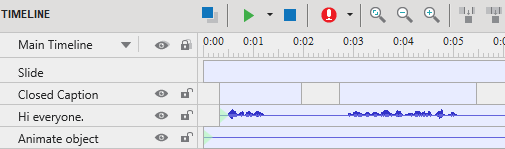
Regardless of your choice, ActivePresenter will generate the audio and place it right below the CC object in the Timeline as a single audio object.
Note: It’s possible to apply the same settings of either the speed or volume of a CC node to other CC nodes. To do that, right-click a CC node and select Apply Speed For All Caption Nodes or Apply Volume For All Caption Nodes.
Use Batch Operations to Convert Closed Captions to Audio
ActivePresenter also provides a batch operation to convert closed captions in some specified slides or in all slides in a project. Do the following:
Step 1: Click the ActivePresenter button > Project > Batch Operations > Convert Closed Captions To Audio.
A dialog appears as follows:

Step 2: Specify the slides (7) where you want to convert closed captions to audio. If you choose Specified Slides, separate the ordering numbers of slides by commas. Otherwise, use hyphens to indicate ranges. For example, the range 3-6 indicates the 3rd, 4th, 5th, and 6th slides.
Step 3: Select Extend caption duration to match the duration of generated audio (8) if needed. This may cause sync problems, so you have to check out the project carefully.
Step 4: Click OK to create audio from closed captions.
Use Text to Speech to Generate Audio from Text
ActivePresenter enables you to generate audio from the text for audio objects and other objects with attached audio.
- For audio objects, access the Insert tab > Audio > Create New > Properties pane > Media tab > Audio section.
- For objects with attached audio, go to the Properties pane > Audio tab.
The Audio tab appears as follows. (The Audio section of the Media tab is similar but it has one more part of playback options.)
To create audio from text, take the following:
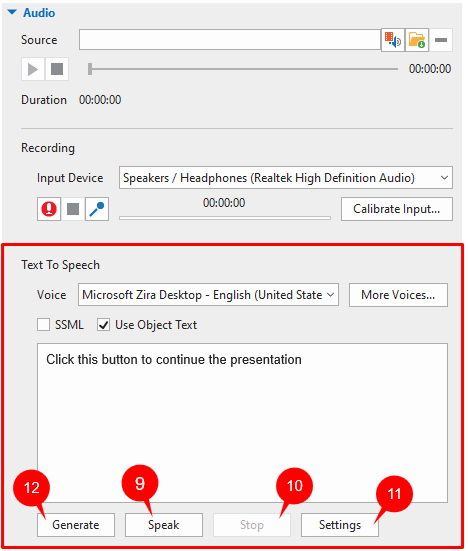
Step 1: Enter your text in the Text To Speech text box. If the object contains text such as shapes, text captions, etc, the text will appear in this text box. However, you can freely change the text as you want.
Step 2: Select a voice from the Voice drop-down list or click More Voices… to access other cloud voices. Besides, you can select SSML check box to enhance your output speech with SSML tags for SSML-supported voices.
Step 3: Click Speak (9) to listen to the voice and click Stop (10) to stop listening. If you are satisfied with the current settings, just click Generate (12) to create TTS audio. If not, go to the next step.
Step 4: Click Settings (11) to adjust the TTS preferences. This opens the Text To Speech dialog where you can specify the voice, speed, and volume for the TTS audio.
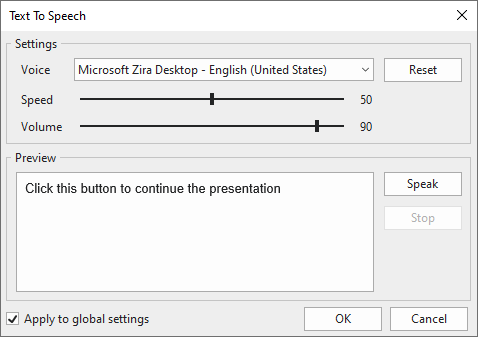
To check the settings, change the voice, speed, and volume, and click Speak to listen to the voice.
- If the results are not OK, change the parameters and try again. Repeat the cycle until you are satisfied.
- If your settings are not good enough, click Reset and start over.
- When you are satisfied, click OK to close the dialog.
Step 5: Once you’re satisfied, click Generate (12) to perform the conversion.
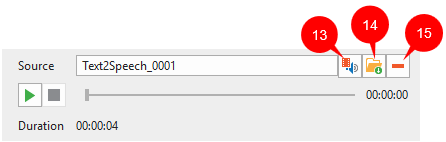
After that, ActivePresenter will generate the audio and attach it to the object.
Note: If you want to remove the generated audio from the object, click Remove (15). ActivePresenter also allows you to attach audio from the current project (13) or from your computer (14) to your objects.
That’s all about the Text to Speech feature in ActivePresenter 8. Save yourself the expense of finding voice talent with this handy feature. Visit our tutorials page, YouTube channel, and blog to learn other useful features.
Related topics: