When working with a range of objects, you often want to align or resize them evenly. This is useful when you want to create, for example, a user interface or a structured page. Therefore, ActivePresenter 8 offers a variety of functions to align and resize objects automatically and precisely.
Align Objects
ActivePresenter 8 can automatically and perfectly align objects for you.
Align Objects Using Canvas Snapping
Canvas snapping helps aligning elements. This tool snaps objects to the center or edges of the Canvas or other element by one or two orange lines that appear. They are vertical or horizontal lines through the edge/center of an object or the Canvas.
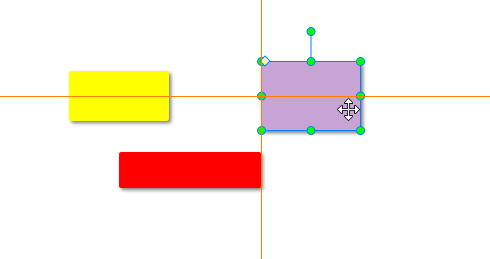
Canvas snapping is turned on by default. To turn it off, click the View tab > Canvas Snapping. Temporarily disable it by holding down ALT when resizing or moving objects.
Align Objects with Anchor Object
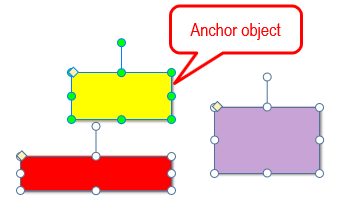
Sometimes, you have an object’s position set perfectly. And then you want to align other objects with that specific object. To do that, define that object as an anchor object and use the Alignment options. The anchor object is the last object you select. It has green resizing handles rather than white handles like others.
You have many options for aligning objects both vertically and horizontally. Do the following:
Step 1: Select multiple objects and define an anchor object you want to align to. To define another anchor object, click any of the currently selected objects without holding CTRL.
Step 2: Click the Home tab > Arrange > Align or the Format tab > Align. Alternatively, on the Canvas, right-click objects > Align.
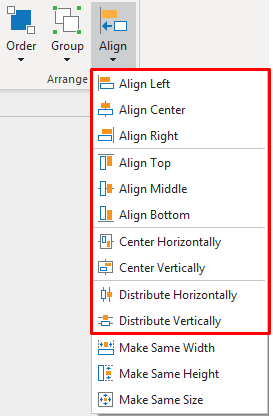
Step 3: Choose the desired alignment options:
- Align Left: Align the left side of all the objects with the left of the anchor object.
- Align Center: Align the center of all the objects with the vertical center of the anchor object.
- Align Right: Align the right side of all the objects with the right of the anchor object.
- Align Top: Align the top of all the objects with the top of the anchor object.
- Align Middle: Align the center of all the objects with the horizontal center of the anchor object.
- Align Bottom: Align the bottom of all the objects with the bottom of the anchor object.
Align Objects to the Canvas
You can align one or more objects to the center of the Canvas. Do the same steps to align objects as mentioned above. But choose either of the following:
- Center Horizontally: Move all the selected objects to the horizontal center of the Canvas.
- Center Vertically: Move all the selected objects to the vertical center of the Canvas.
Distribute Objects Evenly
If you arrange objects in a row or column, you may want them to be an equal distance from one another for a neater appearance. Do that by distributing the objects horizontally or vertically. Perform the same steps to align objects, but choose either of the following:
- Distribute Horizontally: Make the horizontal spacing equal between the selected objects.
- Distribute Vertically: Make the vertical spacing equal between the selected objects.
Note: These commands work only when you select more than two objects.
Resize Objects Equally
ActivePresenter 8 allows you to quickly resize multiple objects that you want to size equally at once. It also can be done by using an anchor object. To resize other objects to the width or height or both of the anchor object, do the following:
Step 1: Hold down CTRL while selecting all the objects that you want to resize. Then, click any of the currently selected objects without holding CTRL to define another anchor object.
Step 2: Click the Home tab > Arrange > Align or the Format tab > Align. Alternatively, on the Canvas, right-click objects > Align.
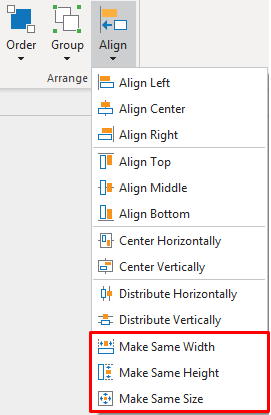
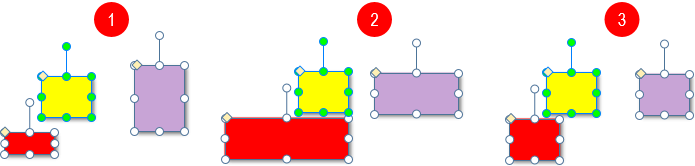
Step 3: Choose the desired resizing options:
- Make Same Width (1): Match the width of all the selected objects with that of the anchor object.
- Make Same Height (2): Match the height of all the selected objects with that of the anchor object.
- Make Same Size (3): Match the height and width of all the selected objects with those of the anchor object, respectively.
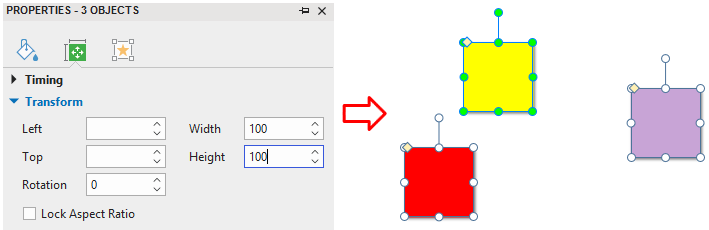
Note: Regardless of the size of the anchor object, you can also change the size of all selected objects equally. For that to happen, you can use commands in the Properties pane. After selecting multiple objects you want to resize, navigate to the Properties pane > Size & Properties > Transform > enter values in the Width and Height spin boxes.
So that’s all about the ways to align and resize objects in ActivePresenter 8. In case you want to group objects to better arrange them, see How to Group Objects. Download and feel free to contact us at any time you need help.
See also: