In the previous post, you’ve known how to use audio effects from basic to advanced such as basic editing tools, audio fade, adjust volume, etc. So today, let’s take a closer look at the Audio Noise Reduction feature in ActivePresenter 8. It can help to improve your audio quality in general and recording quality in particular.
Regardless of the microphone quality, there is a high chance that your recordings will have some background noise. Therefore, noise reduction can reduce constant background noise like tape hiss, electric fans, or hums. Overall, this is a process of removing noise from an audio track.
Use Audio Noise Reduction
ActivePresenter lets you reduce noise for the whole audio track or just a part of it. In general, the procedure to use the Audio Noise Reduction feature is to get a noise profile, then reduce the noise. Now, let’s perform these steps:
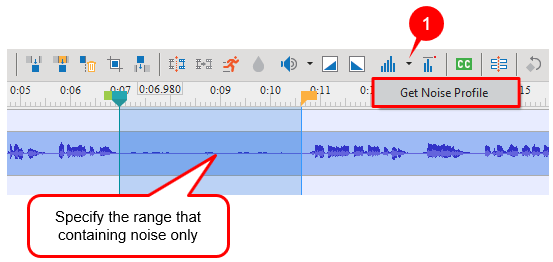
Step 1: Get a noise profile.
- Select the entire track or specify the range that contains only background noise.
- Click the arrow button on the Audio Noise Reduction button (1), then select Get Noise Profile.
Step 2: Reduce noise.
After getting a noise profile, you can apply noise reduction to a certain range in the audio track or to the whole file simultaneously.
- Specify the range or the audio tracks you want to apply the effect to.
- In the Timeline pane, click the Audio Noise Reduction button
 . Then, the Noise Reduction dialog will appear to let you customize:
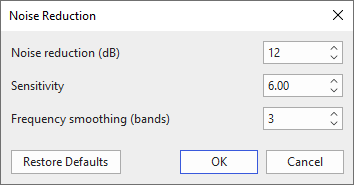
- Noise reduction (dB): Control the amount of volume reduction (0 – 48 dB) applied to the identified noise. Higher values reduce higher amounts of volume reduction, making the noise quieter but can distort the audio track. So, keep this control as low as possible.
- Sensitivity: Control how much of the audio will be considered as noise. Greater sensitivity will remove more noise but it can damage the track. Thus keep this control as low as possible.
- Frequency smoothing (bands): Spread the noise reduction into the specified number of neighboring bands. Smoothing can make the desired audio less clear, so set the value to 0 if your desired signal is strong and the noise is low.
- Click OK to apply the effect to the selected ranges.
Note: If the Noise Reduction effect doesn’t work as you expected, click Restore Defaults and try again with different settings. Alternatively, press CTRL+Z on the keyboard. Bear in mind that you don’t have to get a new noise profile if you think the existing one is good enough.
Some Tips When Using Audio Noise Reduction:
- When getting a noise profile, you shouldn’t choose a very short range because the app cannot get the noise profile. A selection of 2 – 4 seconds of only noise is recommended. You must select a minimum of 2048 samples or about 0.05 seconds at a 44100 Hz sample rate.
- The noise profile you got will be stored in the application. It will be lost in case you close the program or replace it with another noise profile.
- If there are many different kinds of noise in different parts of the audio track, you should repeat the process several times. For example, after reducing noise for an audio track, there might be several parts that noise is not completely eliminated. So, you should get the noise profile for the first part, then reduce the noise for it. Continue picking the next part and reduce the noise until you get the desired result.
- Sometimes, the audio track doesn’t have any part that contains only background noise and you cannot get the noise sample. In such a case, you can create a recording made in identical conditions containing silence only, then use a noise sample from that to reduce noise from the target recording.
Conclusion
That’s all. Download ActivePresenter 8 to enhance the audio quality by using the Audio Noise Reduction feature. Remember that there are many useful tutorials about editing audio tracks on our Twitter, Tutorial page and YouTube channel, feel free to check it out.
More articles you may want to know: