Concerning editing videos, the insert time feature helps you a lot. You can use it for not only inserted videos but also your captured ones such as video demonstration, video simulation. For example, when the video scene is over and you need more time to explain a particular step. So, let’s pause the video for a certain amount of time, extend the duration as long as you want and add annotations to make it clear. Now, let’s learn how to insert time to videos in ActivePresenter 8.
In this tutorial, we will walk you through 3 main stages:
Insert Time
Basically, the Insert Time feature works on both audio and video objects. So, take the following steps to insert time:
Step 1: Select one or more audio/video objects. Hold CTRL while clicking to select a multiple of them.
Step 2: Seek the Playhead (1) along the timeline to the position where you want to pause the track.
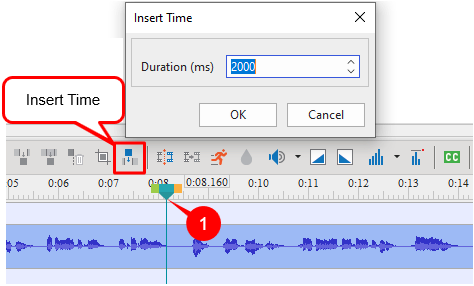
Step 3: In the Timeline pane > click the Insert Time button. This opens the Insert Time dialog.
Tip:
- You can use the default value in the Insert Time dialog (2000 ms) and change the duration later as shown in the next part of this article.
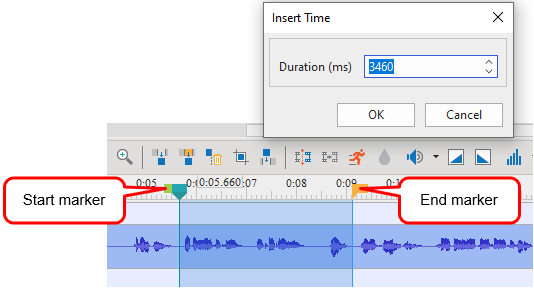
- You can also specify the freezing time by dragging the Start marker (in green) and End marker (in orange) of the Playhead along the timeline. Place the Playhead at the Start marker position and click Insert Time. Time will be inserted exactly between the two markers.
Step 4: Specify the duration of the control and click OK. After that, ActivePresenter will insert time at the Playhead position.
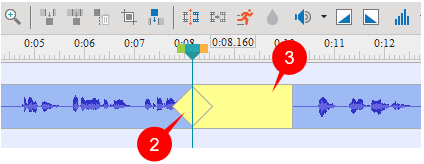
As you can see, a yellow diamond (2) and yellow bar (3) get superimposed on the time bar of the audio/video object. The yellow diamond specifies the points where the track pauses. Meanwhile, the yellow bar represents the freezing time you’ve inserted into the audio/video object.
Note:
- This feature also works on other types of objects in ActivePresenter. If you don’t select any video/audio object, ActivePresenter will insert time in the entire slide. Otherwise, if there is any object in the selected range or at the Playhead position, time is also inserted in that object. Other objects will not be affected at all.
- After inserting time, when previewing or exporting, the host video is paused for the duration of the added time. The rest of the video/audio, as well as other objects of the slide, display normally.
- Each inserted time extends the host track by its duration. In other words, if you insert an n-second pause in an audio/video track, its total duration will be increased by n seconds.
- You can insert any number of pauses in a track. However, two pauses cannot overlap each other.
Customize Added Time
In general, the length of the yellow bar is adjusted to the duration you have defined in step 4. However, you can customize the start time and duration of the inserted time as you want:
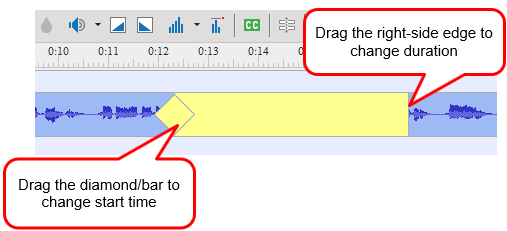
- Drag the whole bar or the yellow diamond along the timeline to change the start time.
- Drag the right-side edge of the yellow bar to the right or left to increase or decrease the duration of the added time respectively.
Tip: By default, the Timeline Snapping mode is on to help you drag the added time bar and select timestamp more precisely. However, in case it is off, access the View tab and click Timeline Snapping.
Delete Added Time
To remove added time from the host track, do either of the following ways:
- Drag the yellow bar (3) downward. Keep dragging until the bar turns gray and release the mouse button.
- Drag the right-side edge of the yellow bar toward the diamond till the yellow bar disappears.
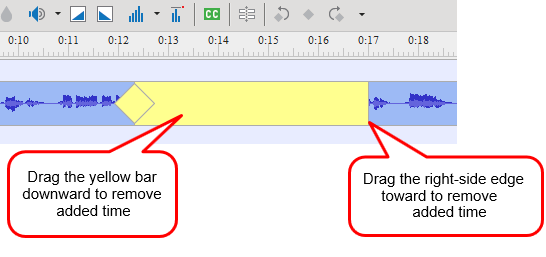
As a result, the added time will disappear and the duration of the host track will be reduced. Obviously, the video/audio track will go back to its original properties.
That’s enough to know how to insert time to video/audio in ActivePresenter 8. Don’t hesitate to use and master this feature. Together with other video editing tools, you will have the best videos possible.
Related articles: