Record Screen with Custom Cursor Effects in ActivePresenter 8
Using cursor effects such as cursor highlight, mouse click sounds and effects in your recorded videos or software simulations may help a lot in drawing the audience’s attention to your mouse movement on the screen. Hence, it makes the audience easier to keep track of the contents. You are free to change the default cursor effects after each recording time. But this may take you a lot of time and effort. Fortunately, ActivePresenter 8 will give you a chance to record screen with custom cursor effects which can be used across multiple captured videos/software simulations. In other words, you will get the same custom cursor effects in all newly recorded videos/software simulations. That can be done with just a few simple steps as guided details in this tutorial.
This tutorial covers:
- Customize Cursor Effects
- Save as Custom Theme to Reuse Across Multiple Projects
- Use the Custom Theme for Recording
- Enable Recording with Theme Settings
- Start and Stop Recording
Let’s get started right now!
1. Customize Cursor Effects
As you might know, cursor effects like cursor highlight, mouse click sounds and effects are all attributes of Cursor Path object. You can style all attributes of the Cursor Path object the way you want and set it as the default of the current theme. This can be done in the Object Settings view which can help you quickly and easily customize default settings of multiple types of objects. Do the following:
Step 1: Open the Object Settings view by clicking the View tab > Object Settings.

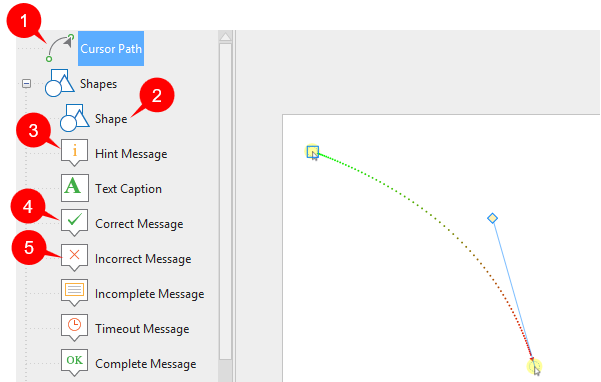
Step 2: This view opens an editor for editing default objects. Just select the Cursor Path object (1) on the left pane and then select it on the Canvas.
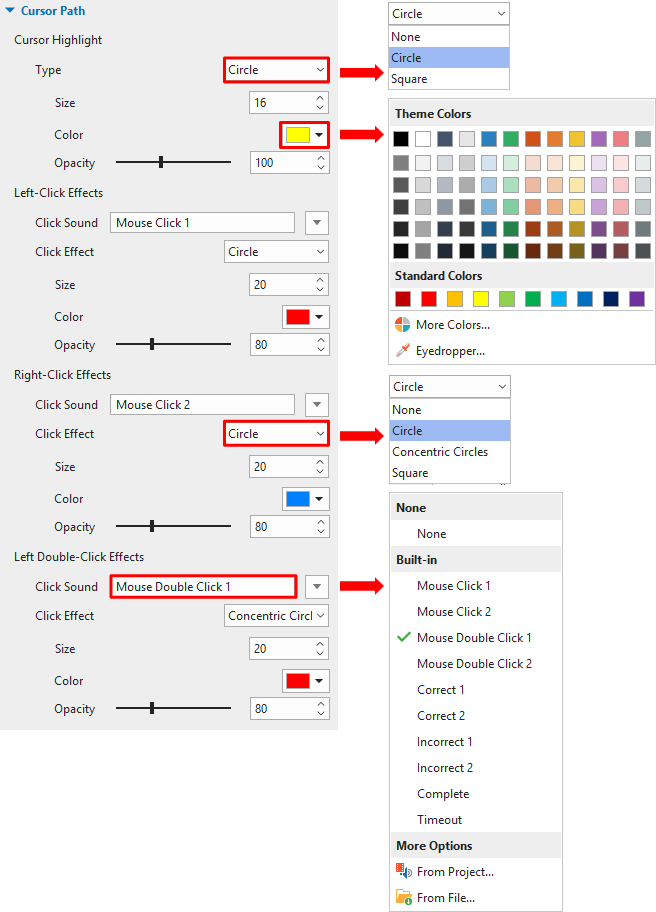
Step 3: Go to its Properties pane > Size & Properties > Cursor Path. Then, modify the mouse cursor effects the way you want.
Note: For recording software simulation, sometimes, you also may want to use even custom Shape (2), Hint Message (3), Correct Message (4), or Incorrect Message (5) across multiple projects instead of the default ones? It’s possible, of course. For that to happen, you can also quickly customize default settings of all of these objects right in the Object Settings view. And then save them as a theme for later use. Keep reading to know what to do next.
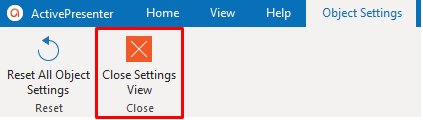
Step 4: Close Object Settings view.
Note: Besides using Object Settings view, in a blank slide, you can also add a new Cursor Path object on the Canvas by going to the Insert tab > Cursor Path. Then, change its attributes in the Properties pane > Size & Properties > Cursor Path. And lastly, right-click this Cursor Path object on the Canvas > Set as Default Cursor Path.
2. Save as Custom Theme to Reuse Across Multiple Projects
After setting the default Cursor Path object having custom cursor effects as you wish, you need to save the current theme that contains it as a custom theme to reuse on multiple projects. Take the following steps:
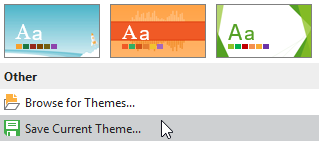
Step 1: Click the Design tab > click the bottom drop-down arrow to expand the Themes gallery > Save Current Theme…
Step 2: Type a name for your theme and click Save.
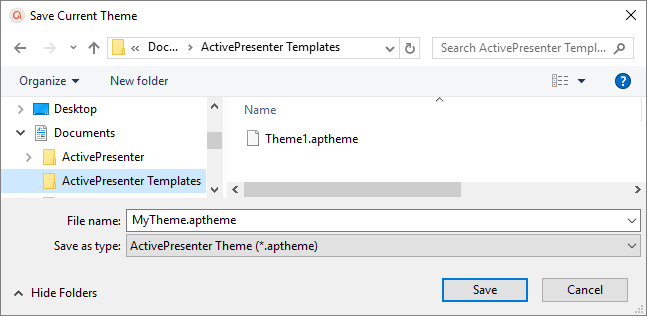
Make sure that your custom theme is saved in the location C:\Users\<user_name>\Documents\ActivePresenter Templates (for Windows) or /Users/<user_name>/Documents/ActivePresenter Templates (for macOS). The theme will appear on the Start Page. Then, you can use this theme to start recording.
3. Use the Custom Theme for Recording
The custom theme you have saved will appear on the Start page > Templates > Custom. To use this theme to start recording, do either of the following:
- Click the theme and select Record Video or Record Software Simulation from the pop-up dialog.
- Right-click the theme and select Record Video (6) or Record Software Simulation (7) from the context menu.
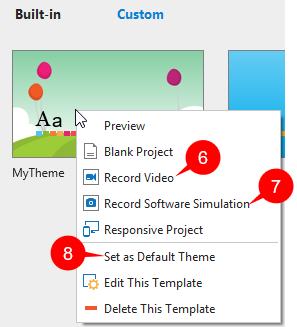
Tip: If you want this custom theme to be the default theme of every recorded video or software simulation, just right-click it and then select Set as Default Theme (8).
4. Enable Recording with Theme Settings
So, how to use custom cursor effects in that custom theme for recording the screen? This part will give you the answer. First, click the Settings icon at the top-right corner of the Record Video Project/Record Software Simulation Project dialog and select Recording Settings…
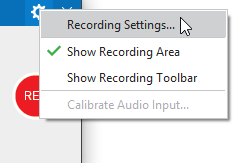
This opens a Recording Settings dialog. Take a look at the Cursor tab.
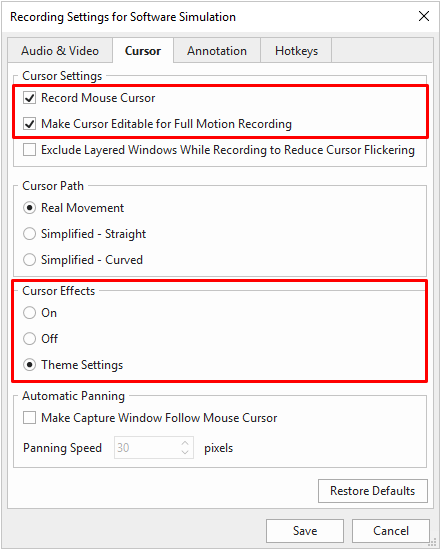
Note: To make your captured videos or software simulations have cursor effects, ensure to enable two options: Record Mouse Cursor and Make Cursor Editable for Full Motion Recording. This way, you can record the mouse cursor and edit its effects after recording. If the latter is deselected, all the cursor effects will be removed and also you are unable to edit them.
Then, you can see the Cursor Effects section offers 3 options:
- On: The mouse movements on the screen have full effects. That means your recorded videos/software simulations will include mouse cursor with full default effects like cursor highlight and mouse click sounds and effects.
- Off: The mouse movements on the screen have no effects. That means your recorded videos/software simulations will exclude any effects of the mouse cursor. This option is enabled by default.
- Theme Settings: The mouse movements on screen have effects depending on the custom theme in use. That means your recorded videos/software simulations will include mouse cursor with effects that you have set up in the custom theme saved earlier. If you want to record with custom cursor effects instead of the default ones, this option is a good choice.
Note that whatever option you select, you can still freely change the cursor effects after recording if you want to.
Lastly, click Save to apply.
5. Start and Stop Recording
Click the Record button to start recording and then press CTRL and END (for Windows) or ⌥⌘2 (for macOS) to stop recording. Besides, you can finish the recording by using commands in the Recording Toolbar dialog. This dialog will appear when you click the ActivePresenter icon in your system tray. See the tutorial: How to Start and Stop Recording for more information.
So, you’ve learned how to record the screen with custom cursor effects that can be used across multiple projects. The new option Theme Settings in recording settings in ActivePresenter 8 will be helpful and save your time. That is in case you want a large number of your captured videos/software simulations to have the same cursor effects without having to change them manually after recording.
Download ActivePresenter 8 now and create your own professional-looking screencast videos or interactive software simulations. Also feel free to contact us if you need any help.
More articles you may want to know: