In the previous post, we’ve explained clearly to you how to insert web-based resources, namely web address and embed code. So, in today’s tutorial, let’s learn how to embed HTML package in ActivePresenter 8. Surely, this web object can help enhance your interactivity with HTML resources such as games, courses, and reference materials.
Now, it’s time to explore how amazing this feature is!
Inserting HTML Package
In general, inserting HTML Package is similar to adding an address or embedding code. However, make sure you have an HTML5 file. To do that, take the following steps:
Step 1: Initially, open the Insert tab > Web Object ![]() . A dialog appears to let you select web object types.
. A dialog appears to let you select web object types.
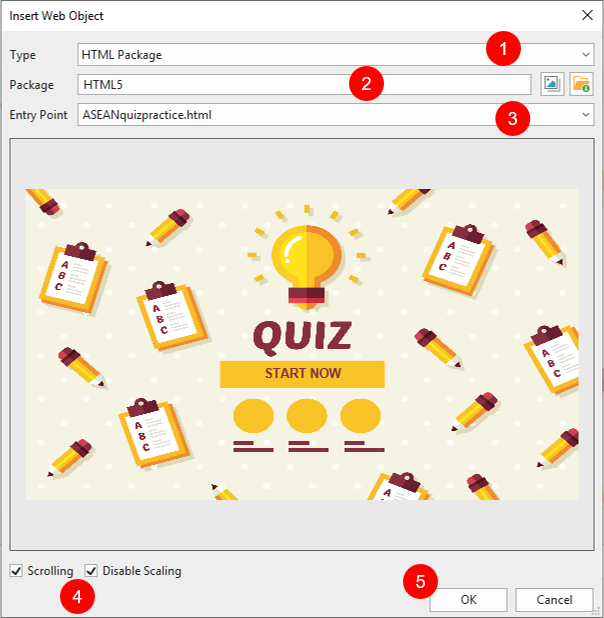
Step 2: Select HTML Package by clicking the Type combo box (1).
Step 3: Do either of the following:
- Click
 to select a package from your project.
 - Click to select a folder from your computer (2).
Step 4: Select one entry point from the drop-down list (3).
The HTML package will load and preview right in the dialog. It is possible to adjust web object size by dragging the border of this dialog.
Step 5: Specify scrolling and scaling behaviors (4) for the package as follows:
- Scrolling: Allow adding vertical and/or horizontal scroll bar to view the rest of the content.
- Disable Scaling: Keep the embedded content the same when scaling a slide. For example, when zooming and panning in the AutoFit mode of the presentation.
Step 6: Finally, click OK (5) to embed your HTML package.
Working with HTML Package
After inserting the HTML package in a slide, the app brings you some options to customize it.
First of all, to change an HTML package, navigate to its Properties pane > Size & Properties > Web Object > Edit.
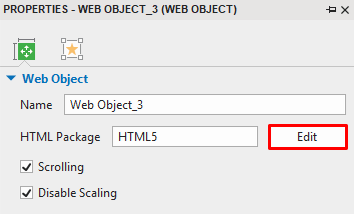
Note: In case the web object Properties pane doesn’t appear on the right side of the canvas, right-click the object > Web Object Properties.
As mentioned before, HTML package is one web object. So, you can work with it like other web objects. Now, right-click the HTML package to see more options:
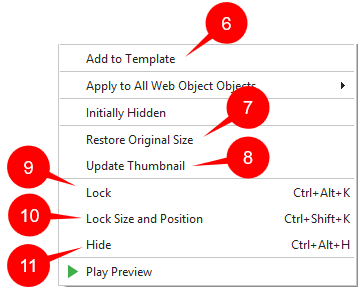
Now, if you want to save and reuse the HTML package, later on, select Add to Template (6) to hold it in the Object Templates. Check out the tutorial Create and Use Object Templates in ActivePresenter 8 for more detail.
After embedding the HTML package within an object on a slide, you can resize it to the desired size. In case the change doesn’t please you, right-click the HTML package > Restore Original Size (7).
Besides, you can also update the thumbnail for the current object, right-click the object > Update Thumbnail (8).
What’s more, you can Lock (9) the object, Lock Size and Position (10) or Hide (11) it on the slide.
Note: Web object only works in HTML5 output. In other outputs, it will be exported as an image.
So, it is easy to embed an HTML package in ActivePresenter 8, isn’t it? Now, you can interact with the HTML package as normal during the lesson. Hope that it helps. Stay tuned for upcoming tutorials on our page!
Recommended Content: