How to Calibrate Audio Input in ActivePresenter 8
In ActivePresenter, calibrating audio input helps detect the recording sensitivity level. This feature sets the audio recording devices to the appropriate level before recording. As a result, it reduces the possibility that the recorded sound is too high or too low which are both not qualified enough.
You can calibrate the microphone either automatically or manually. This tutorial will cover both methods to let you level match your speakers. More interestingly, with the auto-calibration system in ActivePresenter 8, fine-tuning the recording system is almost done for you.
Let’s learn more about this feature to improve the sound recording quality.
How to Calibrate Audio Input
As long as you record voice, you can choose to adjust the audio input. You can do that in recording voice for new projects such as video demos or software simulations. You can also have the audio calibrated in recording new audio file or recording narration.
More articles you may want to know:
Don’t miss this feature out since it can help you to have outputs with the best possible sound.
Calibrate Audio Input When Recording Screen
To calibrate audio input when recording new projects, do the following:
In the Record Video Project dialog or Record Software Simulation Project dialog, click the Settings button in the top-right corner and select Calibrate Audio Input…
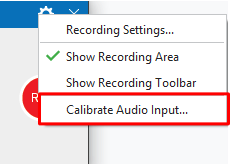
After that, the Calibrate Audio Input dialog pops up. We will talk about this dialog in details in the latter part of this article.
Calibrate Audio Input When Recording Narration Only
To calibrate audio input when recording narration, do the following:
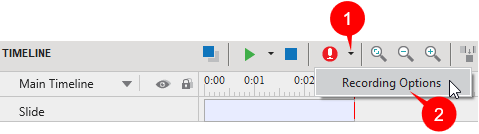
Step 1: Click the drop-down arrow on the Record Narration button (1) in the Timeline and select Recording Options (2).
Step 2: In the Recording Options dialog that pops up, click Calibrate Input… (3).
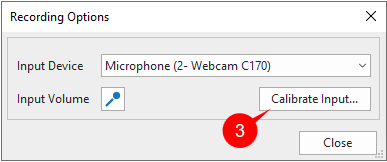
The Calibrate Audio Input dialog which is the same as the one mentioned above will pop up.
To know more in details about recording narration, refer to How to Record Narration.
Calibrate Audio Input Automatically
Below is the Calibrate Audio Input dialog that pops up when you click the Calibrate Audio Input…in the Settings or Calibrate Input… (3) above.
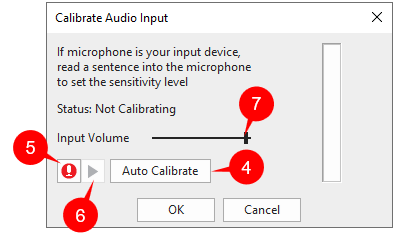
It’s easy to calibrate the audio input automatically with ActivePresenter 8:
Step 1: Click the Auto Calibrate button (4). The Auto Calibrate button will turn into Stop Calibration.
Step 2: Speak something in your normal volume into the microphone. Keep speaking so that ActivePresenter can automatically optimize the gain.
After a few seconds, the button changes from Stop Calibration to Auto Calibrate again, which means the calibration is over.
Remember that you should try to speak louder or smaller during the testing time for a better result.
Calibrate Audio Input Manually
To calibrate the microphone manually, do the following:
Step 1: Keep the microphone in its normal position. Click the Record Narration button (5). This button will turn into the Stop![]() button.
button.
Step 2: Speak something into the microphone.
At the same time, move the slider (7) to the right until the LED bar on the right shows yellow bars intermittently.
If the bar starts showing red LEDs, move the slider a bit to the left.
Step 3: Click the Stop button to end the calibration when you are satisfied with the audio level.
Step 4: Click the Play button (6) to listen to the recorded voice. If the audio level is not good enough or if it has any defect such as breathing noise, repeat steps 1-4.
Regardless of the calibration method, the volume adjustment is accepted only when you click the OK button. If you click the Cancel button, ActivePresenter will discard the new value and apply the old one.
Tip: You can use the Audio Noise Reduction feature in ActivePresenter 8 to enhance the recorded voice. Refer to Use Audio Noise Reduction tutorial for more details.
So, we’ve gone through how to calibrate audio input with ActivePresenter. Don’t forget to visit our tutorial page and blog for more useful tips to get the most out of the app.