Saola Animate is known as an amazing software to create web animations and interactive HTML5 content. It allows you to animate anything under an intuitive editor without the necessity for coding skills. Especially, you can create engaging HTML5 content by using numerous built-in events – actions within the app. Now, let’s take a closer look at today’s article to know more about Events – Actions in Saola Animate 3.
You will walk through 3 main parts, respectively:
Introduce Events – Actions
Interactive HTML5 content changes to respond to user actions. For example, when you hover the mouse over a planet in the solar system, it will stop moving and show up its basic information, or vice versa. Saola Animate uses events and actions to help you add interactivity to HTML5 animations.
Events are occurrences that determine when to trigger an action. For example, the Mouse Over event occurs when users move the mouse pointer over an element. Events can occur based on some condition within the tool (e.g. Play Timeline From, Pause Timeline At …).
Basically, Saola Animate provides events for five item types:
- Element events: Mouse and touch events on elements.
- Scene events: Scene-specific events, keyboard events, and all element events.
- Document events: Document-specific events and scene events.
- Timeline events: Timeline-specific events related to timeline playback.
- Preloader events: Preloader-specific events related to the loading progress.
Events trigger actions. In other words, actions perform a function that responds when an event occurs. To easily create interactive HTML5 animations, Saola Animate offers many different built-in actions:
- Timeline, Symbol, and Media actions: Control the playback of timelines, symbols, audio and videos.
- Visibility actions: Show and hide elements, and toggle their visibility state.
- Other actions: Jump to a scene in the document, load a URL, change text of an element, and invoke a JavaScript function.
To grab detailed information about each type of Events – Actions, you can refer to Saola Animate 3 User Manual, pages 174 – 179.
Add Events – Actions
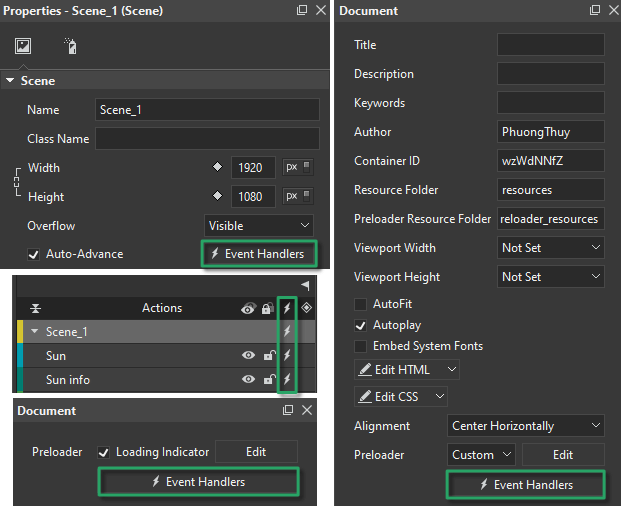
To attach actions to an item, first select that item. Then, click the Event Handlers button to open the Event Handlers dialog. This is where you define the events and actions you want the item to hold. The Event Handlers button appears as a lightning bolt in the Timeline, Properties, and Document panes. It also appears in the context menu when you right-click an element or a scene on the Canvas, or in the Elements and the Timeline panes.
Suppose that when you hover the mouse over an element (for example, the Sun – a host object), it will show the element’s information (the Sun info – a target object). Also, the timeline Sun containing the Sun animations will stop. After that, when you hover the mouse out of the element, its information will be hidden as well as the timeline Sun will continue playing. In this case, you need to add the following events – actions:
- The first event is Mouse Over, the actions are Show Element and Toggle Play/Pause Timeline.
- The second event is Mouse Out, the actions are Hide Element and Toggle Play/Pause Timeline.
Do the following to create the interactivity:
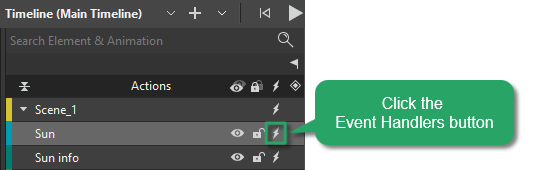
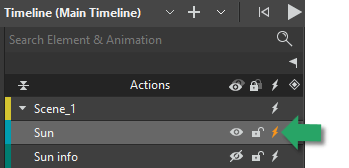
Step 1: Click the Event Handlers button of the Sun element to open the Element Event Handlers (Sun) dialog.
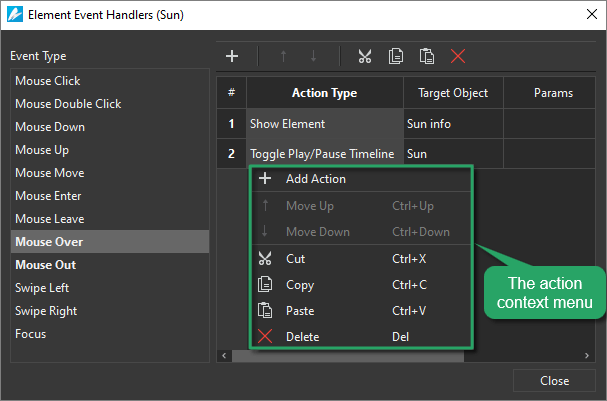
Step 2: In the Event Type list, select the Mouse Over (1) event.
Then, click Add Action (3) > Hide/Show > Show Element > Sun info.
Next, click Add Action (3) > Timeline > Toggle Play/Pause Timeline > Sun.
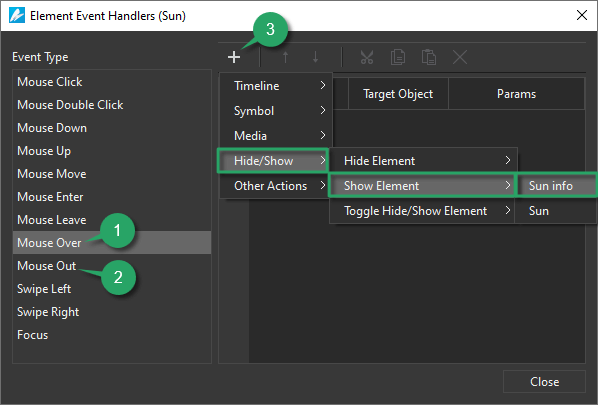
Step 3: Select the Mouse Out (2) event.
After that, click Add Action (3) > Hide/Show > Hide Element > Sun info.
Later, click Add Action (3) > Timeline > Toggle Play/Pause Timeline > Sun.

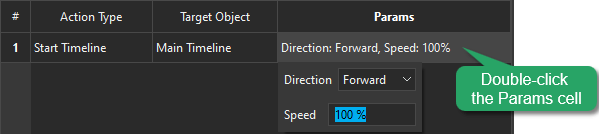
Step 4: Define the parameters (if any) of the action by double-clicking the Params cell. An action can have no or several parameters (e.g. playback direction, speed).
The image below shows an example of the action parameters.
Step 5: Click Close to finish.
In the Timeline pane, an element with actions has a highlighted Event Handlers button. So, it’s easy to figure out which element holds interactivity.
Edit Events – Actions
It’s always possible to edit events and actions attached to an item. To do that, open the Event Handlers dialog corresponding to that item. Then, do one of the following:
- Edit actions: Double-click the Target Object and Params cells to change the target object and parameters (if any). For example, you may want to show another element when hovering the mouse over the Sun element.
- Replace actions: Double-click the Action Type cell. Then, select a new action to replace the existing one.
- Order actions: The order of actions matters. Actions that are stated earlier are triggered before those stated later. For this reason, you can reorder actions by clicking Move Up and Move Down in the dialog toolbar.
- Copy actions: You can copy actions and paste them to the same or to another event. Just select the actions and use shortcuts, buttons in the dialog toolbar, or right-click the actions and utilize the commands in the action context menu to copy and paste them.
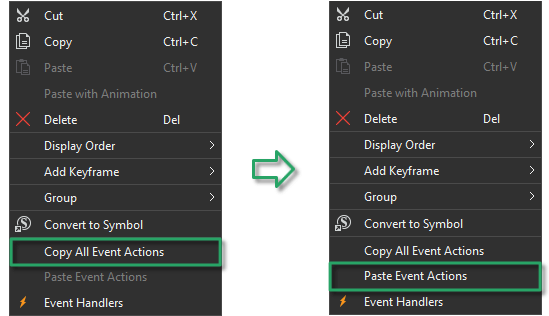
You can also copy all events and actions bound from an element to another. On the Canvas or in the Timeline pane, right-click an element > Copy All Event Actions. Then, select another element, right-click > Paste Event Actions.
- Remove actions: Select actions and press DELETE to remove them. Alternatively, click the Delete command in the dialog toolbar or context menu.
By using powerful functions, I can create an interactive solar system as the example below:
Final Words
So, that’s about events – actions in Saola Animate 3. Built-in events and actions are strong support for JavaScript novices to create interactive HTML5 content. At the same time, they are a real time-saver for those who do know to code. Download the app and be ready to bring your content to life.
See more: