Besides Events – Actions, Timeline triggers play an important role in building interactive HTML5 content. They fire automatically on the timeline, without user control. You can add many triggers along the timeline to execute different actions. Now, let’s learn how to use timeline triggers in Saola Animate 3.
This tutorial covers:
Insert Timeline Triggers
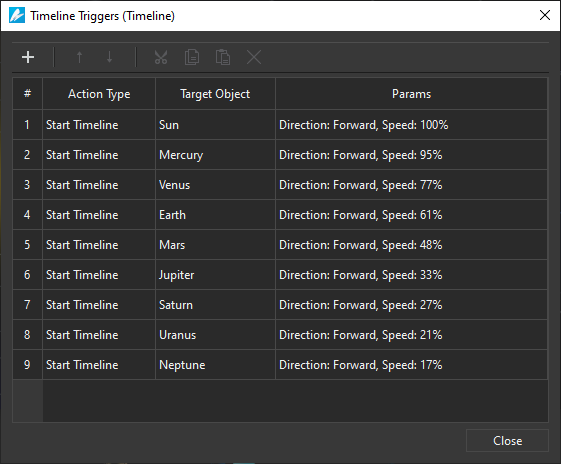
Suppose that you want to start multiple timelines once the project starts. Thereafter, each timeline will play at different speeds. So, do as follows:
Step 1: In the Timeline pane (Main Timeline), move the Playhead to the beginning, at 0:00:00 seconds. Also, you can press the Home button or click the Go to Start button (1) to achieve the same result.
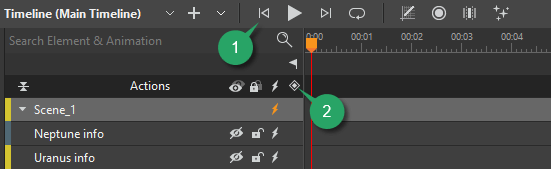
Step 2: Press ALT+T or click the Insert Trigger button (2) on the Actions bar. This opens the Timeline Triggers dialog where you can define a trigger.
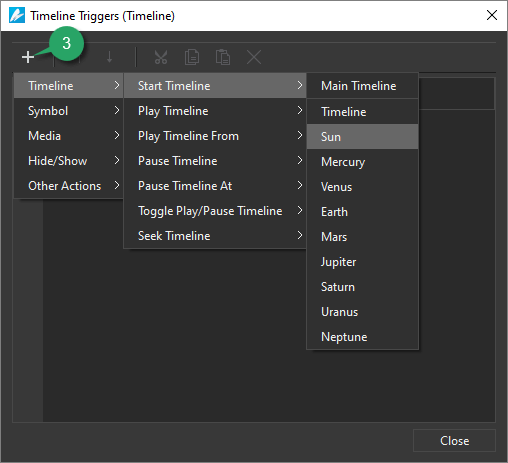
Step 3: Click Add Action (3) > Timeline > Start Timeline > select the desired timeline. This attaches the Start Timeline action to the trigger.
After that, on the Actions bar of the Timeline pane, a red diamond (4) appears at 0:00:00 seconds to represent the trigger.

Step 4: Close the dialog and preview your scene by pressing CTRL+F5, or clicking Preview Current Scene in Browser in the dockable toolbar.
As you can see, all the timelines start from the beginning.
Note: Events – actions and triggers are not triggered during scrubbing or previewing in the editor. You have to test them by previewing them in browsers.
Edit Timeline Triggers
After adding timelines triggers into your project, you now can edit them. Do one of the following to edit triggers:
- Select triggers: Click a trigger on the Actions bar. When being selected, the trigger turns from red to yellow.
- Edit triggers: Double-click a trigger to open the Timeline Triggers dialog.
Here, you can modify the actions as desired, such as changing speed, reordering, copying, and removing actions.
- Move triggers: Click and drag a trigger to a new position along the Timeline pane.
- Copy and paste triggers: Click a trigger on the Actions bar. Then, press CTRL+C to copy and CTRL+V to paste a trigger to the new Playhead position. You can also right-click it and use commands in the trigger context menu, or use the commands in the dockable toolbar.
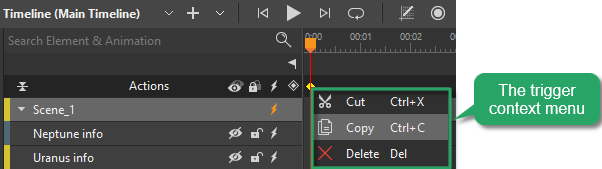
- Cut triggers: Select a trigger, then press CTRL+X. Alternatively, right-click it > Cut from the trigger context menu, or click the Cut command in the dockable toolbar.
- Remove triggers: Select a trigger and press DELETE. Or, right-click and select Delete from the context menu. If you remove all actions bound to a trigger, the trigger is also removed.
As a result, you can create planetary motion in the solar system as the video below:
It’s easy to insert and edit Timeline triggers in Saola Animate 3, isn’t it? Download the app today. Explore it and let us know whenever you need assistance.
See also: