In the Beginner’s Guide, you’ve known the basic workflows to get started with Saola Animate 3. And now, in this article, let’s dive into the core part of this HTML5 animation tool. That’s how to create engaging HTML5 animations step-by-step.
This article covers:
Overview of Animations
Animations are composed of at least two keyframes that define the starting and ending values of a property animation. Particularly, each keyframe specifies a different value of the same property at a specific time. Through these different values, Saola Animate creates a smooth transition of that property over time. As a result, animations are formed by gradually changing from the current style to the new one.
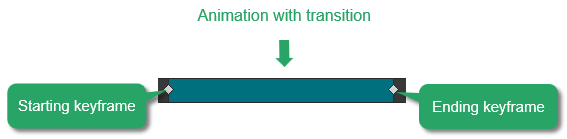
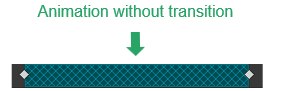
Otherwise, without transition, there will be an instant change in the property value once the Playhead reaches the ending keyframe of the segment.
Create HTML5 Animations
In this step, you will mainly work with the Timeline pane. It is where you devote most of your time to building and editing animations. This can be done easily through adding and managing keyframes.
So, regarding animation keyframes, you may want to take a look at:
For example, suppose that you want to make a boat swayed from side to side like this:

To get it done, just select the boat and do the following:
Step 1: In the Timeline pane, position the Playhead to where you want the animation to begin.
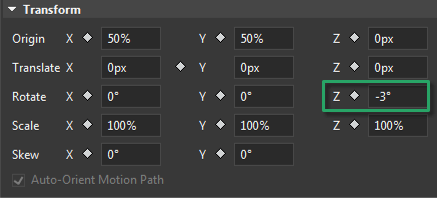
Step 2: In the Properties pane > Position & Size tab > Transform section > click the Rotate Z keyframe diamond to add the starting keyframe (1). Then, adjust the property value of this keyframe as you want.
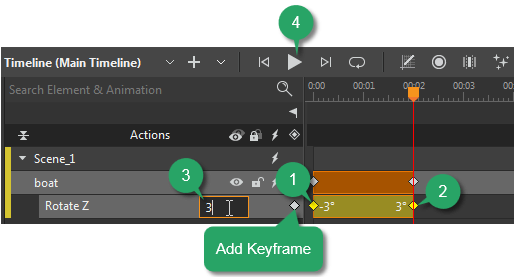
Step 3: Move the Playhead to where you want the animation to end.
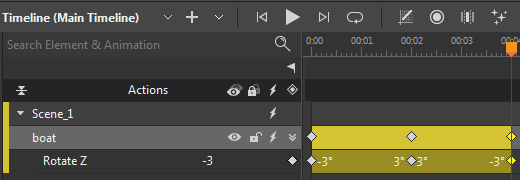
Step 4: Click the Add Keyframe button to add the ending keyframe (2). Adjust the property value (3) of this keyframe (at the Playhead position) in the Timeline pane. You can also change the value in the Properties pane.
After that, this creates an animation segment for the Rotate Z property.
As a result, this animation segment makes the boat tilted slightly from left to right. You can place the Playhead to another position and repeat the steps above to create a swaying animation. Accordingly, the animation in the Timeline pane can be like this:
Step 5: Press SPACE BAR or click Play/Stop (4) to preview the animation.
Note:
- You can generate keyframes automatically to speed up your work thanks to the Auto-Keyframes. Moreover, the Auto-Keyframe range helps you quickly create animations automatically within a specific range.
- When it comes to position animations, motion paths let you animate elements along complex curves to mimic real-life motion.
- You can easily create sprite sheet animations to represent one or several animation sequences while only loading a single image.
- Symbols have independent timelines and interactive capabilities. Use symbols to build complex animations by nesting one animation within another.
Edit Animations
After creating an animation, you are free to make changes to its timing and duration. In addition, using some editing operations such as copying, inverting segments, or managing transition can shorten your work.
Change Timing and Duration
To change the timing, you can drag an animation segment to the left or right. Furthermore, click a keyframe and drag it to change the duration.
Copy Segments
You can copy a segment (CTRL+C) and then paste it onto the timeline of the same or other elements (CTRL+V).
Invert Segments
To swap the starting and ending keyframe of an animation segment, simply right-click a segment > Invert Animation Segment.
Manage Transition
You can make an element gradually change from one state to another over time through the Transition. Otherwise, removing transition makes an instant change in the property value.
To switch between them, right-click a segment > Create Transition/ Remove Transition.
Additionally, it’s better to use different easing functions to control the speed of a transition. Just right-click a segment > Easing… You can customize the easing functions directly in the Timeline pane also.
Those are the basics of using Saola Animate to create HTML5 animations. Hope this helps. Besides, don’t forget to visit our Tutorials page to get Saola Animate 3 tutorials up-to-date.
Read more: