Create Tests with Countdown Timers in ActivePresenter
Let’s grab 4 steps to create tests with countdown timers in ActivePresenter: create tests, add countdown timers, work with countdown timers, and preview & publish tests.
A countdown timer is designed to count down from a specific date or number to 0. People usually use it to count to the end of an offer, for instance. Adding it to a test helps learners know how much time is left to complete the test.
You can create timed tests effortlessly using ActivePresenter elearning authoring tool with Animated Timer.
So, they need to focus on the test rather than wasting time searching in search engines, documents, etc. Besides, time pressure also stimulates them to think fast and respond fast. Because staying too long at a question can make them confused. On the other hand, teachers can work on other tasks instead of watching o’clock during tests.
Ready to create engaging and time-bound quizzes?
If you haven’t downloaded it yet, download ActivePresenter now to create instruction-like tests with an animated countdown timer!

This blog shows you 4 main steps to create:
Let’s get started!
Step 1: Create Tests
The first step to create tests with countdown timers is to create a list of questions. ActivePresenter provides you with 13 ready-to-use question templates. Do either of the following to add a question:
- Open the Home/Insert tab > New Slide > Question layout > click a question icon.
- Select the Interactions button in the Home tab > select a question type you want.
- Open the Questions tab > select a question type.
Besides, ActivePresenter also supports importing questions from GIFT files, CSV files, or importing PowerPoint slides.
By default, learners can interact with questions one time. They get 1 point for each correct answer. However, feel free to customize these values:
- Select the question area.
- Navigate to the Interactivity tab of the Properties pane > Score & Reporting section > adjust the Points and Attempts values.

Read more about questions and how to work with them in this tutorial: How to Create Interactive Quizzes.
Besides, add a report slide at the end of the test to show learners’ results.
Tip: Here are some tips that can help you improve your work:
- Create multiple questions per slide.
- Customize questions in batches by using Slide Masters. In this way, it helps you save so much time and effort. Just do it one time, newly-added slides will inherit the changes you did.
Step 2: Add Countdown Timers
Now, turn to the next step to create tests with countdown timers. Follow either of the ways below to add a countdown timer:
- Open the Insert tab > Animated Timer > Timer.
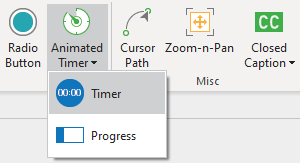
- Open the Home tab > Interactions > Animated Timer > Timer.
You can add countdown timers for each slide to set the time limit for each question or add one for the whole project.
Step 3: Work with Countdown Timers
After inserting a countdown timer, you can edit its size, color, etc. as usual objects. To edit its distributes, select it, navigate to the Interactivity tab of the Properties pane > Timer section:
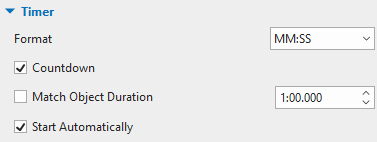
- Format: By default, a timer appears with MM:SS time format. You can select another one in the drop-down list.
- Countdown: This option is selected by default to make it count down. If you deselect this checkbox, it will count up.
- Match Object Duration: Deselect this option and enter the amount of time of a question or test. For example, set 1 minute for a question. In case you leave this option selected by default, you can adjust the timer’s duration on the Timeline pane to define the amount of time.
- Start Automatically: This option is selected by default to make an animated timer start as soon as a timer object starts showing in the main timeline.
When the timer counts down to 0, learners can not interact with the question or test anymore. To make it work this way, you have to add events – actions to it. As mentioned above, you can add countdown timers to each slide or add one to the whole project. Let’s learn how to add events-actions in each case:
Countdown Timers in Each Slide
In this case, countdown timers are inserted into each question slide. When the timer counts down to 0, the presentation will navigate to the next slide. To have it done, select the timer > navigate to the Interactivity tab of the Properties pane > Events – Actions section > add the On Timer Complete event to the timer > add the Go Forward action. Do the same steps for all countdown timers in your test. However, repeating this work in every single slide will take lots of time and effort. So, you can consider this workaround to speed it up:
- Edit timer’s properties as usual.
- Right-click it > Set as Default Animated Timer. Then, newly-added timers will inherit all properties from the default you’ve set.
Another effective way to deal with this limitation is to use Object Settings. However, you need to finish setting before adding timers.
- Open the View tab > Object Settings > Timer.
- Edit timer’s properties as usual.
- Click Close Setting View to save and finish.
- Open the Insert tab > Animated Timer > Timer to insert a timer.
Learners can submit their answers before time out. At that time, the presentation will automatically navigate to the next question slide or the report slide if they finish the test.
Countdown Timers over Slides
To make the countdown timer display over slides, right-click it > Show over Multiple Slides > Top Layer.
In this case, if the timer counts to 0, the presentation will navigate to the report slide. At that time, learners can not interact with the test anymore. The answer will be submitted automatically. To do that, select the timer > navigate to the Interactivity tab of the Properties pane > Events – Actions section > add the On Timer Complete event to the timer > add the Go to Slide action > Report slide.
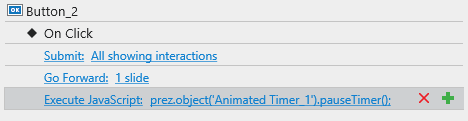
If learners submit all answers before time out, the timer will stop counting. Do as follow to make it work that way:
- Select the Submit button in the last question slide.
- Navigate to the Interactivity tab of the Properties pane > Events – Actions section > add Execute JavaScript action to the On Click event > add this code:
prez.object('Animated Timer_1').pauseTimer();.
Note that Animated Timer_1 in the code is the timer’s name in the project. Remember to customize it.
Step 4: Preview and Publish Tests
After creating a test with countdown timers, you should preview to see if it works the way you want (open the Export tab > HTML5 Preview). ActivePresenter supports exporting tests to multiple formats: HTML5, SCORM, xAPI.
Then, you can upload them to an LMS or embed them on a web server. After that, share the link with learners. By doing so, you can easily track the learners’ results or receive them via email/Google sheets.
So, you’ve learned 4 steps to create tests with countdown timers. Let’s practice creating timed quizzes with ActivePresenter!
Explore ActivePresenter to create eLearning content project now with unlimited trial use (no sign-in required)
Read more: