The Tabbed Toolbar in ActivePresenter 9 is located at the top of the application window. It contains almost all the tools for creating and editing content. It’s a piece of cake to customize the tabbed toolbar depending on your work style.
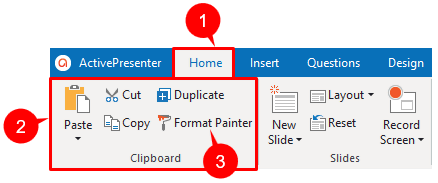
In the tabbed toolbar, the tools can be put together in a tab (1), or group (2). A group consists of some commands. Each command has its own label (3).
The Tabbed Toolbar can be customized easily in the Preferences dialog in ActivePresenter. Follow the steps below to open the dialog:
Step 1: Access the Preferences dialog. You can do either of the following:
- In the workspace > click the ActivePresenter button > Preferences.
- Open the Start Page > click the Preferences button on the left pane.
Step 2: Open the Toolbar tab.
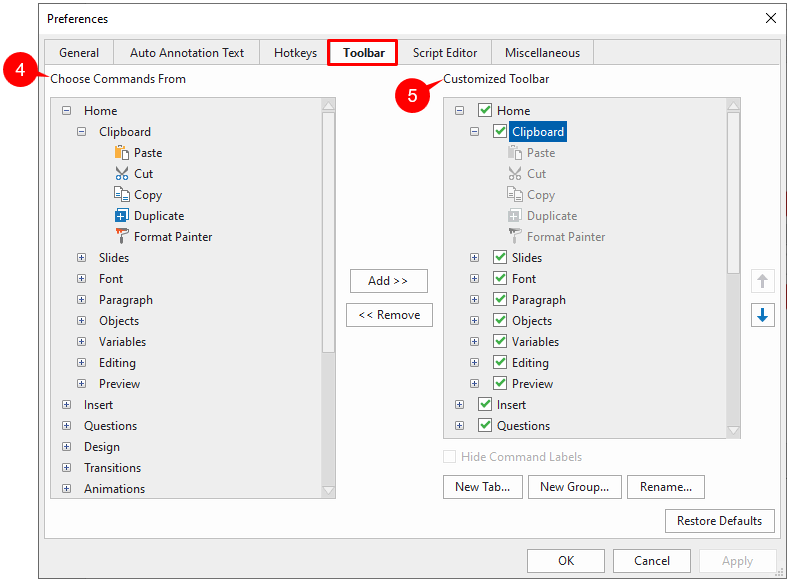
In this dialog, you can see the Choose Commands From section (4) on the left. It contains all commands which are organized in groups. The Customized Toolbar section (5) on the right shows the structure of the current toolbar. To expand or collapse any node respectively, simply click the plus or minus button.
In this tutorial, you will learn how to customize the tabbed toolbar in ActivePresenter 9. The app allows you to:
Create New Custom Tabs and Groups to the Tabbed Toolbar
It is possible to create custom tabs or groups based on your work style.
Create New Custom Tabs
Do the following steps to create a new tab:
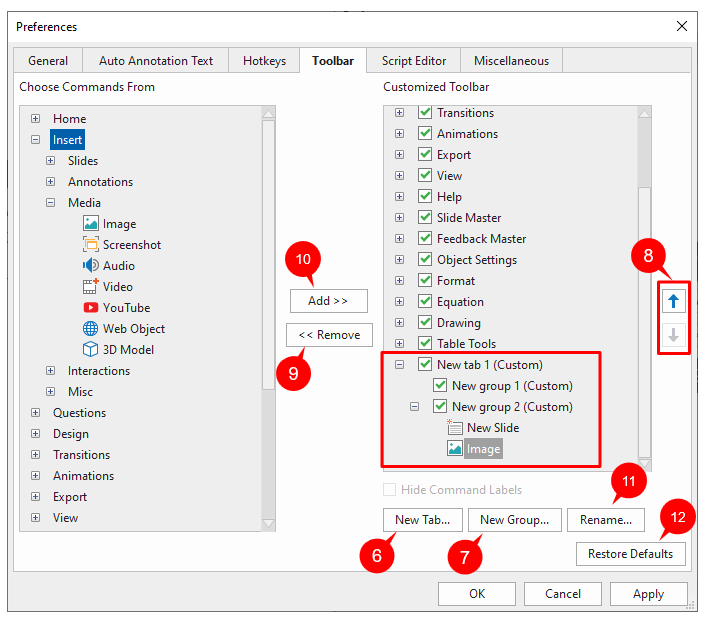
Step 1: Click the New Tab… button (6).
Step 2: Name the new tab in the Name dialog. For example, “New tab 1”
Step 3: Click OK. Then, a new tab will be inserted below all other tabs. In case you selected a tab before adding, it will be inserted under the selected one.
Create New Custom Groups
Besides, you’re able to create new groups, under the default or a custom tab. To do that, follow the steps below:
Step 1: Select the tab you want to add the group into.
Step 2: Click New Group… (7) then, name the newly inserted group, “New group 1”, for example. Repeat this step if you need more groups.
The newly created tab and group(s) have the word (Custom) after their name. This is to distinguish them from the default ones.
Step 3: Add commands to the new custom group. To do that:
- Select the custom group you want to add commands to.
- Select a command in (4).
- Click Add (10). Repeat the steps to add more commands to the groups.
Then, the default commands will be displayed like this:
Customize the Current Tabs, Groups, and Commands in the Tabbed Toolbar
ActivePresenter 9 also lets you customize the current tabbed toolbar. More specifically, it allows you to reorder, remove, add, and rename tabs, groups, and commands.
Reorder Tabs, Groups, and Commands
You can change the order of all tabs, groups, and commands but not the default commands. To do that, in the right box, select the tab, group, or command that you want to move. Then, click Move Up or Move Down (8) until you get the order you want. Finally, click Apply to save and see your changes.
Remove Tabs, Groups, and Commands
In (5), select the group (both default and custom) or tab/command (custom only) that you want to remove from the tabbed toolbar. Then, click Remove (9) to exclude it from view.
Note: To remove the default tabs or groups/commands like the Home or Insert tab, uncheck the relevant check box in the right box. Keep in mind that you cannot hide contextual tabs such as Format or Drawing.
Add Tabs and Groups Back to the Toolbar
After removing a tab or group from view, you can still add it back to the tabbed toolbar by:
Step 1: In the default tabs on the left, select the tab you want to bring it back. In case you want to recover a group, you must select a tab in (5) to place it.
Step 2: Click Add (10) to bring back the selected tab or group. After that, change the tab/group order if needed.
Step 3: Click Apply to save and see your changes.
Rename Tabs, Groups, and Commands
To rename tabs, groups, and commands, do the following:
Step 1: In the right box, select the tab, group, or command that you want to rename. Note that you can rename only commands in custom groups.
Step 2: Click Rename… (11). In the dialog, enter a new name for the tab, group, or command and click OK.
Step 3: Click OK to save and see your changes in the main dialog.
Show or Hide the Tabbed Toolbar
The Tabbed Toolbar is one of the main sections of the workspace, which is shown by default. However, you can hide/collapse it if you want to. For that to happen, simply click the Hide/Show Toolbar button (double arrow) at the top-right corner of the application window. Alternatively, double-click any tab on the toolbar.
Restore Defaults
If you need to go back to all original settings, the Restore Defaults button (12) will help.
Click the button and the toolbar only shows the defaults.
That’s the way to work with the Tabbed Toolbar. Customizing the tabbed toolbar is a good way to help improve your editing performance. Don’t forget to install ActivePresenter 9 and create great things with ActivePresenter today.

Follow our Tutorials page, YouTube channel, and Facebook for more updated information. Don’t hesitate to contact us at support@atomisystems.com if you have any questions!
See also: