Mastering how to align and resize objects using alignment commands is a necessary skill to have. Not only does it allow you to distribute objects in a flash. But it also helps to create a consistent look and feel for your project.
Almost always, when working with a set of objects, you may need to fine-tune their position and size. Doing this by hand is time-consuming and leads to inaccurate results. Thus, it is essential to master all available tools in ActivePresenter 9 to arrange and scale objects early on. In the previous post, you knew about using the Canvas Snapping functions. Today’s article will show you the way to align and resize multiple objects efficiently using alignment commands.
Let’s walk through the following parts:
Download the latest version of ActivePresenter and learn step-by-step:


Align Multiple Objects Using Alignment Commands
Apart from the Gridlines, Guides, and Smart Guides, you can quickly align and resize multiple objects using available alignment commands in the Format tab. Now, just take the following steps to use these commands:
Step 1: Select at least two objects on the Canvas to enable these commands.
Step 2: Right-click the selected object > Align. Alternatively, access the Format tab and click Align.
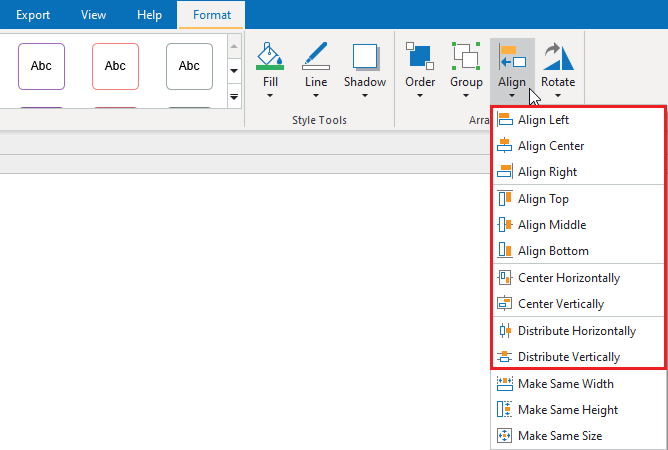
Step 3: Select the desired command from the list.
Keep reading to explore the functionality of each command in the following parts.
Align Objects with Anchor Objects
Sometimes, you have an object’s position set perfectly and you may want to align other elements with it. To do that, initially, you must select at least two elements. The last selected one is the anchor object. It is surrounded by green resizing handles rather than white handles like others. To specify a different anchor object, hold CTRL and click any of the currently selected objects.
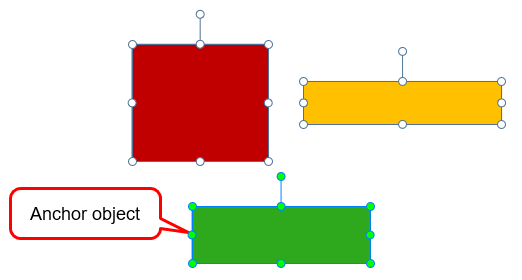
Then, you can use one or many of the following commands to align them as you wish:
- Align Left: Align the left slide of the selected objects with that of the anchor object.
- Align Center: Align the vertical center of the selected objects with that of the anchor object.
- Align Right: Align the right slide of the selected objects with that of the anchor object.
- Align Top: Align the top of the selected object with the anchor object’s.
- Middle: Align the horizontal center of the selected objects with that of the anchor object.
- Align Bottom: Align the bottom of the selected object with that of the anchor object.
Align Objects to the Canvas
In addition, you can also align one or many objects to the center of the Canvas. Just select one of the following commands:
- Center Horizontally: Move the selected objects to the horizontal center of the Canvas.
- Center Vertically: Move the selected objects to the vertical center of the Canvas.
Distribute Objects Evenly
If you arrange objects in a row or column, you may want them to have an equal distance from one another. In that case, you can use the options below:
- Distribute Horizontally: Create equal horizontal spacing between selected objects.
- Distribute Vertically: Create equal vertical spacing between selected objects.
Note: These commands only work when you select at least three objects.
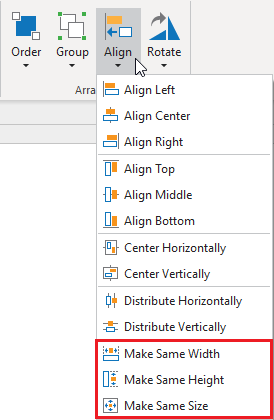
Resize Multiple Objects Simultaneously
Besides using alignment commands to align objects, ActivePresenter 9 also allows you to resize them at once. Depending on the anchor object, you are free to adjust the width, height, or both of the selected objects.
Now, do as follows:
Step 1: Select at least two objects on the Canvas to enable these commands.
Step 2: Right-click the selected objects > Align. Alternatively, access the Format tab and click Align.
Step 3: Select your desired command from the list.
- Make Same Width (1): Make the selected objects have the same width as the anchor object.
- Make Same Height (2): Make the selected objects have the same height as the anchor object.
- Make Same Size (3): Make the selected objects have the same width and height as the anchor object.
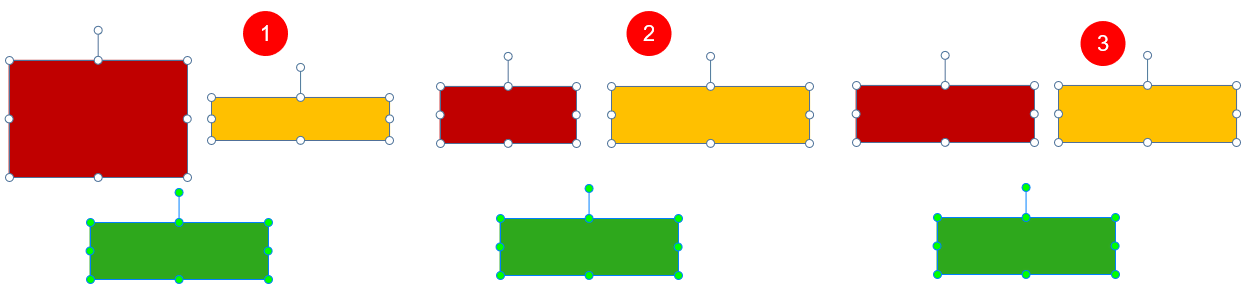
So, it’s easy to make objects that have similar dimensions with just one click.
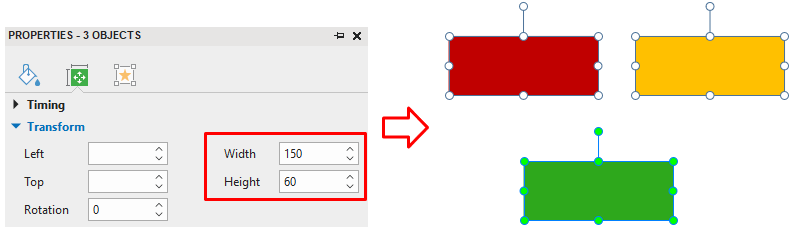
Note: There is another way to resize multiple objects simultaneously by entering the value manually. Just navigate to the Properties pane > Size & Properties tab > Transform section. Then, enter specific values in the Width and Height spin boxes:
That’s how ActivePresenter 9 supports you to align and resize multiple objects using alignment commands. Don’t forget to use those alignment tools to work with objects with ease. Visit our Tutorials page and YouTube channel for more helpful content.
Related Articles: