Key stroke is an interaction object that helps to simulate keyboard actions when interacting with a target software. When you record software simulations, key strokes are automatically inserted whenever you press shortcut keys.
Let’s learn how to work with key stroke object in ActivePresenter 8 in this tutorial.
Insert Key Strokes
Do either of the following ways:
- Open the Insert tab > Key Stroke.
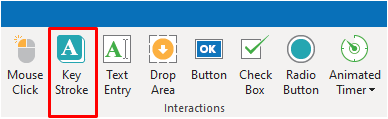
- Open the Home tab > Interactions > Key Stroke.
By default, a key stroke object includes three components:
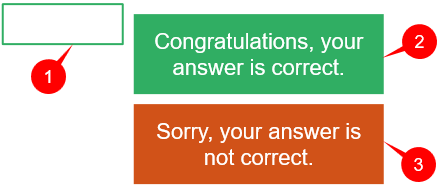
- (1) the target area
- (2) a Correct Message
- (3) an Incorrect Message
When the interactive presentation is played, it will display nothing. It just waits for users to press shortcut keys, for example, CTRL+ALT+H. If the shortcut keys match the reference, the Correct Message (2) appears. Otherwise, the Incorrect Message (3) appears. For example, if the predefined value is CTRL+ALT+H, but users only press CTRL+H without holding down the ALT key, the Incorrect Message will be shown to him to inform that he is doing incorrectly.
By default, the target area (1) is set to be invisible. You can see this default settings in the Properties pane > Size & Properties > Show In Mode:
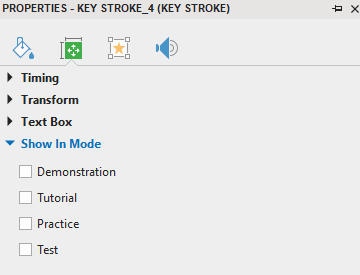
To make the target area visible, select the modes (Demonstration, Tutorial, Practice, Test) that you want.
Set Correct Values for Key Strokes
As mentioned before, a key stroke object has two default feedback messages: Correct (2) and Incorrect (3). You need to help the system understand which are correct actions and which are not by setting the correct values.
To set correct values, do as follows:
Step 1: Select the target area. In the Properties pane > Interactivity tab > General > List of Correct Values > Add Value (4).
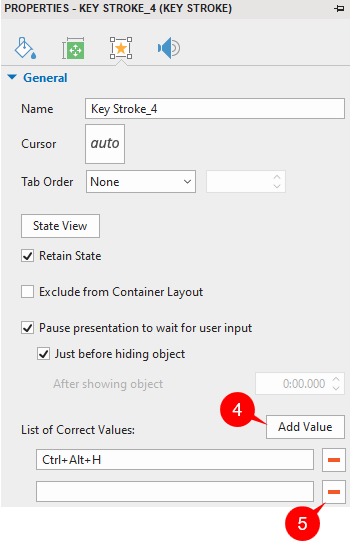
Step 2: Click inside the blank box and press a key with or without modifier keys (CTRL, ALT, SHIFT) to set a correct value.
For example, press CTRL + ALT + H on the keyboard simultaneously, the system will display the correct value Ctrl + Alt + H in the blank box as in the above image.
Note that you can set more than one correct value by clicking on the Add Value button (4) as many times as you want.
If you want to delete a correct value, click on the (5) button to remove it.
Be sure to fully test your key stroke in the published output to avoid any unexpected behavior. Don’t use keys or key combinations that are common in browsers such as CTRL+F or ALT+D.
Set Score and Reporting
Key stroke objects can not only validate user’s actions but also give them points for correct actions. To set points for correct actions, see Set Score and Reporting for Interaction Objects in this tutorial.
Insert and Customize Feedback Messages
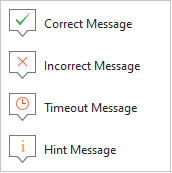
Apart from the default feedback messages, you can add two additional ones, including Timeout Message and Hint Message:
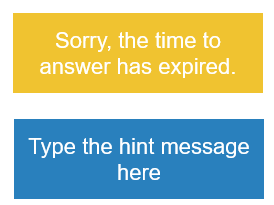
Timeout Message will be shown when users don’t complete an action in the predefined time. Meanwhile, Hint Message will appear when users hover the mouse over the target area.
To add those messages, open the Questions tab > Message. Or, right-click on the target area > Insert. Then, select a message from the list:
Then, you can customize feedback messages as you wish.
For more information, please refer to How to work with Feedback Messages.
Add Events – Actions
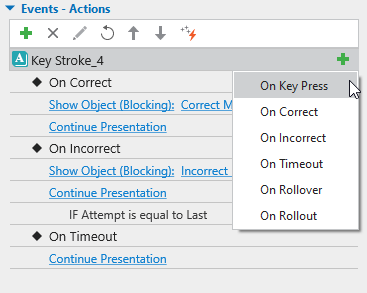
When you add a key stroke object to a slide, it has default events – actions as in the below image:

Except for those default events, you can add three additional ones, including: On Key Press, On Rollover, and On Rollout:
Below is the explanation for the meaning of each event:
- On Key Press: Occur when users complete pressing shortcut keys.
- On Correct: Occur when users press shortcut keys correctly.
- On Incorrect: Occur when users press shortcut keys incorrectly.
- On Timeout: Occur when users don’t respond within the specified time.
- On Rollover: Occur when the mouse rolls over the target area.
- On Rollout: Occur when the mouse rolls out of the target area.
After adding events, continue adding actions to events, and conditions to actions if necessary.
For more details, see Work with Events – Actions.
To better understand, the video below shows you an example of using the Key Stroke feature to move an object in HTML5. Let’s take a look at it:
That’s how to work with a key stroke object in ActivePresenter 8. Download ActivePresenter and make your course more interactive.
Visit the following links if you want to know how to work with other interaction objects: