Slide Names and Numbers play important roles in helping you better identify and manage slides. In this tutorial, you will learn how to add and customize slide names and numbers with ActivePresenter 8.
Slides Names
In ActivePresenter, each slide in a project comes with its default names such as Slide 1, Slide 2, and Slide 3. You can see slide names displaying in both the editing phase and the final outputs:
- The Slides pane when you hover your mouse over each slide.
- The Go-to Slide list when you create the “Go to Slide” action for any object.
- The outline when you export projects to PDF, Word, Excel, and PowerPoint.
- The table of content (TOC) when you export projects to HTML5.
Change Slide Names from the Properties Pane
To name a slide, follow these steps:
Step 1: Select a slide in the Slides pane on the left side.
Step 2: In the Properties pane > Slide Properties > General. Enter a slide name in the Name box. If you want to add more descriptive information or other notes or comments for that slide, just type your text in the Description box.
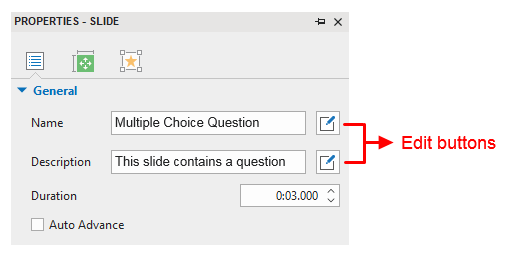
You can further format the style of the slide name or description by clicking the Edit buttons next to the text boxes. Then, a rich text editor will appear:
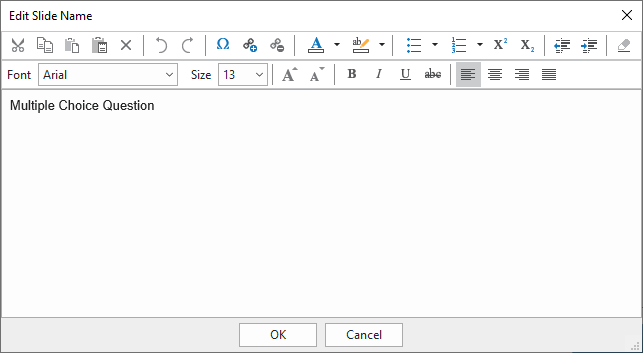
As you can see, this editor contains a lot of commands to style slide names or descriptions. So, keep in mind this feature in case you want to change the formats.
Change Slides Name from the Slides Pane
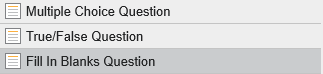
Step 1: Change the view mode of the Slides pane to Slides in Titles by right-clicking the Slides pane, and then clicking Slides in Titles.
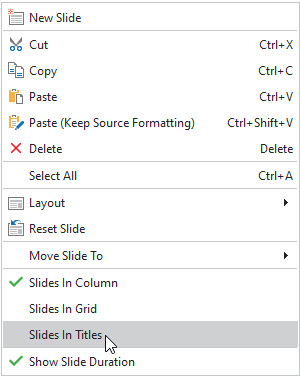
Step 2: Double-click each entry. Alternatively, you can right-click an entry, and then click Edit Name to name a slide.
Note: Keep in mind that ActivePresenters allows you to name many slides the same name. All you need to do is just to select multiple slides that you want to give them the same name and perform the above steps.
Generate Slide Names from First Shape
Another way to name slides is by using a batch operation that generates slide names from the first shape in each slide. This is useful when you want to name slides in a software simulation. Do the following:

Step 1: Click the ActivePresenter button > Project > Batch Operations > Generate Slide Name From First Shape.
This dialog includes:
- The Slide Index represents the slide numbers.
- The Current Name displays the current name of each slide.
- The New Name shows the text inside the first shape of each slide
Step 2: To rename a slide, double-click a name in the New Name column. Or, select any row, then click Edit Name (1). Make sure that the corresponding check box is ticked if you want to apply the change.
Step 3: Click OK to close the dialog and apply the changes.
Slide Numbers
ActivePresenter 8 allows you to insert slide numbers with some simple steps. You can use one of the three following ways to add numbers to all the slides or just a few of them.
Use Slide Footer
Insert Slide Number from Slide Footer
Footer allows you to add dates, slide numbers, and text to the bottom of a slide. To insert a footer, do the following steps:
Step 1: Select a slide in the Slides pane on the left side.
Step 2: In the Insert tab > Footer. This shows the Slide Footer dialog.
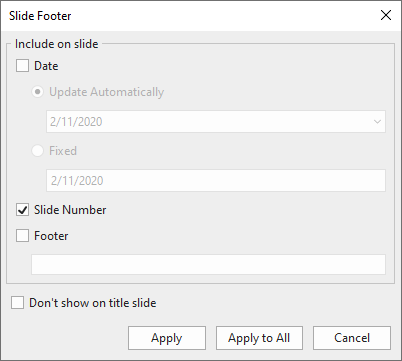
Step 3: Select the Slide Number check box. If you don’t want to show the slide number in the title slide, select Don’t show on title slide.
Step 4: Click Apply to insert a number to the selected slide. This number is also the one you see at the bottom-right of the slide in the Slides pane.
Or, click Apply to All to add numbers to all slides in the current project.
Customize Slide Number in Slide Masters
Using Slide Masters, you can customize the style of slide number for multiple slides. The change applies to all slides which use these footers. Besides, you can also change the style of the slide number footer for each slide.
Step 1: In the View tab > Slide Master. This opens the Slide Master View.
Step 2: Select the slide master.
Step 3: In the Slide Master tab > Master Layout. Then, select the Slide Number check box.
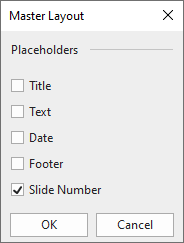
Then, you will see a placeholder with a code <#> like this.

Step 4: Change the style of the above placeholder (e.g. size, position) as you do for a normal object.
Step 5: In the Slide Masters tab > Close Master View.
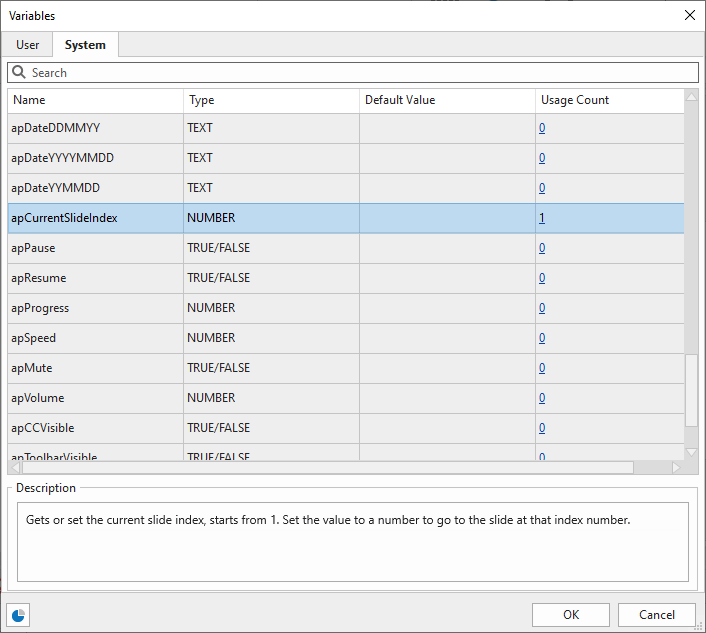
Use Variables to Add Slide Numbers
Another way to change slide numbers is by using Variables. Just use the “appCurrentSlideIndex” system variable and insert it into a shape or text caption to show the current slide number.
Step 1: Insert a text caption (or a shape) to the first slide that you want to add the number. You need to click the Insert tab and then click Text Caption (or Shape).
Step 2: Add variable to the text caption. In the Home tab, click Reference, and then select apCurrentSlideIndex in the system tab of the Variables dialog.
Step 3: Click OK to close the dialog and apply the variable to the slide.
Note: You can apply slide numbers for other slides in the current project by right-clicking the Text Caption or the Shape, and then click Show over Multiple Slides > Top Layer.
For more information about using variables, please see Overview of Variables and How to Add Variables.
Now that you have learned how to add and customize slide names and numbers. Don’t forget to work with this feature when creating projects in ActivePresenter 8. Feel free to download the app and contact us if you need any help.
See Also: