In Saola Animate 3, you can easily control video and audio playback either manually or automatically. There is more than one way to do that, which will be revealed in this tutorial.
This tutorial covers:
Play Video/ Audio Manually
Video and audio playback can be initiated manually by user gestures, such as a mouse click. There are two ways to let users play video/ audio manually in Saola Animate. The first way is to use Player Controls. Besides, users can interact with a button.
Use Player Controls
Player Controls (also Media Controls) allow users to play video/ audio manually. To display the Player Controls in Saola Animate, do the following:
Step 1: Select a video/ audio.
Step 2: Navigate to the Properties pane > General tab > Media section > select Controls (1):
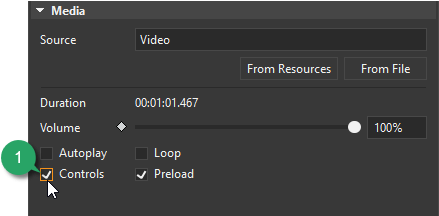
The Player Controls can differ in the look and function between browsers. That said, there are typically a play/pause toggle, a seek bar, a time counter, and a volume control.

Create Interactive Buttons
Besides the built-in controls, you can create custom ones. That way, you can customize their look and feel.
Do as follows:
Step 1: Create a button (by inserting a DIV, shape, freeform, or an image).
Step 2: Assign events – actions to the button.
Normally, you may want to add the Mouse Click event (2) to trigger a Media action (3):
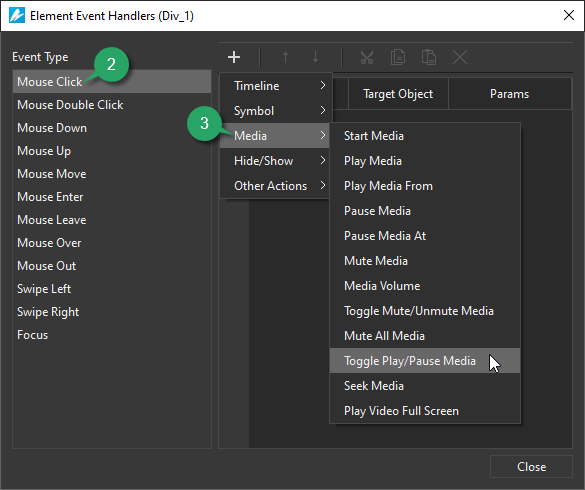
For example, you can select the Toggle Play/Pause Media action to create a play/pause toggle.
In addition, you can use the following ones:
- Start Media: Start the playback of the video or audio.
- Play Media: Resume the playback of the video or audio.
- Play Media From: Resume the playback of the video or audio from a specific time.
- Pause Media: Pause the playback of the video or audio.
- Pause Media At: Jump to and pause at a specific time of the video or audio.
- Mute Media: Mute the video or audio.
- Media Volume: Change the volume of the video or audio.
- Toggle Mute/Unmute Media: Mute or unmute the video or audio.
- Mute All Media: Mute all video and audio elements in a scene.
- Toggle Play/Pause Media: Toggle the playback of the video or audio.
- Seek Media: Jump to a specific time of the video or audio without affecting whether it is playing or paused.
- Play Video Full Screen: Play the video on full screen.
Anything beyond these can be done with the support of custom JavaScript functions. Navigate to the Functions pane and create your own functions to fulfill your needs.
Play Video/ Audio Automatically
HTML5 video and audio can start off automatically by certain attributes and methods. In detail, there are three ways to achieve that: enable the Autoplay attribute, use timeline triggers, or create playback animations in the Timeline pane.
Before getting to know these 3 ways, be aware that mobile browsers commonly disable automatic playback to protect user’s bandwidth and avoid usability problems. For example, a web page contains background music that plays as soon as it loads. It can be annoying for those in a public setting such as the library or for those using screen readers. So, be careful when playing HTML5 video and audio automatically.
Autoplay Video/ Audio
To enable the Autoplay attribute, do the following:
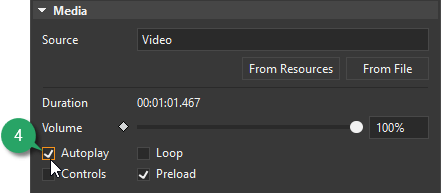
Step 1: Select a video/ audio.
Step 2: Navigate to the Properties pane > General tab > Media section > select Autoplay (4).
That way, a browser will start playing a video/ audio once it loads.
Note:
Mobile browsers commonly ignore this attribute to prevent consuming data. Instead, the choice to play audio or video is user-driven. It means users must explicitly trigger the playback, such as tapping the screen.
Use Timeline Triggers
In the tutorial about how to use timeline triggers, you already know that actions can occur without user control thanks to timeline triggers. You can add timeline triggers along the timeline to play a video/ audio automatically. Do as follows:
Step 1: Select a video/ audio. Then, place the Playhead at the timestamp you want it to start playing.
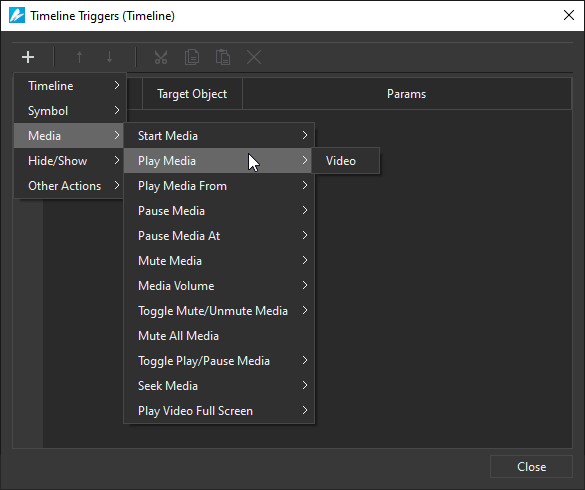
Step 2: Click the Insert Trigger button (5) or press Alt + T on your keyboard:
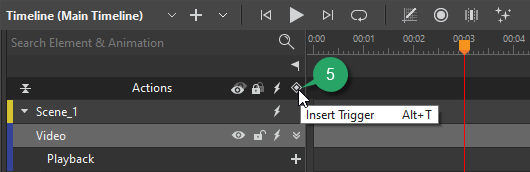
Step 3: The Timeline Triggers dialog pops up. In this dialog, you can select Media action from the list:
Create Playback Animations
Creating playback animations is another way to play a video/audio without user control. In the Timeline pane, click the Add Playback button (6), then select an action from the list:
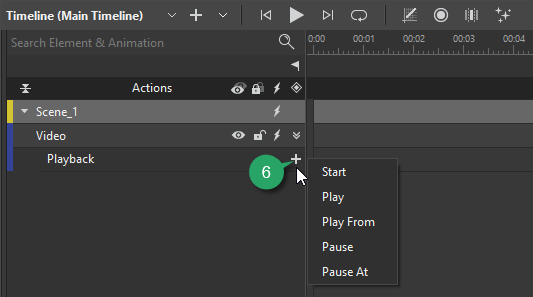
- Start: Start a video/ audio from the beginning.
- Play: Resume a video/ audio from the point where it has been paused.
- Play From: Resume a video /audio from a specific time.
- Pause: Pause a video/ audio at the current time.
- Pause At: Jump to and pause at a specific time of a video/ audio.
Note: You can adjust playback animations by the following ways:
- Drag the playback icon to where you want the control to take effect.
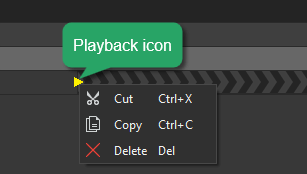
- Cut, copy, or delete the control by right-clicking the playback icon and selecting a command. You can also use shortcuts on your keyboard.
- Change the control by double-clicking the playback icon. Then, click the drop-down arrow to select a control from the list:
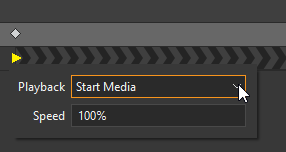
This way also allows you to adjust the playback speed of the video/ audio.
Note: Be careful when using the combination of playback animations and timeline triggers together. Let take an example. Assume that you create a playback animation to make a video start playing from the beginning (in the Timeline pane > click the Add Playback button (6) > select Start). Besides, you create a trigger to pause the main timeline. In this case, the video will also be paused as a result of the timeline trigger. Meanwhile, if that video is initiated by the Autoplay attribute (4), it will still play.
That’s how you control video and audio playback in Saola Animate 3. Hope this helps.
Related Articles: