ActivePresenter – The most powerful & popular video editing tool
As you know, ActivePresenter has become an indispensable screencast tool for users around the world. Millions of free and paid users are working with it every day to create wonderful training videos, tutorials in project formats. It is considered to be best screen recorder and screencast video editor as well the most powerfull elearning authoring tool of all time. After working hard to achieve a favorable project with ActivePresenter, you must want to export it properly. ActivePresenter makes many output formats available (videos, images, HTML, documents, etc.), depending on your final goal, you should select the right one. Saying that, if a demonstration that does not require user interactions in a self-pace manner is what you want, then video format is a smart choice. In the scale of this article, I will show you how to export your projects to videos.
Export project to video demonstration
Do as followings to get it done:
-
Open the EXPORT tab. (1)
-
Select Video icon. (2)

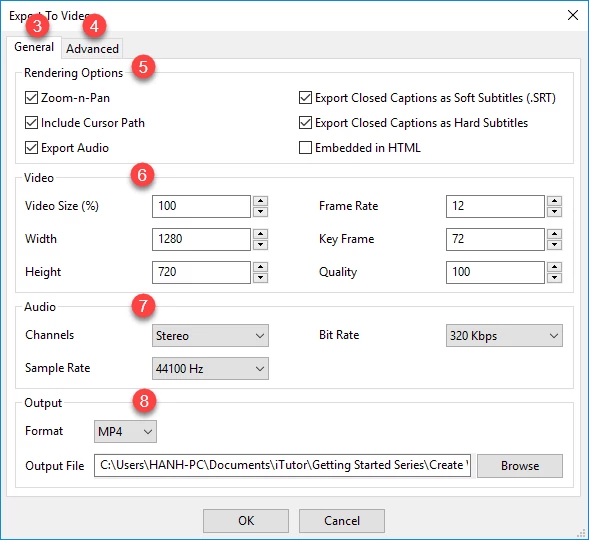
After that, you will see the Export to Video window having two tabs containing options for your exported videos. They are General tab (3) and Advanced tab (4) which we will dive deeper into the exporting process.
-
Working with the General tab.
This tab brings you four big groups of options allowing you to have the adjustments in Rendering, Video, Audio and Output Options.
Rendering Options
Under the Rendering section (5), you can choose which property will be rendered in your exported video by checking their check boxes.
Zoom-n-Pan: Your output video will show the zoom effect that you’ve inserted in.
Cursor Path: Your output video will include the mouse cursor and mouse movements.
Export Audio: If you select this, all of the audio file in your project will be exported, hence, it can be displayed in the video.
Export Closed Captions as Soft Subtitles (.SRT): If you select this one, ActivePresenter will export your project to a video along with a separate subtitle file with .srt extension. Hence you can edit the font size and color of the subtitle, change its language.
Export Closed Captions as Hard Subtitles: Check this checkbox you want the Closed Captions to be hard-coded inside the video. In this case, you cannot change any attribute of the Closed Caption anymore.
Embedded in HTML: If you select this one, your project will be exported to video and embedded in HTML page to be viewed in a browser.
Videos Options
Under the Video section (6), you can change a lot of the video’s properties.
Video Size (%): This lets you set the size of the exported video basing on the canvas size that you defined before creating the project.
Width and Height: You can define the width and height of the exported video respectively. They will be automatically calculated whenever you specify the video size. And vice versa.
Frame Rate: You can set the Frame Rate between 1 and 30 frames per second. A higher frame rate may increase the video size. The most commonly used range is 20-30 frames/s.
Key Frame: Define the number of frames between which we must have a key frame.
Quality: Define the video quality in the range from 1 to 100. Higher value, better video quality and larger file size.
Audio Options
The Audio section (7) enables you to change the properties and quality of the audio file in the output video.
Channels: Select the audio channel from mono or stereo. In comparison with mono, the stereo channel needs double file size.
Sample Rate and Bit Rate: They allow you to select the sample rate and bit rate from the drop-down list. They define the audio fidelity of your exported video and the higher value, the higher audio quality and the bigger file size.
Output Options
Now comes the final option of the General tab which is the Output options (8).
Format: Access the format drop-down list and choose the format that fulfills your requirements. (MP4, FLV, AVI, WMV, WebM, MKV)
Browse: Then specify the file path and name for your video.
-
working with the Advance tab.
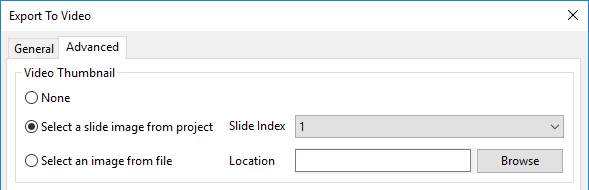
Now, we will get to know the Advanced tab containing the options for Video Thumbnail. Bear in mind that this tab is only activated when you choose to embed your video to HTML.
None: Check this if you don’t want to have any video thumbnail.
Select a slide image from project: Check this and choose the slide to set it as a video thumbnail.
Select an image from file: It allows you to select a thumbnail from an image on your computer.
So, now you know how to export your ActivePresenter projects to videos. Hope that it helps in certain ways.
Related tutorial: Exporting ActivePresenter projects to HTML5 Simulation