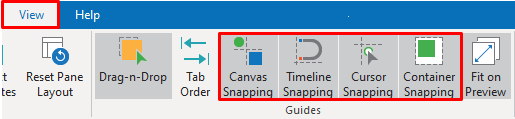
How to Use Snapping Modes in ActivePresenter 8
Snapping modes help you easily align objects whether they are on the Canvas or in the Timeline. There are four snapping modes in ActivePresenter 8 including Canvas Snapping, Timeline Snapping, Cursor Snapping and Container Snapping. Let’s learn about them in today’s tutorial.
Canvas Snapping
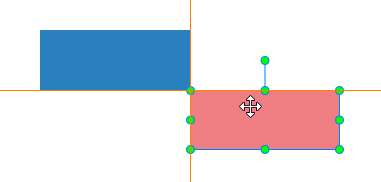
The first snapping mode in ActivePresenter is Canvas Snapping. It helps a lot when you move, resize, and rotate objects.
When canvas snapping is on, as soon as an object comes in the vicinity of another object or the Canvas, it will make a tiny jump to match the edge of each other. Vertical and/or horizontal orange lines will appear to visualize the alignment.
Canvas snapping is enabled by default. To disable it, click the View tab > Canvas Snapping. Temporarily disable canvas snapping by holding down ALT when you drag or resize objects.
Tip: Take a look at Align and Resize Objects Equally.
Timeline Snapping
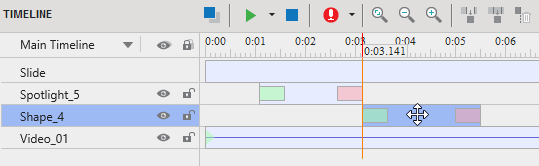
With the Timeline snapping mode in ActivePresenter, you can align different objects more easily and precisely in the timeline. When the snap mode is on, as soon as a moving “snappable” object comes in the vicinity of another “snappable” object, it will make a tiny jump to match the timestamp of the other object.
Timeline snapping applies to the following timeline items:
- In ruler area: Playhead, start marker and end marker of the range.
- In the time bars of objects: Starting and ending edge, all markers inside the object time bar.
- Others: Start and End point of the slide.
Timeline snapping is enabled by default. To disable it, click the View tab > Timeline Snapping. Temporarily disable timeline snapping by holding down ALT when you drag an object’s time bar.
Notes:
- The “other object” may be anywhere in the timeline: Right from the ruler to the lowest object’s time bar. The vertical separation between the objects doesn’t matter at all.
- You may not be dragging the “snappable” object itself. For example, when we drag a time bar of an object, all “snappable” objects in the bar are moving simultaneously. Any of these objects can snap to another snappable object.
Cursor Snapping
Cursor snapping mode is designed for cursor path, especially when you record software simulations. It helps move the corresponding point in the previous/next slide to ensure a smooth mouse movement.
If you don’t want the cursor path to move continuously between slides, click the View tab and turn off Cursor Snapping.
In rare cases, the cursor path can be out of sync. For example, when you delete a slide that is in the middle or delete the cursor path in that slide. This results in an abrupt movement of the mouse cursor in the rendered presentation when the slide changes. To avoid this, you can again stitch the ends of cursor paths of adjoining slides together. Do the following:
- Right-click the start point > Snap to Previous.
- Right-click the end point > Snap to Next.
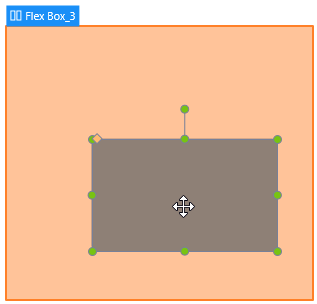
Container Snapping
When you select a container (Flex or Grid), the Container Snapping mode will be enabled by default. That is to say, when you move objects into a container layout, objects will be automatically snapped to that layout (the container turns orange).
Any object can be included in or excluded from the container layout. If an object is excluded from the layout, which means it will not be dragged into that layout, you are free to place them anywhere on the slide. To make one or more objects excluded from a container layout, you can select them first and then do either of the following:
- Right-click the objects > Exclude from Container Layout.
- Go to the Properties pane > Interactivity > General > select the Exclude from the Container Layout check box.
- You can temporarily disable the snap behavior by holding down ALT while moving objects. Or turn off this mode by clicking the View tab > Container Snapping.
You’ve learned about four snapping modes in ActivePresenter 8. Work smarter with these little helpful features!