Footer is useful when you want to add more detailed information like slide number and date. Basically, a Slide Footer area can include three placeholders: Date, Footer, and Slide Number. You can insert footer elements (date, footer text, and slide number) into these placeholders. We’ll guide you on how to insert a footer in this tutorial.
Insert a Footer
ActivePresenter allows you to insert a footer into a specific slide or multiple slides at the same time. Perform the following:
Step 1: Select a slide in the Slides pane on the left side.
Step 2: Click the Insert tab, and then click Footer. After that, a Slide Footer dialog will appear like this.
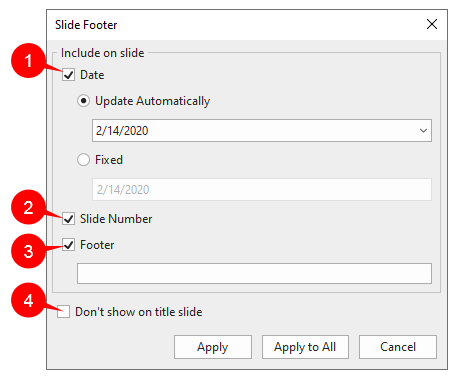
Step 3: Work with options (1, 2, 3) in the Slide Footer dialog to insert footers. These options will be described later.
Step 4: (Optional) To hide the date, footer text, and slide number on the title slide, select Don’t show on title slide (4).
Step 5: Click Apply to save changes. If you wish to apply the changes to all slides in the current project, click Apply to All.
Then, you see the Slide Footer like the below screenshot.

Insert Date into Slides
To make the date appear on slides, select Date (1). Then, you have the following two options:
- Update Automatically: Select it if you want the date to reflect the current date each time you open or print the project. You can choose the date format from the list.
- Fixed: Select it to set the date to a specific date. Do this by typing the date you want to the Fixed box. After that, the date remains the same no matter when or where you edit or deliver your presentation.
Insert Slide Numbers into Slides
To add slide numbers, select Slide Number (2). For the detailed procedure, see Add Slide Names and Numbers in ActivePresenter 8.
Insert Footer Text into Slides
Footer text is where to add a message, copyright, or anything you want to be visible on slides. To add a footer text, select Footer (3). Then, type your text in the Footer box.
Note: If Slide Footer doesn’t appear on any slide, placeholders might be removed from specific slide layouts. To show Slide Footer again, open the Master View and select Footers in the Slide Master tab. See Use Slide Masters for more information.
Customize a Footer
After inserting Slide Footer into slides, you can reposition, format, and style footer elements on a specific slide or on multiple slides at once.
- To customize footer elements on a slide, apply the same steps as when you do this with a normal shape. See Inserting and Styling a Shape for more details.
- To customize footer elements on multiple slides at the same time, use Slide Master. Note that the changes you’ve made only affect footer elements on slides that use the same Slide Master as the selected slide. It has nothing to do with footer elements on slides that apply to other Slide Masters.
Remove a Footer
You’re free to remove footer elements on a specific slide or all slides. Do any of the following:
- Click a date/footer text/slide number placeholder and press DELETE.
- Right-click a placeholder and select Delete.
To remove the Slide Footer of all slides, go to the Insert tab > Footer. Then, deselect the Date, Slide Number, and Footer check box. Click Apply to All to finish.
So, that’s how to insert a footer in ActivePresenter 8. Remember to use this technique to add footer-type information to your slide. Download ActivePresenter and start creating your own project now.
See Also: