With ActivePresenter 8 – professional screencast software, you can record the screen and webcam simultaneously. This is a handy feature for creating video demos, how-to videos or interactive eLearning courses where visible instructions needed.
Besides, ActivePresenter 8 also allows you to record webcam separately and save videos to use in your projects.
Let’s get to know how to do that in this article.
Record Webcam and Screen Simultaneously
Recording webcam and screen simultaneously is critical especially in creating video demos. With this feature, you can record the screen with all the actions and sounds happened along with your voice if needed.
Access the Record Video Function
To record screen and webcam together, firstly, you have to access the Record Video function.
Remember that if you select Record Software Simulation, recording webcam is not available. In other words, you cannot record software simulation and camera simultaneously.
Now, take the following steps to do that:
- On the Start Page, click Record Video.
- In the current working project, click the ActivePresenter button > Record Video.
- Click the Home tab > Record Screen > Record Video.
After that, ActivePresenter will launch a blue rectangle and a Record Video Project dialog where you can access the Webcam Recording feature.
A completed tutorial about how to record video demonstrations is available on our tutorial page, feel free to take a look for more details if needed. In this tutorial, we will only focus on the Record Video Project dialog.
Enable Webcam Recording
In the Record Video Project dialog, if the Webcam button is grey, you need to click to enable it. If the button is already green, that means the webcam recording has been enabled. Then, a live preview of the camera will appear next to the webcam option.
ActivePresenter allows you to have many settings for the webcam by clicking the drop-down arrow next to the Webcam button and selecting Format Settings… They will be discussed in details in the latter part of this article.

Record Webcam Only
ActivePresenter 8 also allows you to record the screen and webcam separately. This means that you can record camera, save videos, and insert them into slides to use in projects.
Note: Webcam videos are treated as normal videos, so you can take advantage of many video editing tools such as cut/crop/insert time, etc., to enhance them if you want.
Now, to get it done, open the Insert tab > Video button > Webcam Recording.
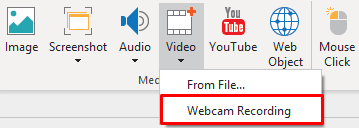
After that, the Webcam Recording window will appear:

Webcam Section
The webcam section contains a live preview and many other setting options.
Select a device detected from the Device list.
- Click Refresh to detect new webcam device.
- Click Settings to open the dialog for the webcam format settings.
These setting dialogs will be explained in the Webcam Settings section.
Audio Section
- Select an audio device from the Device list.
- Click the Volume button to change the audio input volume.
- Click the Calibrate Input… button to calibrate audio input.
ActivePresenter allows calibrating the sound level before actually recording to make sure that the sound level is good enough.
Detailed information about this feature can be found in How to Calibrate Audio Input and How to Record Video Demonstrations.
Webcam Settings
Normally, Webcam Recording feature in ActivePresenter 8 has default settings that are ready to go. However, you can have further settings and changes when needed.
Webcam Settings dialog allows adjusting the video format and compression:
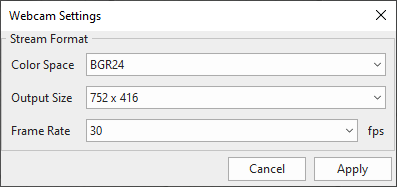
- Color Space: Select one from two default values for this option.
- Output Size: The dimension of the recorded video.
- Frame Rate: Change the recording frame rate for webcam. A higher value will make the motion in the video smoother but larger file size.
Note:
- When finishing recording webcam and screen simultaneously, the result you get is a slide that displays the captured video with the webcam video placed at the bottom-right corner.
- The webcam video is also a video object, you can edit it as a normal video and drag it to any position you want.
- The webcam video should not have too large in size, otherwise it may cover the important content of the captured video.
From now on, you can use ActivePresenter to record webcam and screen simultaneously to create professional training videos. You can also use this feature to create interesting eLearning courses with visual instruction included.
I hope that you enjoy the tutorial and feel free to contact us if you have any obstacles.
Related articles: