Welcome back to ActivePresenter 7 tutorial series.
This article will show you how to record system audio and record microphone audio in ActivePresenter 7. They are two of the most important features that professional screencasting software like ActivePresenter must have. Thanks to that, you can record your narration and system audio (from the speaker) simultaneously or separately; it all depends on your need.
Access Recording Function
Recording audio from your computer can make your video demos or software simulations more fun to watch. It also makes them easier to notice and understand. For example, a streaming video with both actions and corresponding sounds can bring a better experience to viewers.
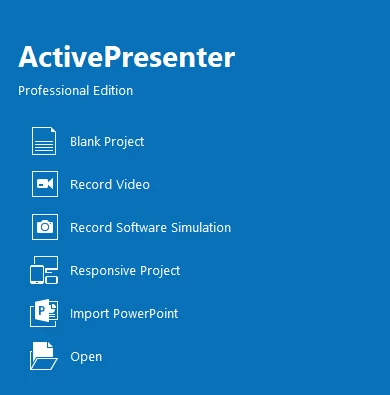
To start capturing, on the Start Page, click Record Video or Record Software Simulation:
To know more about these two kinds of recording, refer to Recording Software Simulations and Recording Video Demos.
For this tutorial, I’ll demo with recording a video demo that audio and screen recording simultaneously usually needed.
Note: Mouse click properties are also important in recording. If you want to include or change the mouse click sound and effect to make your projects more engaging, refer to Changing Mouse Cursor and Mouse Click in Captured Videos.
Record System Audio
After selecting the recording function (here is Record Video), you will see a blue rectangle and Record Video Project dialog appear.
Take the following steps to record system audio:
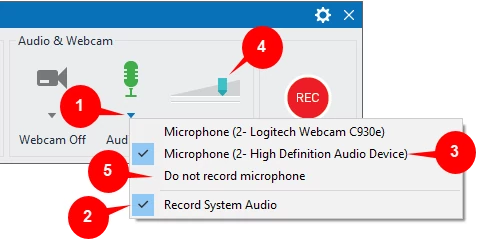
Step 1: Click the Audio button (1) on the Record Video Project dialog.
Step 2: Select Record System Audio (2).
Step 3: Adjust system audio volume.
The volume of the system audio can be changed easily by using the Adjust Volume tool on your computer.
If you don’t want to record system audio, just deselect the option.
Note: When you select to record system audio, all of the sounds on your computer including app notifications will be recorded. So, you should turn off notification sounds of unused apps to avoid any unwanted sound.
Record Microphone Audio
Tip: You should not record software simulations and audio from microphone simultaneously. Since the recorded audio file may be saved in different slides, it’s not easy to control and edit. Narration or audio from microphone should be recorded after the simulation recording is finished.
In order to record microphone audio during recording video demos, do the following:
Step 1: Click the Audio button on the Record Video Project dialog box (1).
Step 2: Select one from audio input devices detected (3).
Step 3: Change input audio volume by dragging the Volume scale (4)
Click Do not record microphone (5) to disable this function.
To record narration from the editor:
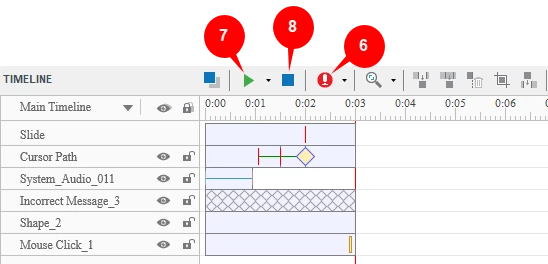
Step 1: Click the Record Narration button on the Timeline (6).
The Record Narration button will appear to be disabled and you can speak into the microphone.
Step 2: Click Pause/Resume button (7) to pause and resume the recording.
Click the Stop button (8) to stop the recording.
After recording, ActivePresenter will save the recorded audio file in the current slide that you are working with.
Note: You can manage and edit your recorded file as a normal audio file. This means you can take advantage of many audio editing tools such as cut, change volume, etc., to enhance it.
Test Sound Before Actually Capturing
To have a recording project with a high sound quality, you should test the sound before actually capturing. This ensures your project will have a proper sound level.
To test the input audio level, do one of the following ways:
#1. Speak something into the microphone while dragging the Volume scale (5) to the left or right to change the audio input volume.
- Keep dragging until the volume scale displays in yellow signal since. At that level, the volume is high enough for recording.
- If the volume slider displays the red or green color signal, you should decrease or increase the input volume respectively.
#2. Calibrate audio input.
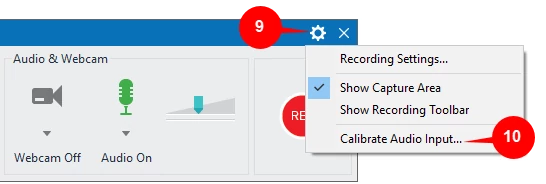
Step 1: Click the Settings icon (9) in the top-right corner of the Record Video Demo Project dialog.
Step 2: Select Calibrate Audio Input…(10).
The Calibrate Audio Input dialog will appear:
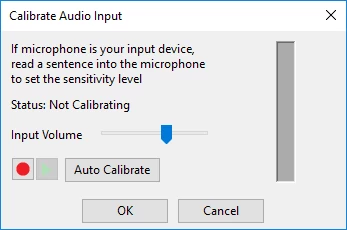
In this dialog, click Auto Calibrate and speak something into the microphone in your normal voice.
Keep speaking until the LED bar on the right shows yellow bars intermittently. If the bar starts showing red LEDs, move the slider a bit to the left.
To know in details how to calibrate audio input, refer to the Calibrating audio input tutorial.
So, that’s enough for recording system audio and audio from microphone in ActivePresenter.
Download ActivePresenter today and start to create impressive screencasting projects with this feature. Don’t forget to visit our blog for more useful information and tips for using the app.