It can be said that vocabulary is the fundamental element of all languages and helps develop other language skills. Using vocabulary games not only helps students to better retain new words but also allows them to practice vocabulary in a fun way.
According to David A. Wilkins, a British linguist: “Without grammar, very little can be conveyed; without vocabulary, nothing can be conveyed”. Vocabulary plays a vital role in learning any language. However, vocabulary acquisition can be challenging, especially for young learners who get distracted easily. Therefore, innovative approaches are needed to support the learning of vocabulary, one of which involves using games. So, do you wonder how vocabulary games are created? This blog will walk you through steps to make a simple vocabulary game with ActivePresenter, one of the best eLearning authoring software for teachers and trainers.
You can download a sample project here. Note that you can open the project only if you install ActivePresenter on your computer.
Table of contents
Vocabulary Game Introduction
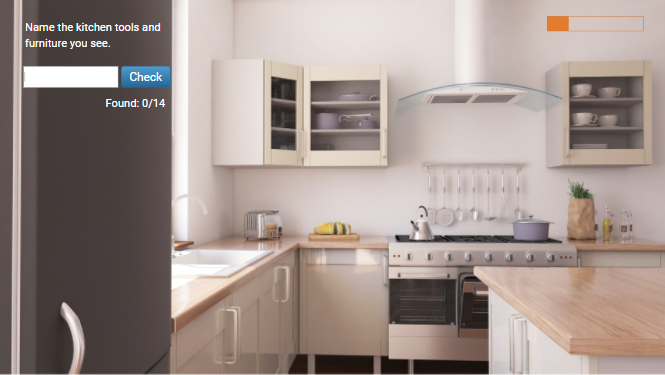
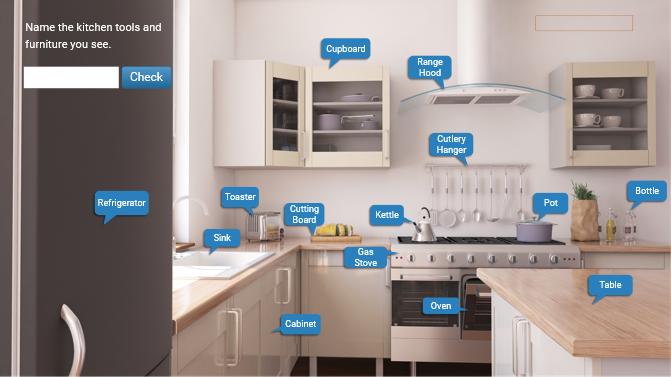
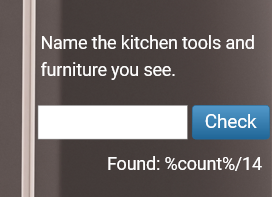
In this game, there is a picture that includes many objects related to a random topic. Players have to guess their names and then type the answers into a text box. This vocabulary game not only reduces the boredom of your classroom but also helps students concentrate and remember new words better.
Vocabulary game design
Game Rules
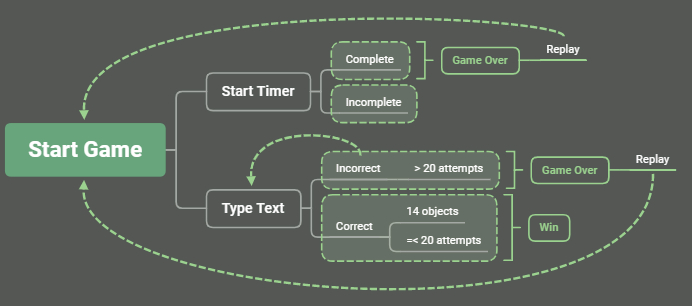
When the game begins, the timer starts counting. There are 14 objects in a picture. Within 2 minutes, players type the names of the objects they can see into a text box. Then, they press Enter or click the Check button to submit the answer.
The players will receive 1 point for each correct answer over a possible total of 14 points. Both wrong and unanswered questions result in 0 points, and then they can try again.
Within 2 minutes and not exceeding 20 attempts, the players who name all 14 objects correctly win.
If the time is up or attempts exceed 20, they will lose the game.
Steps to Make a Vocabulary Game
This vocabulary game has three steps: adding a question and slide background, adjusting the question, and adding the introduction. To make this game, you will mainly use the Fill in Text Entry question in ActivePresenter. Aside from this, you will need to know some information about other features such as events – actions, animated timers, advanced actions, variables, and buttons.
1. Adding a Question and Slide Background
First, you add a question by accessing the Questions tab, then clicking Fill in Text Entry.
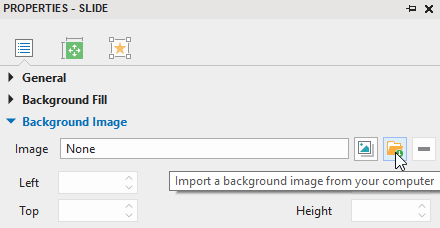
After that, you add a background image to this slide. (In the Slide Properties pane > Background Image > Import a background image from your computer.)
2. Modifying the Question
As the most critical step in creating the game, the adjusting question step includes many activities. For your convenience, those actions are listed below.
- Adding shapes containing objects’ names
- Adding correct answers
- Setting attempts to the question
- Display the number of objects answered correctly
- Setting up events-actions for the text entry
- Customizing feedback layers
- Creating an advanced action
- Adding events-actions to the text entry
- Inserting an animated timer
Adding Shapes Containing Objects’ Names
You can customize the question and fit it to the background. For example, change its position, size, color, and button name. After that, you add 14 shapes (In the Insert tab > Shapes). Then, you type into one shape with an object’s name.
In this vocabulary game, the shape will not appear until the players name an object correctly. Therefore, you need to hide all of them initially by right-clicking them and selecting Initially Hidden.
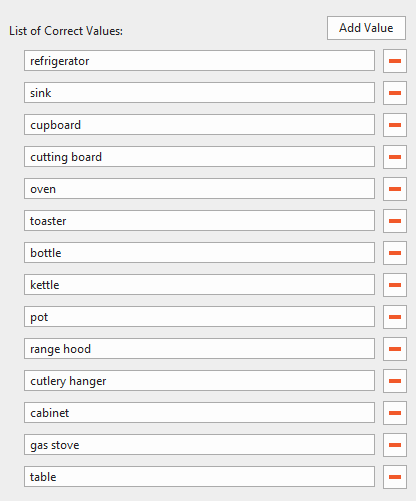
Adding Correct Answers
Now you add correct answers for this question. Select the text entry > open the Properties pane > General > click the Add Value button and type the answers into the blank box.
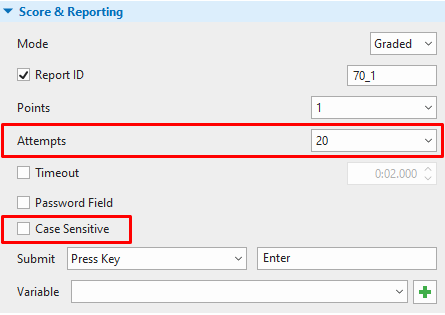
Setting Attempts to the Question
There are 14 objects in total. So, you can set many attempts you want as long as they are more than 14. For instance, you can set it to 20 in the Score & Reporting section. Then, uncheck the Case Sensitive option so that the uppercase and lowercase characters are treated the same. For more information, please refer to this tutorial.
Displaying the Number of Objects Answered Correctly
A Found box displays the number of objects that were answered correctly. To create this box, in the Insert tab, click Text Caption. Then, you type “Found: /14”. Each correct answer will add 1 point to the Found box. Therefore, you add a number variable and create a reference as follows:
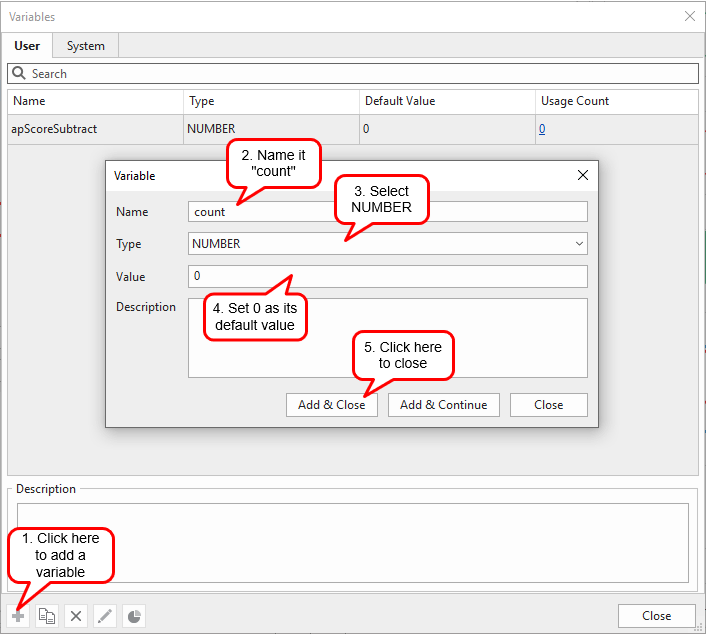
In the Home tab, click Variables. Then, you add a number variable and set 0 as its default value.
Create a reference in the Found box. After that, add a reference here by accessing the Home tab > Reference > selecting the count variable. You will have the Found box displayed like this:
Setting up Events – Actions for the Text Entry
There are events – actions added to the Fill in Text Entry question by default. However, you can edit them to suit your needs.
| Players answer correctly: Show the name of the object (shape) Play audio Add 1 to “count” | On Text Enter event: => Show Object action: if text entry is equal to object. => Play Audio action: if text entry is equal to object. => Add a number variable named “count”, default value = 0. Adjust Variable action: Add 1 to count if the text entry is equal to the object. |
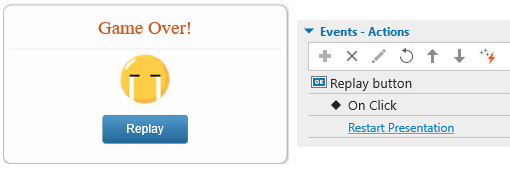
| Players answer incorrectly: If attempts < 20: Show Try Again feedback Play Audio If attempts > 20: Show Incorrect feedback | => Use default On Incorrect event. => Insert audio to Try Again Feedback Layer. => Add the Restart Presentation action to the Replay button of the Incorrect Feedback Layer. |
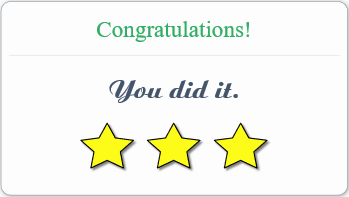
| Name all the 14 object names correctly | => Show Correct Feedback Layer if “count” is equal to 14. |
You delete the On Correct event, then open the Feedback Master view (In the View tab, click Feedback Master) to edit Correct and Incorrect feedback.
Customizing Feedback Master
Select Correct Feedback Layer, then you change text and add the star shapes like this. You can also add audio to this feedback layer. (In the Insert tab > Audio > From File).
Select the Incorrect Feedback Layer, change the text inside and name the button Replay. Insert audio to this feedback layer. Then, add the Restart Presentation action to the On Click event of the Replay button.
After that, you close the Master View to save the changes.
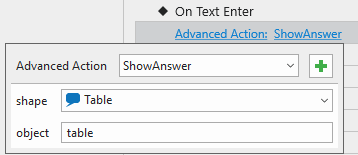
Creating an Advanced Action
In the Normal view, you add events-actions to the Text Entry object. As there are 14 objects with the same events – actions, you should create an advanced action to reuse across all of them. You can see the Advanced Actions icon in the Questions tab.
After the players type their answer correctly, an object’s name will appear, correct audio will play, and 1 point will be added to the Found box. So, you need to add events – actions as shown in the image below.
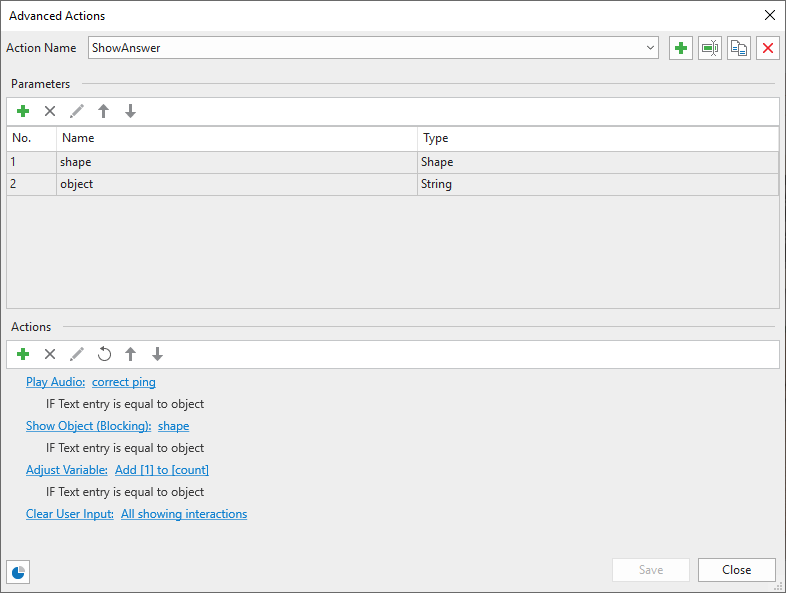
There are two types of parameters here. The first one is shape type, used for the shapes you have hidden initially. The second one is a string type, used for texts that you have typed into the text box. The Adjust Variable action allows adding 1 to count. Lastly, the Clear User Input action is used to clear text input after an answer is submitted.
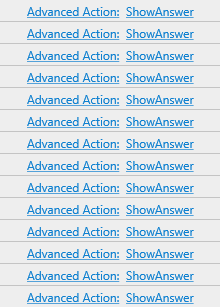
Adding Events – Actions to the Text Entry
You select the text entry. In the Properties pane > Interactivity > Events-Actions > add the On Text Enter event, Advanced Action.
Then, you perform the same steps to add actions for the other 13 answers.
If the players name 14 objects correctly, they win the game. Therefore, you add the Show Feedback Layer: Correct Feedback action under the condition that “count” is equal to 14 to the On Text Enter event.

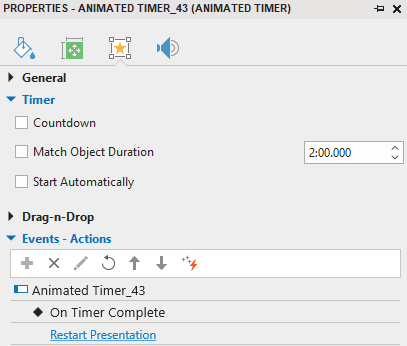
Inserting an Animated Timer
The timer tells the players how much time has passed. So, you add the animated timer to the project. (In the Insert tab > Animated Timer > Progress. Then, adjust the Progress in the Properties pane > Interactivity > Timer > Uncheck the Match Object Duration and Start Automatically options.) Add time to the box, for example, 2 minutes. Then, add an action to restart the presentation when the timer completes.
3. Adding Vocabulary Game Introduction
This part includes 3 objects. They are the game name, Start button, and background shape. You add 3 shapes in turn. (In the Insert tab > Shapes). After that, you adjust them as follows:
- Background shape: In the Properties pane > Size & Properties > Fill > change its Color and Opacity.
- The game name: You click the shape to type text into it. Then, adjust the font, size, and color as you want.
- Start button: You perform the steps as when you did to the name of the game.
After that, you group them by right-clicking and choosing Group > Group.
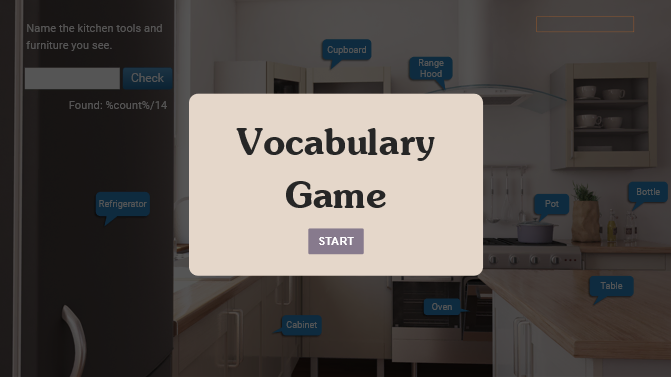
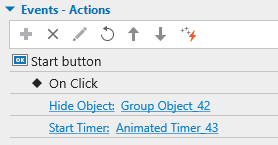
When the players click the Start button, it will hide the group and start the animated timer. So, you need to add the following actions to this Start button:
Creating vocabulary games isn’t as difficult as you might think, right? With ActivePresenter, you can now make more beautiful and helpful eLearning games for your students. Download the software and see how it can bring your work to life!
See Also: