Introduction to Interactive Objects
Interactive Objects are special objects that have the ability to respond to the user’s input in pre-specified manners. They enhance the interaction and communication between the course contents and learners. In this article, I will deliver you an overview of the Interactive Objects in ActivePresenter. Before reading below tutorial, I guess you deeply understand all features of ActivePresenter, right? If not, check out software description here. This tutorial is about Interactive Objects in ActivePresenter 6. For more information about the Interactive Objects in ActivePreseter 7 – our latest version, please take a look at this link.
To insert an interactive object, first, open the Interaction tab (1).
And you will be presented with the Interaction tab containing all the interactive objects.

Types of Interactive Objects
Interactive Objects not only manipulate the presentation basing on users’ inputs but also keep a track of activity by assessing their performance in a test.
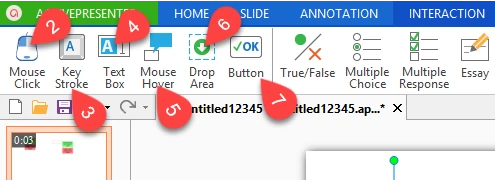
Mouse Click (2) is used to respond when the user clicks in a pre-defined area.
Text Box (3) will respond when the user enters specific text.
Key Stroke (4) responds to an individual key on the keyboard or a hotkey that the user presses.
The Mouse Hover (5) has two different types of responses.
They let users know whenever he/she hovers the mouse over a certain area or when they move the mouse away from that area.
This kind of interactive object does not assess the correctness of the user responses.
The Drop Area (6) responds when the user drops a drag source onto it.
And Button (7) will respond whenever the user clicks on it.
Interactive Questions (8) are widely used in creating eLearning courses or software demonstrations and ActivePresenter offers you nine kinds of interactive questions:
True/False, Multiple Choice, Multiple Response, Essay, Fill in Blank, Sequence, Drag-n-Drop, and Rating Scale.

Insert an Interactive Object
For this article, I’m going to insert a Mouse Click object to demonstrate its interaction. For creating a quiz from the scratch, please refer to How to Create Quizzes in ActivePresenter.
Take following steps to insert any interactive object:
Step 1: Open the Interaction tab. (1)
Step 2: Select an interactive object. Here I’ll select Mouse Click. (2)
You will see the Mouse Click object appears in the Canvas having the Mouse Click area (9) and Feedback Messages (10) to provide responses to users.
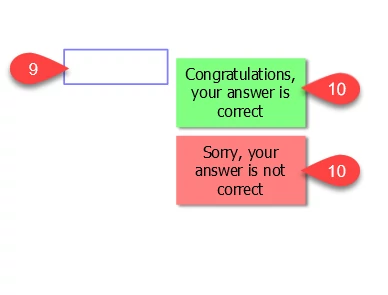
ActivePresenter provides four kinds of feedback messages:
- Correct Message: is shown when users take correct actions.
- Incorrect Message: is displayed when users take incorrect actions.
- Timeout Message: is displayed when the time limit has been expired.
- Hint Message: is displayed when users move the mouse over the interactive object.
You can adjust the mouse click area and feedback message size by dragging their green handles.
By default, ActivePresenter inserts a Correct and an Incorrect message to respond to correct and incorrect actions of users respectively.
Step 3 (Optional): Inserting more messages.
You can add more messages by clicking the Message icon (11) on the Format tab, and select the type of message to add.

Event Editor
Each interactive object has its own Event Editor which allows you to have more settings in terms of trigger conditions.
To open the Event Editor, do as one of the followings:
- Double-click the Mouse Click area (9), you will see the Event Editor dialog appears.
- Click the Event icon (12) on the Format
From this window, you can set how ActivePresenter defines an answer as correct and incorrect, and how this interactive object will act after each user response.
The Mouse Click Tab
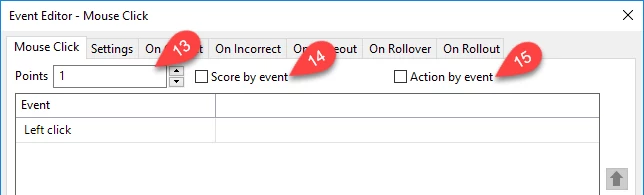
Points (13): the number of scores that users will gain after each correct answer.
Score by event (14): define the number of scores for each correct event.
Action by event (15): a specified action will be taken place corresponding with each event.
The Settings Tab
This tab lets you have the settings in terms of user’s attempts, pauses and timeout.
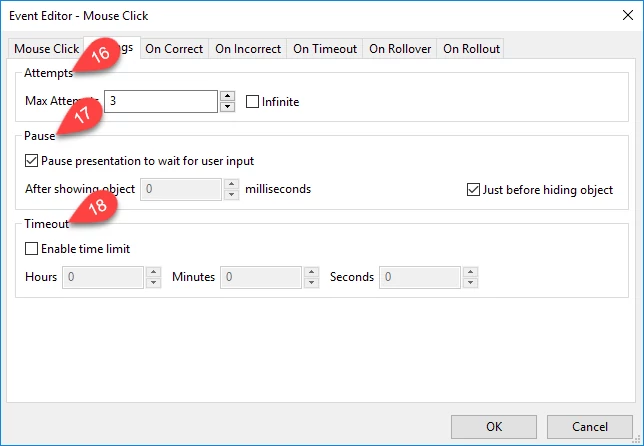
Max Attempts (16): the number of max attempts that a user is allowed to interact with the object.
Pause (17): pause the presentation to wait for user’s input.
Timeout (18): enable the time limit within it user actions are accepted.
Other Tabs
These tabs contain settings for responses that will be carried out after user actions such as correct, incorrect, timeout, rollover, rollout.
Finally, click OK to confirm the all the settings that you have made.
That’s an overview of interactive objects in ActivePresenter and how to use them. Taking advantages of them in your projects and feel free to contact us whenever you need help.