Freeze-Frames or Insert Time function is used when you want to have a silent time in a video or a project. It serves as a powerful tool especially when you need some more time explaining your audiences the course content while not missing any piece of information. In this article, I will walk you through a step-by-step article showing how to do that with ActivePresenter – Great tool for interactive elearning authoring.
Insert Freeze-Frames
To insert a Freeze-Frame in ActivePresenter, do as followings:
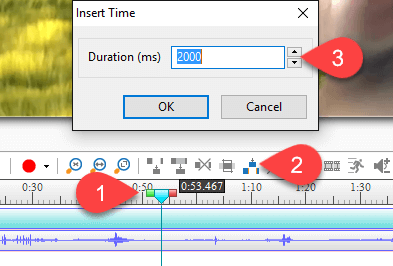
Step 1: Select Timestamp that you want to insert time. (1)
Step 2: Click the Insert Time icon. (2)
Then, you will see the Insert Time dialog pops up, take further steps bellow:
Step 3: Input number of freezing time. (3)
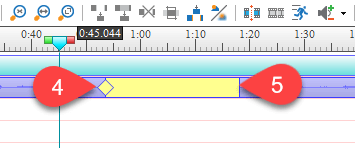
After that, you will see a yellow bar having a diamond appears in the Timeline host. During that range, the video will be frozen, no sound and actions taken place anymore. Take a step further to change its Start Time and Duration so as to precisely freeze the intended range:
Step 4: Adjust Start Time and Duration by dragging its diamond (4) and end edge. (5)
You can add as many Freeze-Frames as you want by taking those steps again. (1), (2), (3)
Removing Freeze-Frames
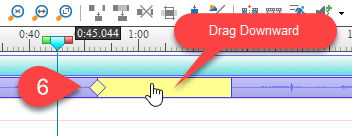
You can delete any Freeze-Frame if you don’t want to have it anymore. ActivePresenter provides you two ways to do that:
- Click the Yellow Bar and drag it downward out of the Timeline host. (6)
Keep dragging until the bar turns gray and release it.
- Or drag the end edge of the bar toward the diamond. (7)
Keep dragging till two of them meet.
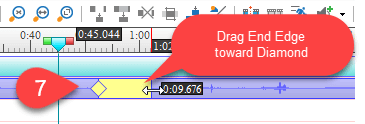
After the Freezing Frame is removed, your video will back to its original properties.
So, that’s how to insert and remove Freeze-Frames in ActivePresenter, hope that it helps.
Try it today and please feel free to contact us if you need more help.