How to Start and Stop Recording in ActivePresenter 7
As you may know, ActivePresenter 7 offers some big changes in the recording process. Among them, the concept of capture profiles is gone for good. Additionally, you no longer take times to figure out what to record from the Welcome Screen. It’s now much simpler and easier to start and stop recording with ActivePresenter.
Let me prove you this right now.
Start Recording
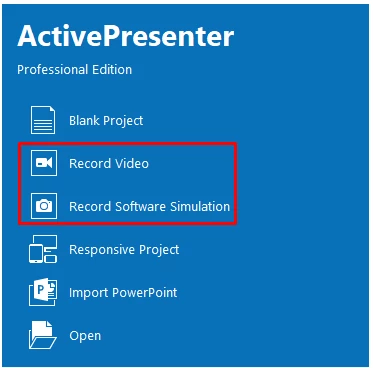
In ActivePresenter 7, the Start Page replaces the Welcome Screen. You now work with a very intuitive user interface. From here, you can choose between Record Video or Record Software Simulation to start recording in minutes.
The former is for recording a video demonstration as a video project. The latter is for creating a software simulation as a slide-based one.
Assume that you plan to create a video demo. Then, do the steps below:
Step 1: Go to the Start Page > Record Video. Then, the blue rectangle and the Record Video Project dialog appear.
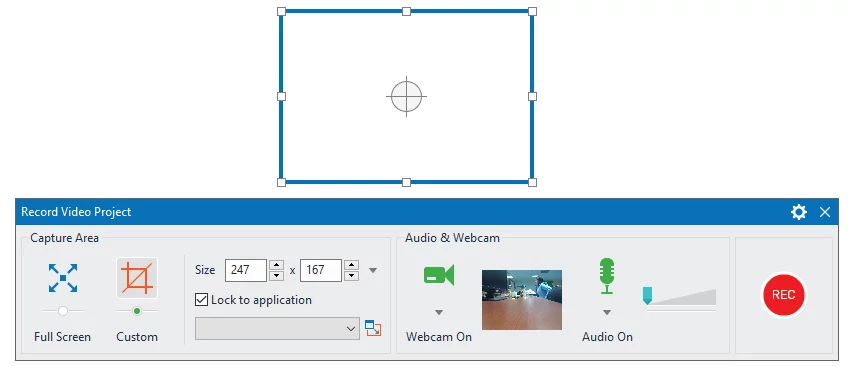
Step 2: Specify the capture area and other settings. For more details, see Record Video Demonstrations and Record Software Simulations.
Step 3: To start recording, click the Record button ![]() . ActivePresenter will start to record after the countdown. Then, all of your actions happening inside the selected capture area will be recorded.
. ActivePresenter will start to record after the countdown. Then, all of your actions happening inside the selected capture area will be recorded.
Note: The Record Video and Record Software Simulation commands are also available in the editor. You can click ActivePresenter button to select one of these commands and start recording a new project. Or, select them from the Home or Slide tab to capture screen as one or multiple slides in the current project.
Finish Recording
The easiest way to stop recording is press CTRL + END (for Windows) or ⌥⌘2 (for MacOS).
In addition, ActivePresenter gives you some other options. To show them, click the ActivePresenter icon ![]() in the system tray. Then, the Recording Toolbar appears.
in the system tray. Then, the Recording Toolbar appears.
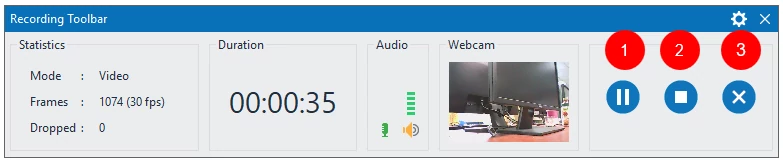
The Recording Toolbar gives you basic information about statistics, recording duration, and sound level. This toolbar also offers three functional commands: Pause, Stop and Discard.
- Pause (1): Come in handy when you’re busy with something and need to suspend the recording process for a while. Click Pause to temporarily pause recording and click it again to resume.
- Stop (2): Click to stop recording. Click Stop to end the recording and step into the editing process.
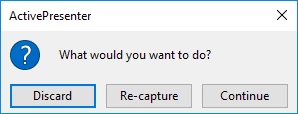
- Discard (3): Click this button to display a dialog giving you three options. Discard is to abort the project that you are currently recording and remove all of what you’ve recorded. Re-capture is to abort the current recording without saving it and start a new recording with previous settings. Continue is to resume the current recording.
Tip: It’s good to show the Recording Toolbar right from the start when capturing a part of screen, especially when recording webcam at once. In the latter case, you’re able to see a live preview of yourself. But as the app will record anything happening inside the capture area, you should place this toolbar outside the selected area. To do that, in the Record Video Project dialog, click the Settings button > Recording Toolbar.
Note: ActivePresenter allows you to change hotkeys for recording. See Customizing Hotkeys for more details.
It’s so simple to start and stop recording in ActivePresenter 7. Download the app today and create a new recording project. Don’t hesitate to contact us if you need any support.