In creating eLearning contents such as quizzes or software simulations, video and audio objects play an important role in engaging viewers. For instance, adding background music can make your project much more interesting. Using audio files, there is a high chance that you will need to adjust volume of those tracks sometimes. In this article, I will explain in details how to do that with ActivePresenter.
Bear in mind that this technique is also applied to the sound in videos. This means you can adjust the sound volume of videos as doing that with audio tracks.
Adjust Audio Volume
You can choose to adjust the volume for any specific part of the track or the whole track at once.
Adjust Volume for Audio Parts
To change the sound for a specific part of the video/audio, take the following steps:
Step 1: Select the audio track in the Timeline pane, Selection pane or Canvas.
Step 2: Define the audio range in the Timeline pane. Just drag the green and yellow marker along the Timeline ruler to select the range.
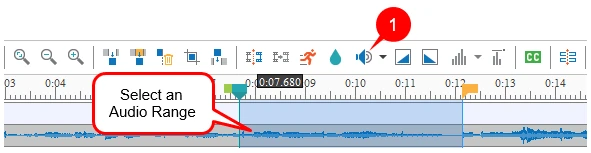
Step 3: Click the Adjust Volume button (1).
This opens the dialog where you can scale the volume from 0 to 500. Check the Mute check box to silence the track.
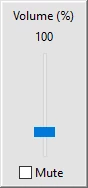
Note: This is a relative volume scale with a default value of 100% (means original volume). It lets you adjust the volume from 0 (means mute) to 500% (means original volume x 5).
Adjust Volume for the Whole Audio Tracks
Changing the sound for the whole audio track is similar to changing the sound for a specific part of the track. However, you don’t have to define the audio range. Just select the audio file (in the Timeline pane, Selection pane, or Canvas) and take the Step 3 above.
Tip: In case you need to create fade in and fade out effects for your audio tracks, see how to do that in Using Audio Fade.
Restore Original Audio Volume
After all the changes and adjustments of the audio tracks, you can definitely go back to their original volume. Similar to changing sound, you can restore the sound level for any specific part of the audio or the whole track at once.
Restore Original Volume for Audio Parts
Take the following steps to restore original volume of audio parts:
Step 1: Open the View tab and click Timeline Snapping ![]() to turn the Snap mode on. This feature helps you select the range more easily.
to turn the Snap mode on. This feature helps you select the range more easily.
Step 2: Select the audio range.
ActivePresenter will mark the audio part that has been adjusted volume with the red vertical makers (2a, 2b). These markers allow you to see the changes easily.

Drag the green and yellow marker of the Playhead to start red vertical marker and end vertical marker respectively.
Using the Snap mode, when you are dragging the green or yellow marker of the Playhead and the marker comes in the vicinity of the red vertical line (2a, 2b) of the audio range, it will make a tiny jump to match the edge of each other.
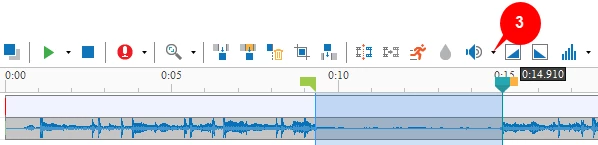
Step 3: Click the drop-down arrow on the Adjust Volume button (3) and then click Restore Original Volume.
After that, the Adjust Volume effect in that range will be removed and ActivePresenter will restore the original volume.
Restore Original Volume for the Whole Audio Tracks
Regardless the where you change volume, you can restore the audio track as a whole. Different from restoring a specific part of the track, you don’t have to define the range. Just select the track and take Step 3 above.
So, that’s how to adjust volume in ActivePresenter. Try it and let us know if you need help.