Learning about our solar system is an interesting thing but it’s not always an easy task. A stunning solar system with interactive images will bring your students much more engagement.
For those just stepping into the realm of eLearning, creating engaging and interactive content might seem like a daunting task. However, today’s article will reveal just how accessible and straightforward it can be to transform static images into excited learning experiences.
With the right eLearning authoring tool, you can easily add layers of interactivity, turning simple visuals into powerful engagement drivers. Speaking of such tools, ActivePresenter stands out as a fantastic option for creating interactive images, incorporating elements of gamification, and developing a wide range of interactive teaching content.
You’ll discover that bringing your images to life with interactive hotspots, embedded questions, and engaging activities has never been easier than with ActivePresenter.
Let’s explore how this versatile tool can help you elevate your eLearning content.
The Logic Behind
Basically, an interactive image is a photo whenever you hover the mouse over or click it, it can show information, change state, hide itself, or even more.
For example, you may want to provide learners with information about our solar system by creating interactive images. So, to get it done, we will use Multiple Timelines, Events-Actions, and Advanced Actions from ActivePresenter.
Before that, make sure to download ActivePresenter for free and follow our step-by-step guide to build your eLearning project.

Then, you can click download Solar Systems eLearning sample (open with ActivePresenter only)
Now, let’s practice step-by-step to complete an interactive solar system in this post.
Preparing for Creating Interactive Images
In fact, a clear plan will help you speed up your process. Thus, let’s make a plan before starting. In this way, you can create interactive images with ActivePresenter quickly and effectively.
First of all, make sure to install our tool and run it on your computer.
Secondly, define the tasks you have to do to create interactive images. For example, I have to complete 3 tasks respectively:
(1) Create 8 planets orbit around the sun.
(2) Make a planet stop moving and show its information when moving the mouse over it.
(3) Set the information disappear and the planet continues moving when moving the mouse out of it.
Thirdly, prepare a universal background image and 8 separate planet images.
Then, open a Blank Project of ActivePresenter > Insert tab > Image to add those prepared images.
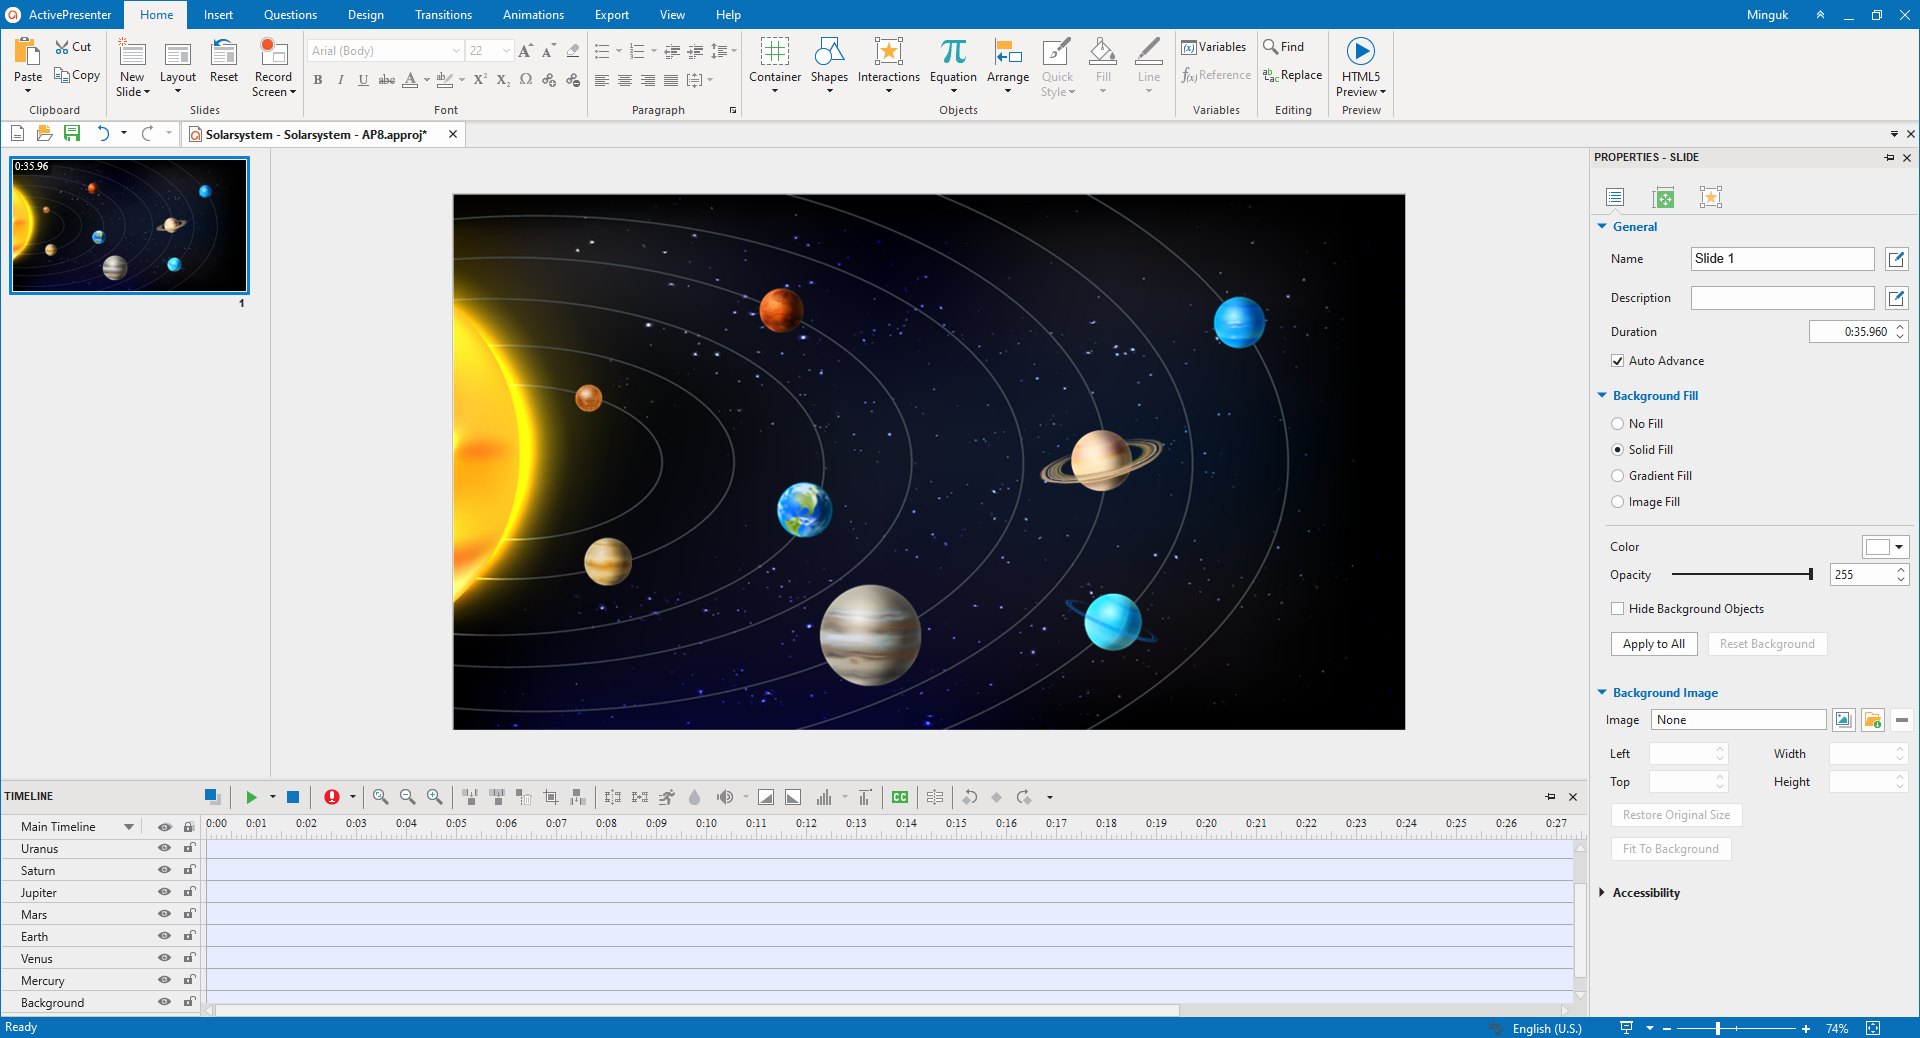
As you can see, all the planets are placed respectively in their orbit. Now, adjust each image’s size to match its planet’s size.
After having a well-prepared plan, let’s start creating interactive images with our tool.
Making Eight Planets Orbit Around the Sun
To begin with, creating the planets’ orbits and making them orbit around the sun are the first tasks. The multiple Timelines feature from ActivePresenter comes in handy to help you complete this work. Initially, we need to create a new timeline for each planet to work independently if I move the mouse pointer over or out of it.
Now, do the following steps:
Step 1: Click Add Timeline > Rename Timeline… > type the timeline name > OK.
For more information, please refer to Using Multiple Timelines.
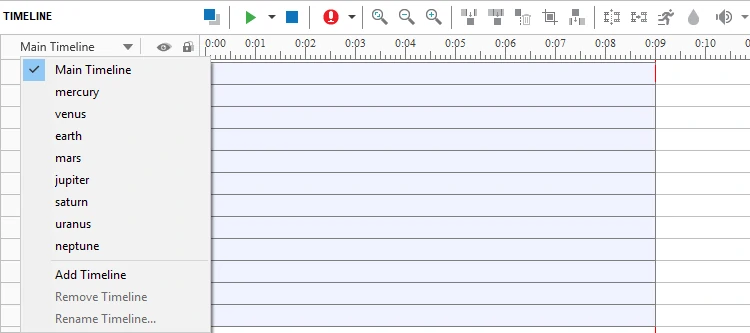
Tip: Name each timeline after its planet’s name. This helps you identify and edit easily.
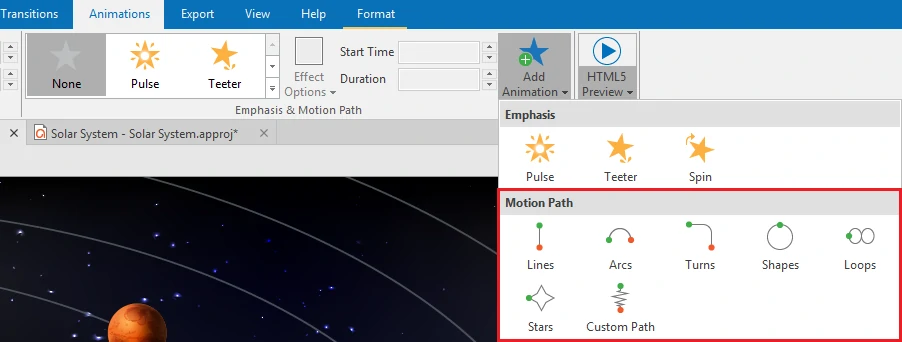
Step 2: Create planets’ orbit by adding a motion path to each planet’s timeline. Open the Animations tab > Add Animation > choose one type of Motion Path.
Step 3: Adjust the motion path as you want by dragging the anchor points and control points. To curve the motion paths, right-click the black points and select Smooth Point.
Note: The anchor point is used to define the position of the motion path, and the control point is used to define the level curve.
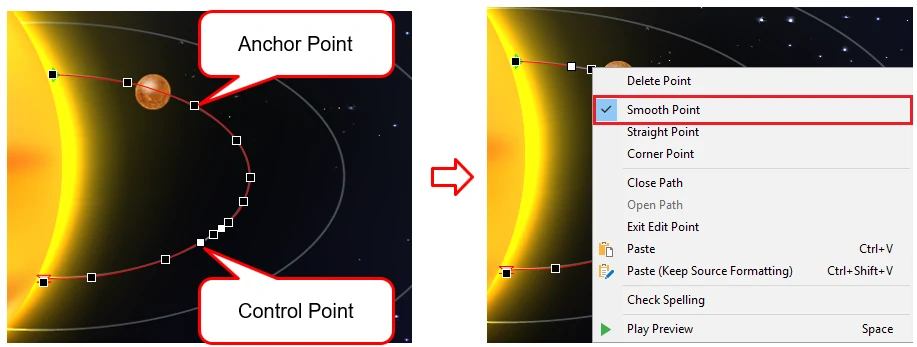
Tip: You can create many anchor points to adjust easily by clicking anywhere on the motion path.
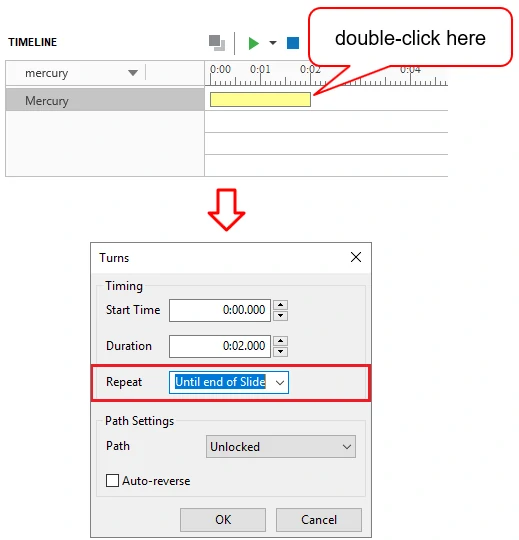
Step 4: Make the planets orbit around the sun continuously.
In the timeline, you can double-click the effect time bar to open the dialog, allowing you to modify the effect. Here, you can adjust the Start Time and Duration to fit the planet’s moving speed. Especially, select Repeat Until end of Slide to loop the planet’s motion path. Then, click OK to apply.
Remember to repeat the 4 steps above for all planet objects.
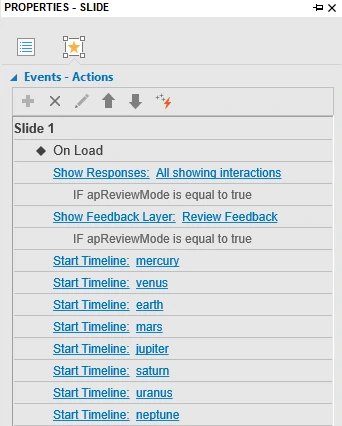
Step 5: Add the Start Timeline action of all the planets on the On Load event of the Slide. This makes the planets orbit around the sun when the project starts.
Providing Information for the Planets
When exploring the universe, learners may want to get more knowledge. So, inserting objects to provide information for learners is a good choice. Here’s how:
Step 1: Open the Insert tab > Shapes > Select one shape from the built-in list and type information.
Tip: You can insert links, images, videos, etc. as you wish.
Step 2: Open the Format tab to adjust shape style, color, etc.
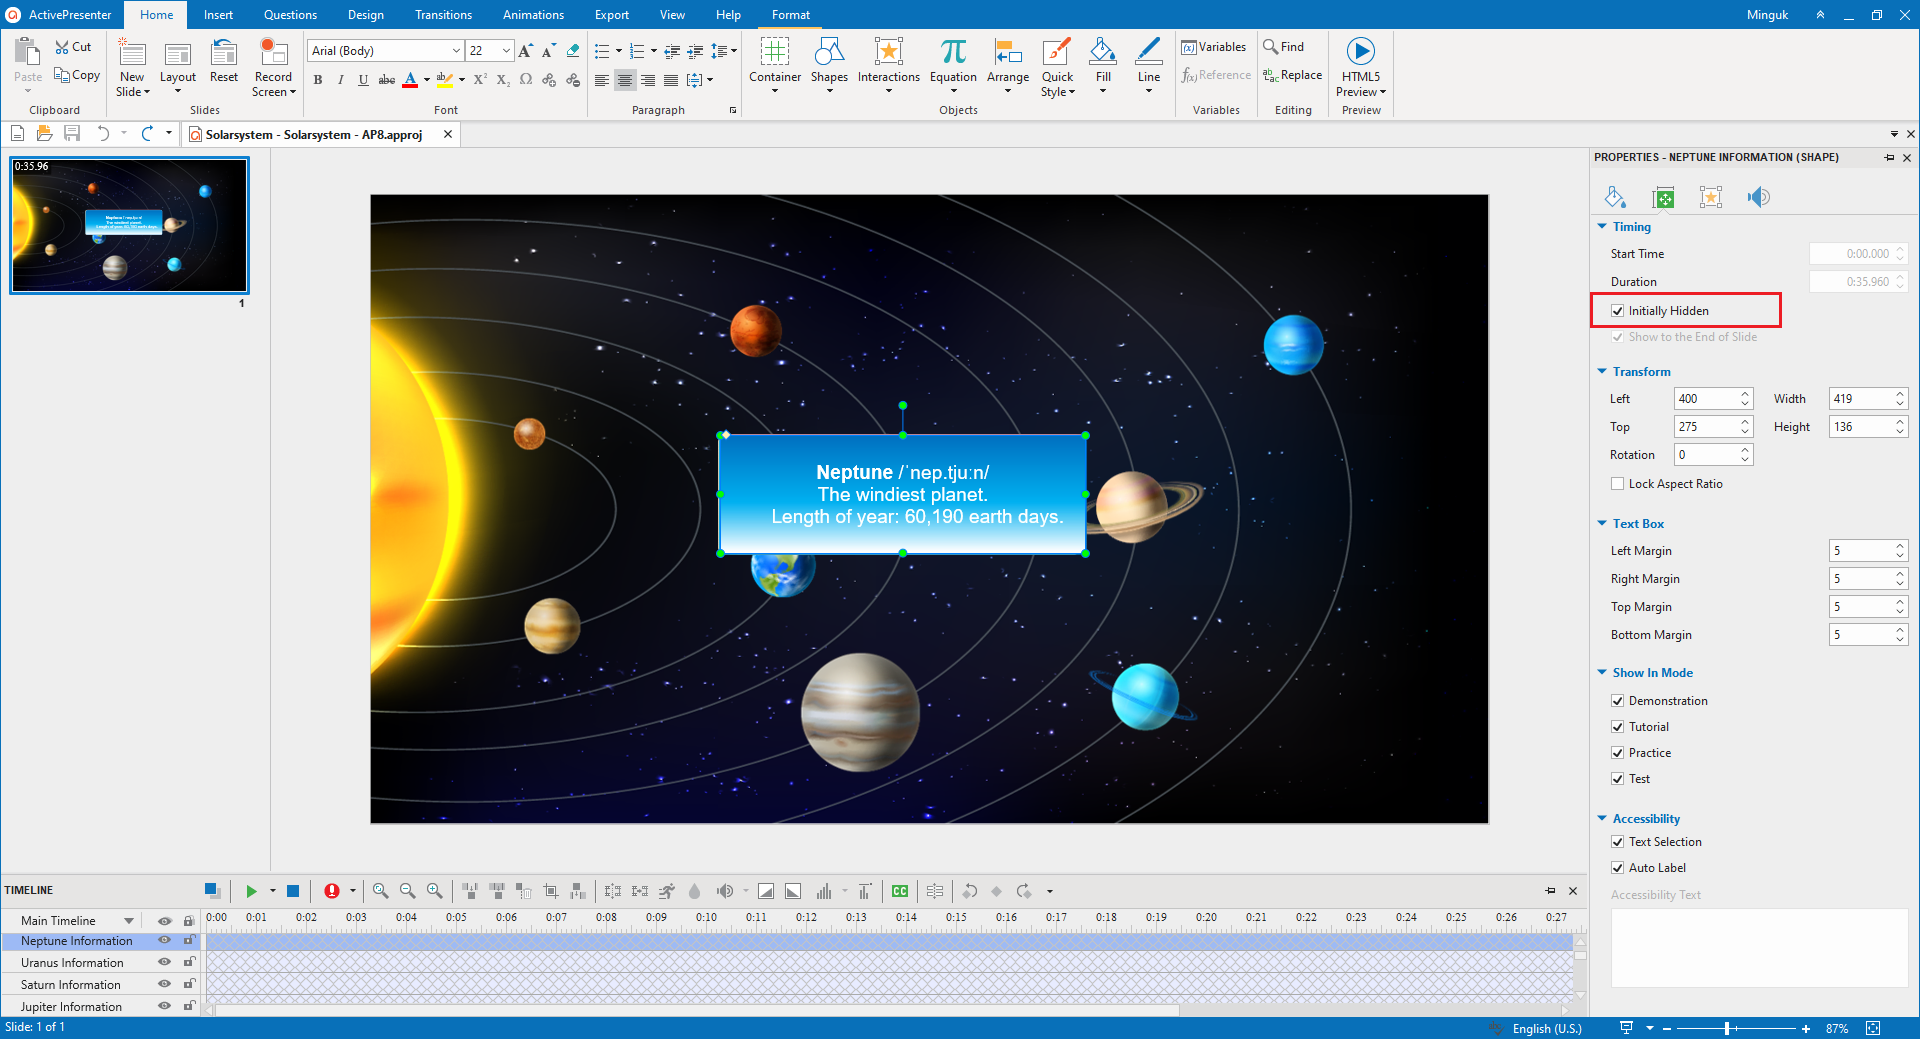
Step 3: Go to the Properties pane > Size & Properties > Timing > Check the Initially Hidden box to hide the information objects when the project starts.
You can repeat the above steps with each planet.
Creating Interactivity for the Planets
Creating Advanced Actions for Interactive Images
After creating the planets’ orbits and giving information to the planets, it’s time to add interactivity to them. In fact, the actions of making the planet stop moving, showing the information, hiding the information, and making the planet continue moving will be applied to all planets. So, we need the help of Advanced Actions to create interactive images quickly.
Step 1: Click Advanced Actions in the Interactions tab or the Properties pane. The Advanced Actions dialog will appear.
Step 2: Create advanced actions to make the planets stop moving and show information when moving the mouse pointer over them, do as follows:
- Name it is “Stop_Show”.
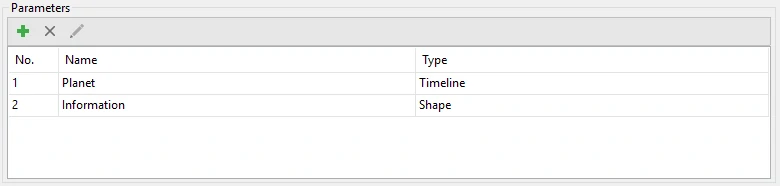
- Insert two parameters with their corresponding types.
- Add Pause Timeline action for Planet parameter.
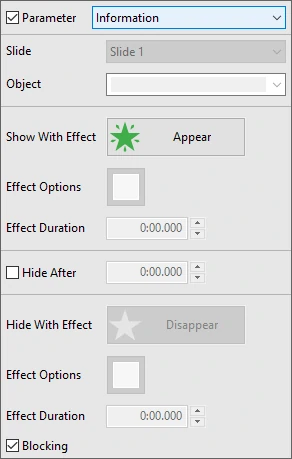
- Add Show Object action for Information parameter.
Then, click Save to keep what you did.
Step 3: Create advanced actions to make the planet continue moving and the information disappear when moving the mouse out of them, do as follows:
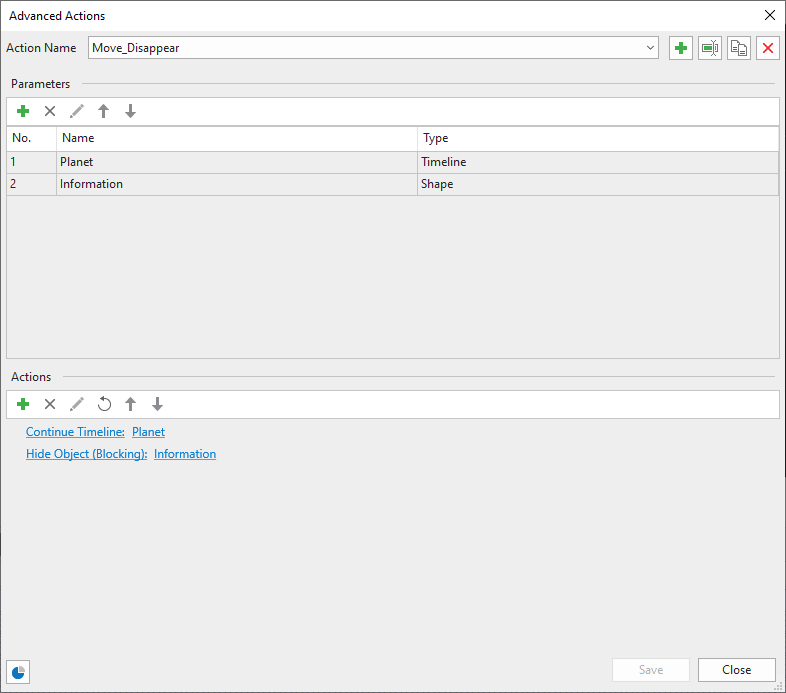
- Add advanced actions “Move_Disappear”.
- Insert two parameters similar to step 2.
- Add Continue Timeline action for Planet parameter.
- Add Hide Object action for Information parameter.
- Click Save.
After that, click Close the Advanced Actions dialog. Now, we move to the next part.
Applying Advanced Actions to Events for Interactive Images
Let’s take the last steps to complete creating this interactive image:
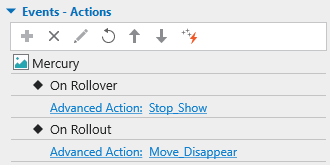
Step 1: Select a planet image > in the Properties pane > Interactivity > Events – Actions.
Step 2: Add On Rollover event > Add Action > Advanced Actions.
- Click Click to edit.
- Select advanced actions “Stop_Show”.
- Select a suitable value for Planet, and Information parameters.
Step 3: Add On Rollout event > Add Action > Advanced Actions.
- Click Click to edit.
- Select advanced actions “Move_Disappear”.
- Select a suitable value for Planet and Information parameters.
Repeat the above steps for all the planet images. And then, click HTML5 Preview to see your result. Believe me! You may be surprised by what you created.
Final Words
You’ve known how to create interactive images with ActivePresenter. Hope that it helps. Don’t forget to follow us on our Youtube channel to stay updated with eLearning interactive activities. See you!