When your project has many objects of the same type, you may want them to have the same animation effects or formatting style. ActivePresenter allows you to style multiple objects in a flash.
For Existing Objects of the Same Type
Let’s say your project has many slides and each slide has one or more shapes. You want all the shapes to appear and disappear with the same animation effects, such as fading in and out of the slide. Additionally, you want all of them to use the same fill, line, shadow, and text style. All those shapes, therefore, are consistent.
To animate and style multiple objects of the same type as that, do the following:
Step 1: Animate an object or format it the way you want.
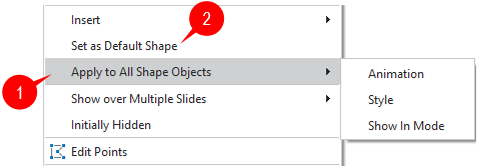
Step 2: Apply the animation and style of the object to all other existing objects of the same type. To do that, right-click the object > Apply to All Objects (1). Then, you can choose to apply the Animation, Style or Show In Mode of the selected object.
Another way to animate and style multiple objects in a slide is by selecting all of them, and then changing their mutual properties. This technique is useful when you want to make changes to multiple objects of multiple types as long as they share certain properties. For example, you can select several shapes, text captions, and apply the same line style to all of them. But you can only use this technique with objects in a single slide because it’s impossible to select objects in different slides at the same time.
The Apply to All Objects option only affects existing objects. It has nothing to do with objects that haven’t been inserted yet.
For Newly Added Objects of the Same Type
If you want the newly added objects to use the same style as those existing ones, you must use the Object Settings feature or default objects.
See Object Settings for more information.
With default objects, you format a certain object and set it as the default. After that, the same properties will be applied to all the new objects of the same type in the same project. Do that by right-clicking the object > Set as Default (2).
In practice, you often combine both the techniques above to make your project consistent. While you’re constantly inserting objects and adjusting their styles, you can apply the style (and animation) of the selected object to all other existing objects of the same type. Meanwhile, you will set that selected object as the default so that newly added objects share the same properties with it.
That’s it! You’ve learned the ways to style multiple objects at once and save tons of time and effort when working with ActivePresenter.