Let’s learn how to create an interesting typing game for kids with ActivePresenter. In this game, kids can press keys on their keyboards to play the game instead of clicking the mouse button.
When it comes to interacting with content, activities such as clicking the mouse button or hovering the mouse over an object are the most common uses. Apart from those, you can also make users’ interactivity more diverse by using the keyboard. That is to say, users can press keys on their keyboards to interact with objects. On account of that, in this article, let’s explore how to use the keyboard keys to create a simple typing game with ActivePresenter.
From Playing to Creating The Typing Game
How to Play?
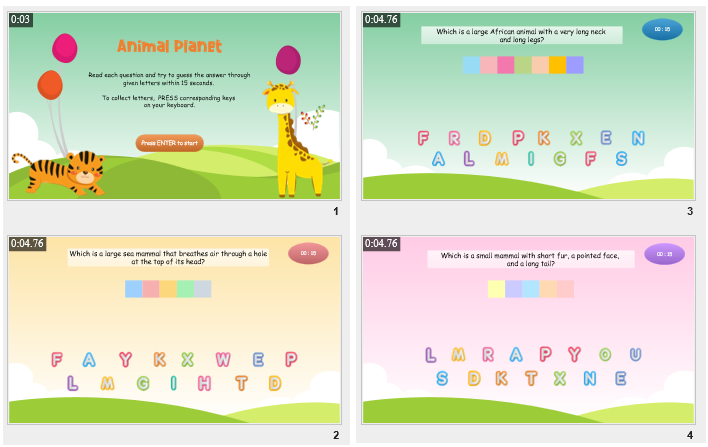
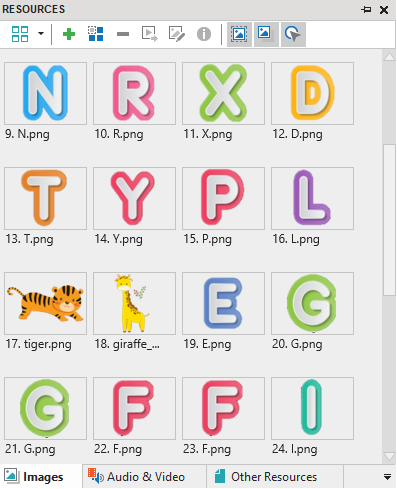
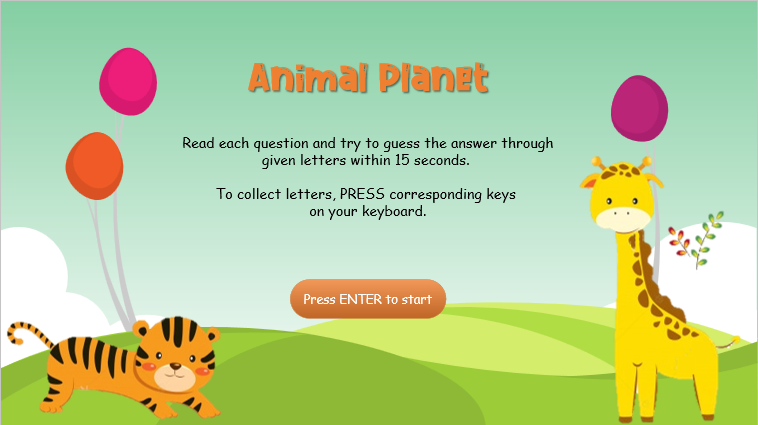
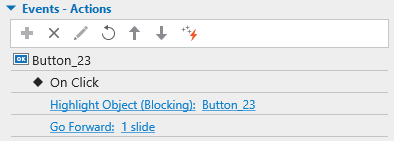
This typing game consists of an Introduction slide (slide 1) and a list of question slides (slide 2,3,4).
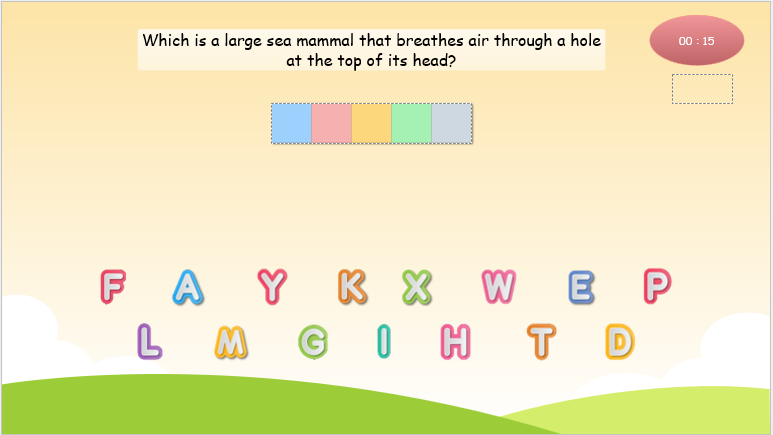
In each question slide, players need to press keys to collect corresponding letters of the answer. The time is out after 15 seconds.
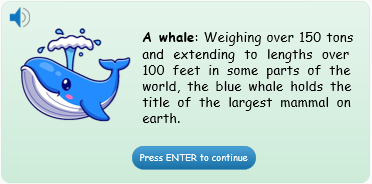
For example, in slide 2 above, the answer to this question is a whale.
- If players press one out of 5 letters: W, H, A, L, E, it will be hidden then shown in the crossword.
- If players press a letter other than those 5 listed letters above, there is a shaking effect to inform them that it’s incorrect. Then, they need to press another key.
After they get full of correct letters, a feedback message will be shown to give further explanation about the answer. Otherwise, if the timer runs out, a timeout feedback message will appear and let players retry this question.
How to Create a Typing Game?
To begin with, you can prepare some letter images and audio tracks for sound effects (if needed). After that, access the View tab > Resources > drag and drop all necessary files on your computer into that pane. By doing that, you can quickly insert objects from this pane without opening the folder on your computer many times.
As its name implies, this typing game lets players press keys instead of clicking the mouse button. All interactivity in this game should be done by keyboard control. Therefore, the main technique will be using the Key Stroke feature to invoke the pressing function. Moreover, using object states, variables, events-actions, and advanced actions will make the game highly interactive.
To be more clear, follow this procedure to create a typing game:
Now, let’s take a deep dive in turn.
Design the Introduction Slide of the Typing Game
Setting up the Introduction slide includes using a built-in theme, adding a game title and instruction, and a Start button. Particularly, you can:
- Apply a theme for the entire game (Design tab > click the drop-down arrow of the theme gallery > choose the desired theme).
- Add a game title and instruction (Insert tab > Text Caption > change their style, font, size, colors the way you want in the Home tab or the Format tab).
- Create the Start button (Insert tab > Button > change its style if needed).
Note: Dedicated to the Button object, its On Click event will be triggered when you click on it, or press ENTER or SPACE when it’s focused. So you don’t need to bind any key event to it.
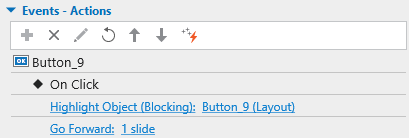
Taking this into account, you can set the On Click event and the following actions to that button to let players start the game:
Moreover, you need to access the slide Properties pane > General section > uncheck the Auto Advance option. This makes the slide not automatically advance when it ends. Remember to do the same to all other slides in this game.
Make Question Slides of the Typing Game
Each question slide has independent objects and interactivity. The following steps will guide you to create one question slide in detail. After that, you can create as many question slides as you want, similarly.
The procedure should be:
- Insert Question Title and Letter Images
- Create Crossword to Show the Answer
- Set Time Limit for the Question
- Create Interactivity for the Question
- Customize Feedback Messages
Insert Question Title and Letter Images
Firstly, come to the Home tab > New Slide > Blank to insert a new blank slide for the question. Then, it’s so easy to insert the question title by using the Text Caption object in the Insert tab.
Secondly, letter images can be inserted into the slide directly from the Resources pane. You can select one or more images, and right-click them > Insert to Slide. After that, place them in suitable positions.
Tip: To align letter images quickly, select them > open the Format tab > Align > select a command to align them automatically. For example, Align Middle then Distribute Horizontally.
After inserting and customizing all the letter images, you should give each of them a specific and meaningful name. That will help you a lot when recalling them later.
Create Crossword to Show the Answer
Create the Crossword
You can easily create a crossword to show the answer by using the Grid Box feature. To get it done, take the following:
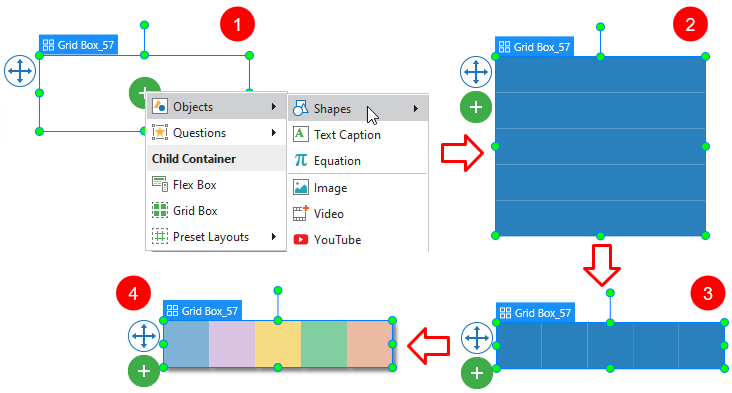
- Access the Insert tab > Container > Grid Box > click the green plus button at the center of the container > Objects > Shapes (1) > Rectangle.
- Insert 5 shapes corresponding to 5 letters of the answer (2). Note that the more letters your crossword contains, the more shapes you need to insert.
- Navigate to the Properties pane of the grid box container > Size & Properties > Container Layout > set the Number of Column to 5. The number of columns should be equal to the number of shapes.
- Adjust the size of the grid box in the Transform section. For example, 500px wide and 100px high (3).
- Customize the style of all inserted shapes the way you want (4). Besides, don’t forget to rename these shapes into more specific names (eg. box_w).
Show Letters in the Crossword Using Object States
Using the Object States feature is a quick way to show correct letters in the crossword. In detail, you need to create a letter state for each shape.
To do that, select a shape. Then, in the Interactivity tab of its Properties pane > click the State View button. This opens the Object States pane, click the Edit States button to turn on the editing mode.
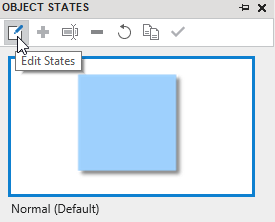
Next, click the Add State button, select New State. The Add New State dialog pops up to ask you to enter the state’s name, eg. letter. After that, to change the style of the selected state of a shape, you access the Properties pane > Style & Effects > Fill > Image Fill > select a letter image from the Resources pane.
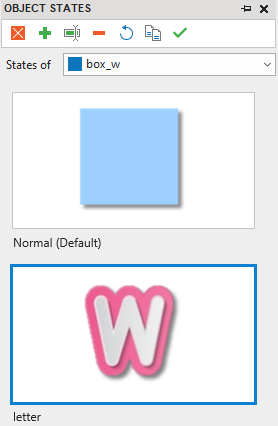
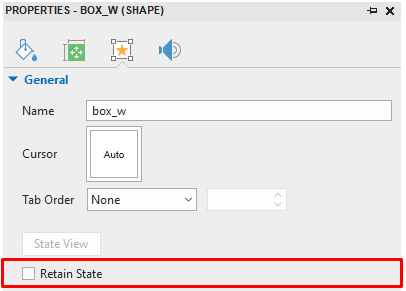
Note: In each shape Properties pane, there is the Retain State checkbox selected by default. You need to uncheck it to make a shape reset to its normal state when players replay that question slide.
For details, let’s check out the following article: Work with Object States.
To control the states of these shapes, you need the help of events-actions. Just stay tuned, the Create Interactivity section of this article will show you how.
Set Time Limit for the Question
To set a time limit, you can insert an Animated Timer object from the Insert tab. Then, free to adjust timer properties in the Properties pane > Interactivity tab > Timer section.
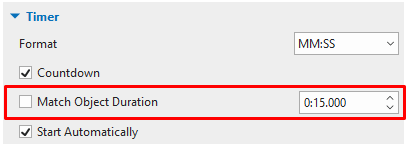
Notice the Match Object Duration option. Uncheck it if you want to type the exact time limit for your timer. Otherwise, you need to drag the duration of the Animated Timer object in the Timeline pane to define the time.
For more information, please refer to the tutorial: Work With Animated Timers.
Create Interactivity for the Question
Now it’s time to go deeply into the core part to make this question work. In this part, you need to use Variables, Events-Actions, and Advanced Actions to create interactivity for the question.
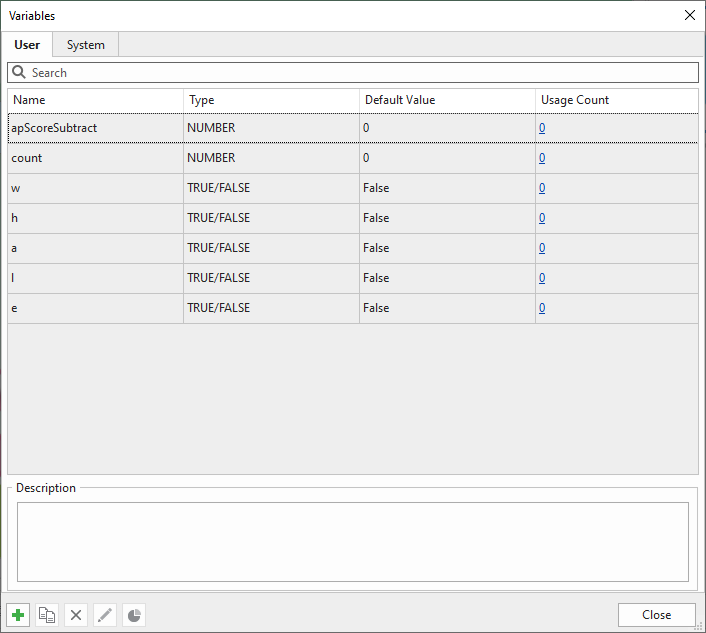
Create Variables
Variables can be used to control and complete multiple tasks in this typing game. To create a variable, access the Home tab > Variables > click the Add button. Then, choose the NUMBER or TRUE/FALSE variable type and set its name and default value.
In which:
- Number variable count: helps give a point to each correct letter. Hence, once players get full of 5 points, explanation feedback will be shown. Also, it pauses the timer at that moment.
- True/False variables w,h,a,l,e: help adjust the condition for an advanced action to occur. For their use cases, keep reading the Add Interactions for Collecting Letters section.
Note: The more letters the answer has, the more variables you need to create. For instance, if the answer is a giraffe, it’s necessary to create 7 true/false variables in total. In which, they should be g,i,r,a,f1,f2,e. Besides, if a letter also appears in the answers to other question slides, you just need to create its corresponding variable once. After that, reuse it in other slides.
Add Interactions for Collecting Letters
Create Advanced Actions
Multiple actions can be used similarly for multiple keys pressed. Therefore, creating advanced actions can save you a lot of time and effort.
In this typing game, you need to create 2 advanced actions. The first advanced action is for correct letters, the other is for incorrect ones. You can find the Advanced Actions button in the Questions tab.
1. The First Advanced Action
When players press one of the correct letters, it will be hidden then shown in the crossword. Having these in mind, let’s name the first advanced action correct_letter.
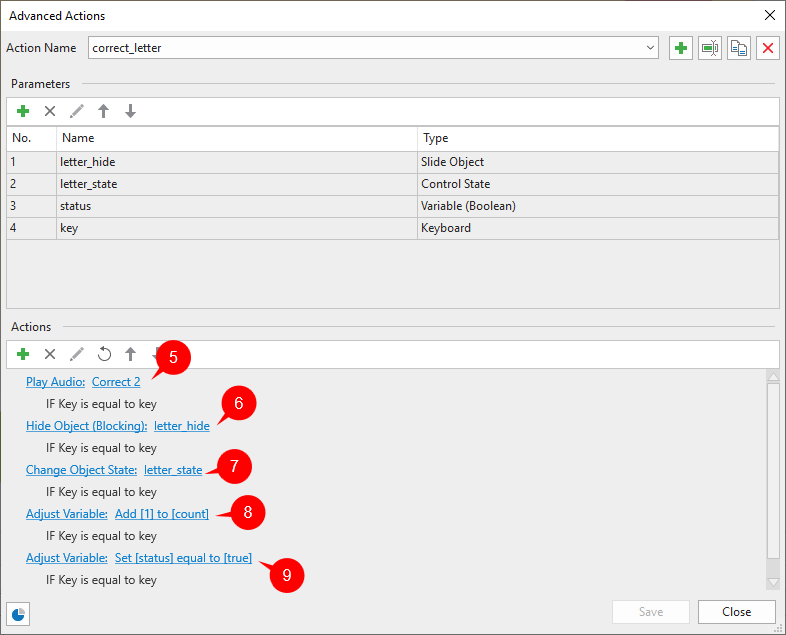
- In the Parameters section, you need to create 4 types of parameters: Slide Object, Control State, Variable (Boolean), and Keyboard. Then, see the detailed functions of these parameter types in the Actions section below.
- In the Actions section, you need to add 5 actions in turn:
– Play Audio (5): Plays a correct sound when players press a correct letter.
– Hide Object (6): Hides a correct letter from the given list.
– Change Object State (7): Shows a correct letter in the crossword by changing a shape’s normal state to its letter state.
– Adjust Variable (8): Adds 1 point to the number variable count once players press a correct letter.
– Adjust Variable (9): Sets a True/False variable, eg. w, equal to the true value other than its default false value. By doing this, it prevents the advanced action from occurring when players press a key multiple times.
– In each action above, you need to apply the Keyboard parameter type to set the condition for that action. In other words, all the actions above can only occur when players press a specific key on their keyboard.
2. The Second Advanced Action
Besides the first advanced action, you need to create another one for the incorrect letters. Once players press an incorrect letter, there is a shaking effect and an incorrect sound played. To make this happen, you continue creating another advanced action and name it incorrect_letter.
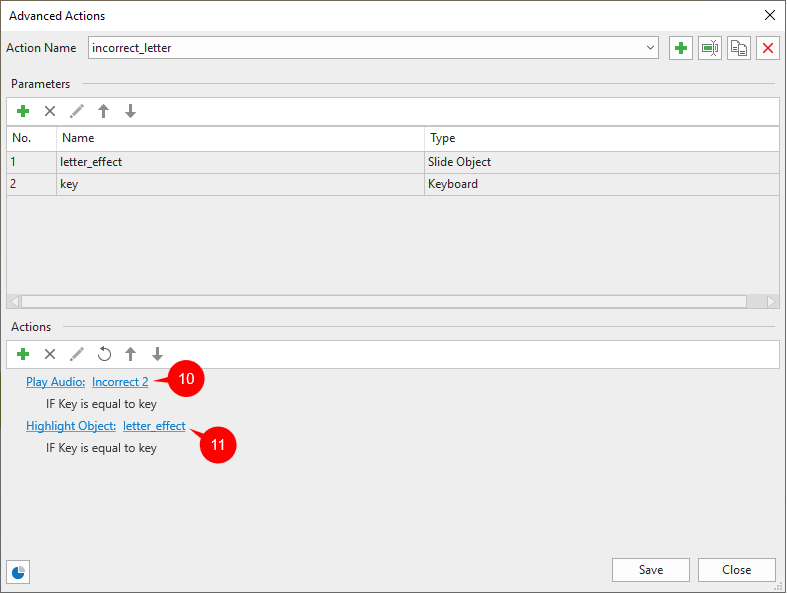
- In the Parameters section, you add 2 parameter types, namely: Slide Object and Keyboard.
- In the Actions section, add the following actions:
– Play Audio (10): Plays an incorrect sound when players press an incorrect letter.
– Highlight Object (11): Makes an incorrect letter shake when players press its corresponding key.
– Similar to the condition set in the first advanced action, you need to use the Keyboard parameter type to define which pressed key will lead the actions to occur.
Assign Advanced Actions to Event
After creating advanced actions, now it’s time to reference parameters to events – actions.
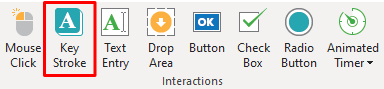
This typing game requires creating the pressing function to control the game. To invoke this function in ActivePresenter, you first need to insert the Key Stroke button from the Insert tab.
You can refer to the Work with Key Stroke article to better understand this feature before continuing to create the game.
After inserting, just delete default feedback messages if you don’t need them. And set its style No Fill and No Line to make it totally transparent.
After that, navigate to its Properties pane > Interactivity tab > Events-Actions > add the On Key Press event. With this event, you can add Advanced Action actions for correct and incorrect letters.
- Add the first Advanced Action action for the correct letters. Then, assign specific values to the parameters:
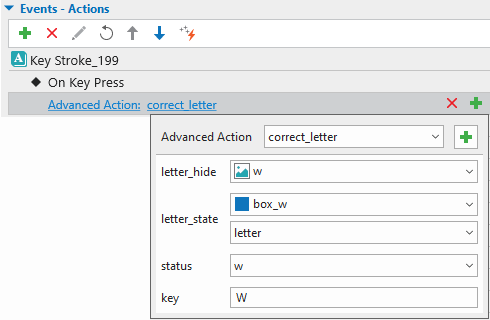
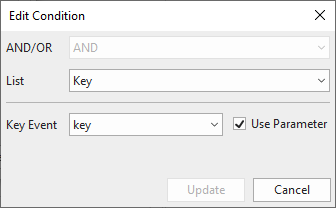
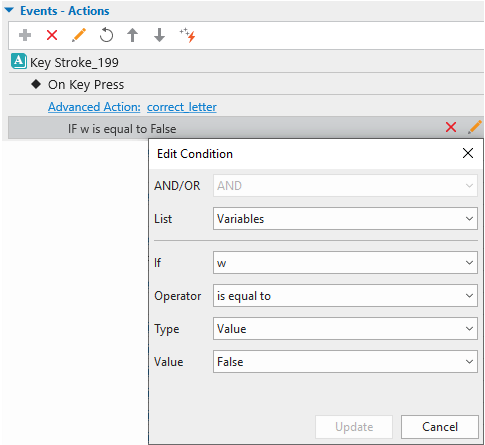
Besides, you need to add a condition so that the advanced action will occur once. For instance, the True/False variable w is equal to its default false value.
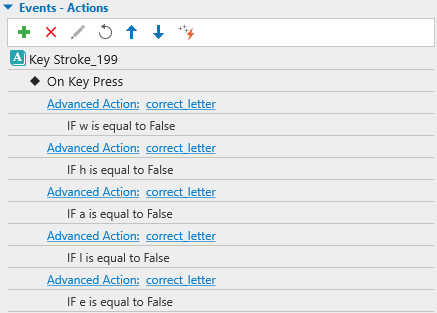
For other correct letters, you can copy the advanced action and its condition and adjust parameters like this:
- Add the second Advanced Action action for the incorrect letters.
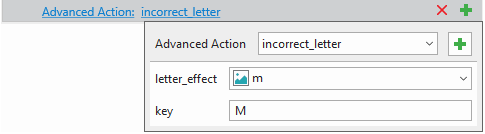
Copy the advanced action and change parameters for other incorrect letters in the given list.
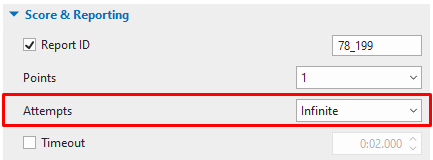
Note: To create unlimited presses that players could make, set the question’s attempts to Infinite. (Score & Reporting > Attempts)
Add Interactions for the Timer
The timer will start playing as soon as a question slide loads. After players collect full of the correct letters, the timer will be paused at that time. To make this happen, on the On Key Press event of the Key Stroke object above, you need to add the Pause Timer action with the condition that the variable count is equal to 5.

Customize Feedback Messages
Customize Feedback Messages
Let’s say players will get explanation feedback for the answer after they get all the correct letters. Otherwise, players will get the timeout feedback once reaching the time limit. Therefore, you can customize feedback layers in the Feedback Master view (View tab > Feedback Master). From here, you can style texts, buttons and even add audio for all feedback layers.
- Select the blank feedback layer at the bottom of the feedback master. Then, you can add content to that custom feedback layer as normal.
Note: You can change the name of this blank feedback layer if you want. To get it done, right-click the layer > Rename Layer > enter a new name > click OK to save. By doing this, you can easily recall the layer in the events-actions later.
Next, add a Continue button. It allows players to advance to the next question slide when they press ENTER. So, just set the On Click event and actions like this:
- Select the Timeout Feedback Layer and customize it the way you want.
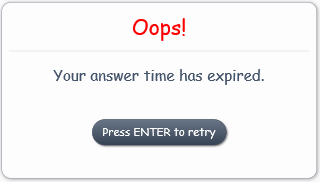
The Retry button can be added if you want players to replay the current question. Similar to the Continue button above, you need to add the On Click event to it but with different actions:

Notice the Adjust Variable action. Setting the value of apCmdHistoryBack variable to true means going to the previously visited slide in the navigation history. After that, adding the Go Forward 1 slide action helps players come to the current slide.
Show Feedback Messages
To show the explanation feedback, select the Key Stroke object > On Key Press event > Show Feedback Layer action > choose the custom feedback layer. Add the condition that if the number variable count is equal to 5.

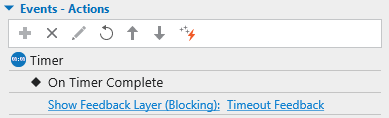
Meanwhile, to show the timeout feedback, select the Animated Timer object > On Timer Complete event > Show Feedback Layer action > Timeout Feedback.
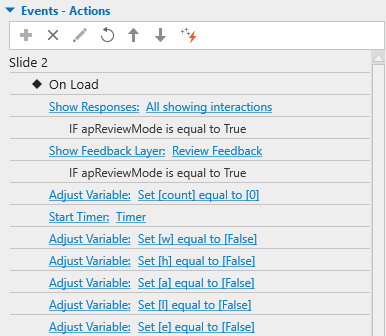
One more thing you need to bear in mind is when players revisit a specific question slide, all its taken interactions must be reset. Therefore, you need to add the following actions in the question slide On Load event:
Preview and Export the Typing Game
It’s time to preview what you’ve created and check if everything pleases you. To do this, use the HTML5 Preview feature. Then, if you’re satisfied with the game project, just export it to HTML5, SCORM, or xAPI packages. Moreover, you can publish your result directly to a free LMS called ActivePresenter Online.

That’s it. Hope you enjoy creating that typing game using the pressing function with ActivePresenter. A lot of other interesting eLearning content is available on our website and YouTube channel. Keeping following those will inspire you somehow. Also, feel free to contact us if you need any assistance.
Click here to download the sample project.
See also creating other exciting eLearning games with ActivePresenter: