In ActivePresenter, an event is a trigger condition for an action to be taken after the audience click, hover, drag or press any key on the keyboard. To custom these behaviors, you can manipulate the Event Editor dialog which I’ll explain in great detail in the tutorial below. This is an interesting and convenient feature because of the ability to give you a full control how to communicate with learners.
Launching Event Editor
As I have described earlier in the Introduction Interactive Objects article, each interactive object has its own Event Editor with some certain trigger conditions covered by a separate tab. However, the structure of a given tab does not change from one object to another.
To give an illustration of this, I will insert a Text Box object into the slide that I am working with.
Step 1: In the Interaction tab (1), click Text Box (2).

Step 2: Do any of the following ways to open the Event Editor window:
- Select that object on the Canvas or in the Timeline pane, go to the Interaction tab, and then click Event (3).

- Or right-click that object on the slide or in the Timeline pane, and select Event Properties (4).
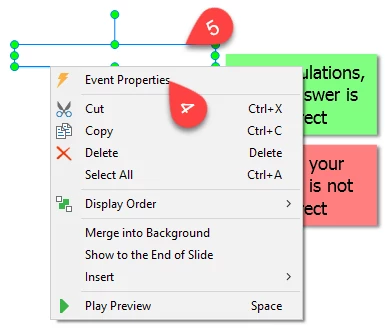
- Or double-click the target area (5) of Text Box.
Customizing options in Event Editor
Generally, there are eight tabs on the event manager of Text Box.
The Text Tab
This tab defines a text string. If the audience types exactly what you want, the condition is met.

- Points (5): The score that you want to assign to the question. With all correct answers, users will gain this score. For example, if users enter “Steve Jobs”, “Apple”, and “iPhone”, they earn 3 points.
- If you select Score by answer (6), the Points column (7) is available, and you can specify different scores for different answers. For instance, if users enter “Steve Jobs”, “Apple”, and “iPhone”, they will earn 1 point, 2 points, and 3 points respectively.
- Actions by answer (8): Select it to define a particular behavior for each answer. After that, you can double-click any cell in the Actions column (9), and select an action from the drop-down list. Also note that a given value can be associated with multiple actions.
From the right side of the Text tab (10), take the following steps:
- Click the green cross-hair button to insert a new value (if you click any cell in the Value column) or new actions (if you click any cell in the Actions column) into the selected row.
- Click the red bar icon to delete the selected row (including an event and all its actions) or remove a given action row without affecting the value row.
Choose how users will submit their answers (10):
- You can select the Auto option or select the Press key option and type your the hotkeys you want.
- Once you check this box, the answer will be listed in a sensitive case. For example, if users enter SteveJobs instead of Steve Jobs, they will not earn any point.
The Settings Tab
The Settings tab has three sections, as shown below:
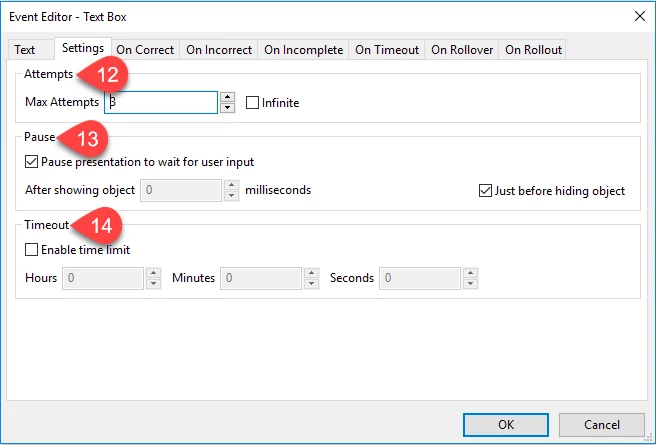
- Attempts (12)
Specify the maximum number of times that users could attempt the question. If you check the Infinite box, you give the freedom for users to give their answer without any limit.
- Pause (13)
Select this box if you want the presentation to stop when users type their answers.
- Timeout (14)
Check the Enable time limit box to set the time duration that users are allowed to give answers.
The Other Tabs
These tabs (15) include settings about the following actions in response to trigger conditions.
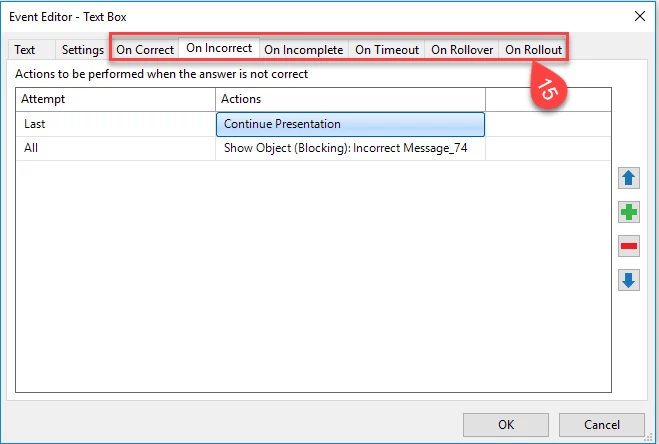
- On Correct: Define the action(s) to be taken when users give a correct response.
- On Incorrect: Define the action(s) when there is an incorrect answer.
- On Incomplete: Define the action(s) when the answer is not completed.
- On Timeout: Define the action(s) when users do not respond within the specified time.
- On Rollover: Define the action(s) when the mouse rolls over the shape of the object.
- On Rollout: Define the action(s) when the mouse rolls out of the shape of the object.
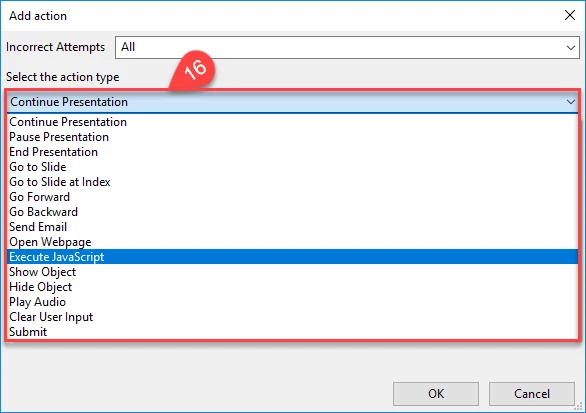
By using four options on the right side of each following tab, you can add, remove, and organize different actions. There are fifteen15 types of behaviors (16) for you to choose, and remember that the inserted actions are placed in the order of the appearance from top to bottom.
Event Editor is a powerful tool in ActivePresenter, helping you to create interactions and communicate with learners effectively. Try it today, and feel free to contact us if you need any support.