Do you often create interactive software simulation?
There are thousands of software created every day. Most of them need interactive simulation. It is a simple process that you create, test, make demonstration videos, and show it to customers to get their feedback, comments and get the work done. We created ActivePresenter – one of the best tool for interactive software simulation. It has been developed to meet the requirements of the professional software which can be used in screencasting, eLearning authoring, and simulating.
Create a wonderful interactive software simulation with ActivePresenter – Let’s show you how!
It’s not only showing others how you practice a software or how you process something step-by-step but showing it engagingly and lively. That’s what ActivePresenter offers you with the software simulation feature in which I’ll go in details in this article. The result that you get when using this feature is a series of slides or steps describing how to achieve a specified purpose with the application that you are capturing.
Capturing
To use ActivePresenter to create a software simulation, take following steps:
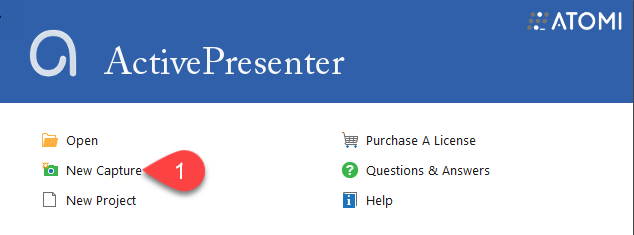
Step 1: Click New Capture from the Welcome Screen. (1)
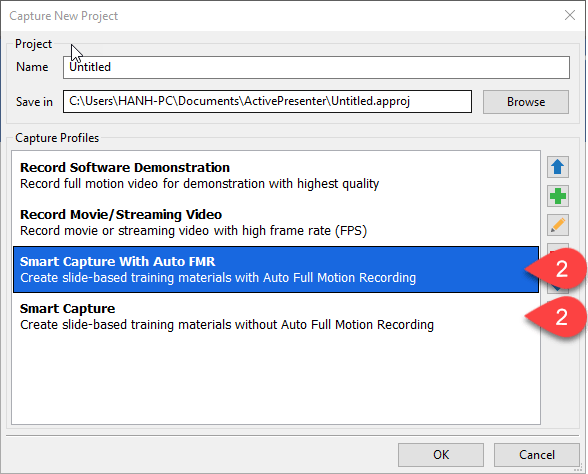
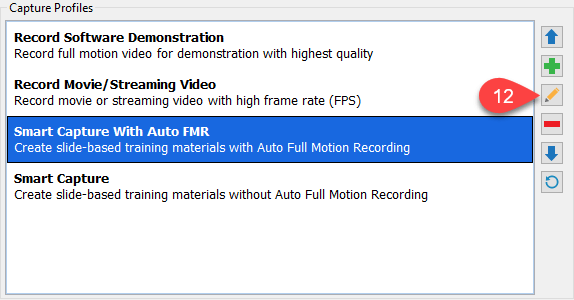
Step 2: Select Smart Capture with Auto FMR or Smart Capture. (2)
In order to create an interactive software simulation, you can choose either Smart Capture with Auto FMR or Smart Capture. You can take a look at Choosing Capture Profile for Interactive Software Simulations to know in great details the difference between them.
Click OK and the Capture New Project dialog will pop up. Take further steps bellow:
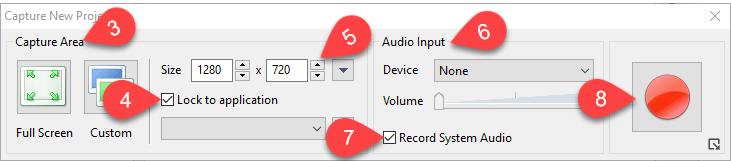
Step 3: Select capture range in the Capture Area section. (3)
ActivePresenter allows recording full screen or just a specified part of the screen.
Step 4 (Optional): Choose to lock to the application to record. (4)
This means that the record window will stick to and follow where it moves to.
Step 5 (Optional): Select the preset size. (5)
Step 6: Set Device and Volume for the record in the Audio Input section. (6)
Uncheck the Record System Audio button (7) if you don’t want to record any audio which is currently playing in your system.
Finally, click the Start Record button (8) and start recording.
To finish your recording, press Ctrl + End.
Editing
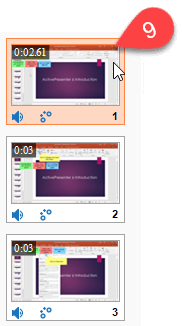
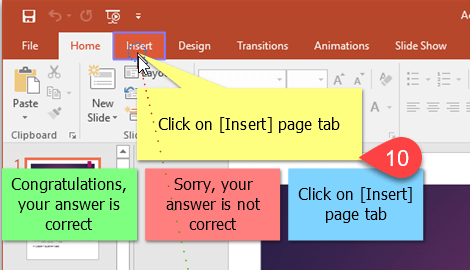
The result is a series of slides/steps with mouse clicks and keystrokes recorded. They describe how to achieve a specified purpose with the application that you are capturing. Here is the Microsoft PowerPoint application simulation. (9)
There are feedback messages and mouse click interactions that ActivePresenter inserted for you (10). They are going to respond to each of the learner actions.
Exporting
The last but not least, don’t forget that you can export your project to many kinds of outputs that ActivePresenter offers. (11)

Capture Profile Editor in details
To have more advanced settings of the recording, you can go to the Capture Profile Editor. To do that, click the Edit Capture Profile (12) in the Capture New Project window.
It has five tabs which support creating simulation (13). However, I would like to briefly explain some features that are most usually used. For more detail about the Capture Profile Editor, please refer to the Working with Capture Profile Editor article available on our website.
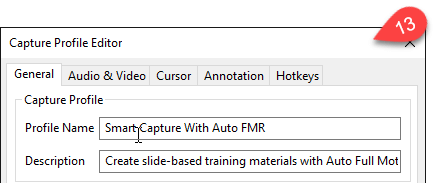
- General Tab
You can have generic choices for the capture settings here.
- Audio & Video settings
The Audio & Video tab contains two sections: video and audio settings.
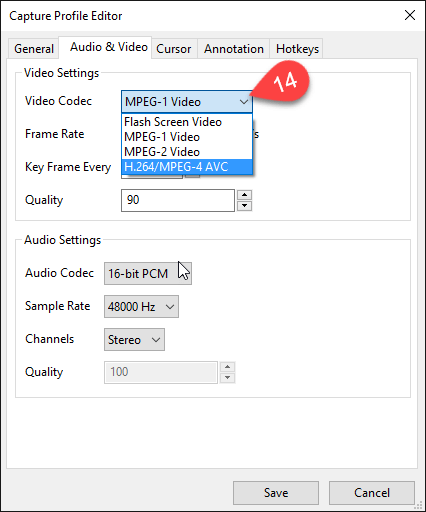
Video Codec (14) offers you four choices from which you can choose:
Flash Screen Video: ActivePresenter will use the lossless algorithm in encoding. Using this codec will reserve the video quality.
MPEG1, MPEG2 and H264 codec: ActivePresenter will use the lossy algorithm so the file size will be reduced.
- Cursor Tab
This tab contains options for Cursor settings which apply for both cursors in recorded video and the cursors of the cursor path object.
- Annotation tab
The Annotation tab’s options are only activated when you select the Smart Capture mode. It controls the annotations and interactions that are automatically added during the capture.
- Hotkeys Tab
This tab contains settings for the keyboard shortcuts.
So, you have walk through all about interactive software simulation. We believe that it is not all the box but we guess it is enough. If you would like to share with us your great simulation video, don’t hesitate to contact us.
For newbie
We hope you enjoy the post. If you wanna get Activepresenter and try to practice yourself, get Download here. See also our Pricing plan for commercial use. Remember: Activepresenter are both work on Window and Mac OS.