Text boxes are interaction objects into which learners can enter text. They are a good way to test learner knowledge and collect information.
Inserting Text Boxes
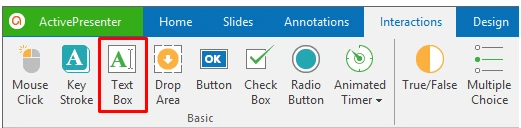
To insert a text box, click the Interactions tab > Text Box. Alternatively, click the Home tab > Interactions > Text Box.
By default, a text box consists of three separate elements: (1) a target area, (2) a Correct message, and (3) an Incorrect message.
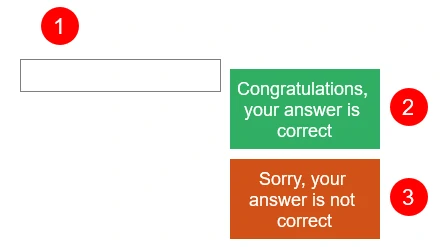
When the interactive presentation is played, the text box displays only the target area (1) and waits for learners to enter text strings. If the entered text matches the correct value, the Correct message (2) appears, otherwise the Incorrect message (3) appears.
- When learners enter a text string, it appears in real time in the target area.
- If the entered text exceeds the area, the text is shifted so that the insertion point is always visible. You should resize the target area to appropriate size so that all the text can be visible.
- For submission, see the Setting Score and Reporting section below.
- When you record software simulations, text boxes are inserted automatically whenever you enter a text string.
Setting Score and Reporting
For full details, see Question Score & Reporting.
Take note of the following:
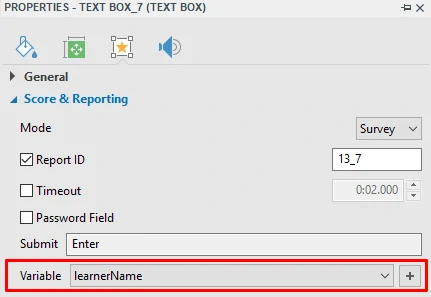
- By default, text boxes use the Graded mode which validates learner input as a correct or incorrect action. To disable validation, set the mode to Survey. The Survey mode is useful when you want to collect learner names or other information.
- There are two ways to submit the entered text: Press Key (the Submit key) and Auto. (The Survey mode only accepts the Submit key.) The former validates the entered text after learners press the Submit key. Meanwhile, the latter validates the entered text whenever learners press any key. As long as the entered text partially matches the correct value, the presentation will wait for learners to input more text. The moment the last entered character is found to be different, it will be deemed incorrect.
- You can assign text and number variables to text boxes to store learner input. Then, you can use references to display variable values anywhere in your presentation or use actions to adjust variable values. For details about variables, see Adding and Using Variables.
Setting Correct Values
To define a correct value, do the following:
Step 1: Select the target area element (1).
Step 2: Click the Properties pane > Interactivity > General > List of Correct Values > Add Value (4).
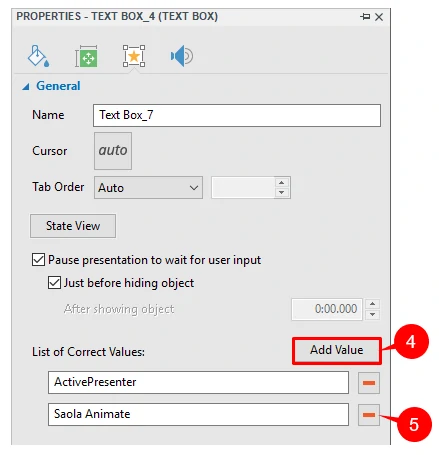
Step 3: Type a text string in the Correct Value text box to define a correct value.
If you don’t want a value anymore, click the Remove button (5) next to that value to remove it.
Setting Events and Actions
To set up events and actions for text boxes, access the Events – Actions section in the Properties pane.
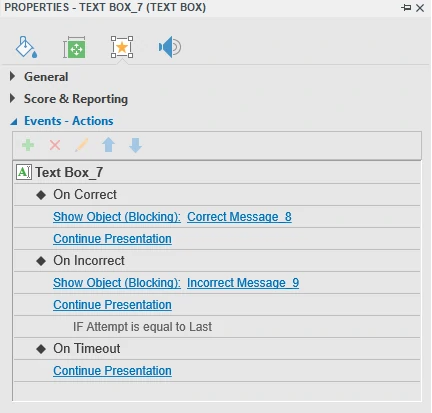
By default, text boxes have three events, namely On Correct, On Incorrect, and On Timeout. You can add four other events, namely On Text Enter (occurs when users enter a text string), On Incomplete, On Rollover, and On Rollout.
For more details, see Working with Events – Actions.
Adding and Removing Feedback Messages
Besides the Correct and Incorrect messages, you can optionally add the Timeout and Hint ones. Select the target area (1) and click the Interactions tab > Message > choose the message you want. Of course, you can remove any unnecessary messages.
For more details, see Working with Feedback Messages.
That’s all about text boxes in ActivePresenter. Visit the following links if you want to learn more about how to work with other types of interactive objects in ActivePresenter:
Working with Mouse Clicks
Working with Key Strokes
Working with Drop Area
Working with Buttons
Working with Check Boxes and Radio Buttons
Working with Animated Timer