ActivePresenter makes many output formats available, namely image, video, HTML SlideShow, document, and HTML5. This article will show you how to export ActivePresenter projects to document formats (PDF, Microsoft Word, Microsoft Excel, and HTML SlideShow). Exporting to PowerPoint presentation is presented here.
Generally, you can use these exporting methods to save projects as PDF or other document types.
To export to any type of document formats, open the Export tab and select one type. This opens corresponding dialogs in which you can define many options for the export.

Export to PDF Document
When exporting a project to PDF document, ActivePresenter will export slides as images and embed into PDF files afterward. Hence, you cannot edit slide objects anymore.
You can define many options of the exporting from the Export To PDF Document dialog. It has three tabs and we’ll get to know each of them in details.
General Tab
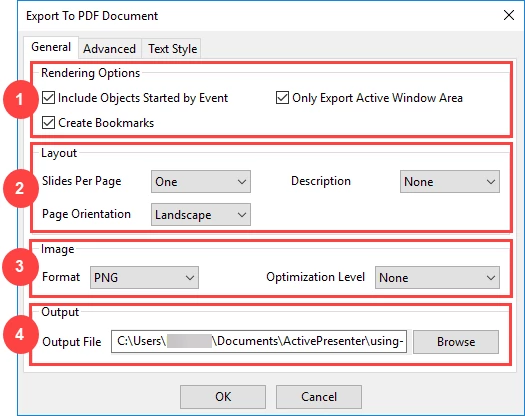
- Rendering Options
When creating projects, especially creating eLearning courses or software simulations, ActivePresenter allows you to choose which properties of the project to render in the output. Just select the check box next to each option.
- Include Objects Started by Event: The output PDF file will include objects which are started by events and actions.
- Only Export Active Window Area: The exported area only includes the Active Window area and slide objects which are selected to export.
- Create Bookmarks: ActivePresenter will create bookmarks that link to each page of the PDF file.
ActivePresenter creates bookmarks from slide names and each bookmark links to a corresponding slide image in the PDF format. The first bookmark level is the slide group title while the second one is the slide name.
- Layout
This section lets you specify the page orientation, as well as the number of slide on each PDF page.
- Slides Per Page: Decide the number of slides per PDF page.
- One: Export single slide per page.
- Two: Export two slides per page.
- Contiguous: The slides are written contiguously in a page until there is not enough space, then it will be moved to the next page.
- Compact: Only export the screen of the first slide in each group. For the following slides, ActivePresenter exports only the slide name and slide description.
- Page Orientation: Choose from landscape and portrait. The page size is always A4. ActivePresenter uses fixed margins of 1” (2.54 cm) on all sides.
- Description: Export slide description and specify which side of the slide to place it (Top, Left, Right, or Bottom). On the other hand, selecting None means there is no description exported.
- Image
This section lets you define the quality of the document background.
- Format: Select from JPEG (lossy compression) and PNG (lossless compression).
Due to their specs and compression algorithms, JPEG is best suitable for pictures while PNG is best suitable for computer graphics (screenshots, drawings, etc.).
- Optimization Level: Select from None, Low, Normal, High, and Ultra. Select None when testing the output. On the other hand, select Ultra or High when exporting the final result. Mind that this option is only available if you select the PNG image format.
- Quality: Specify image quality in the range of 1% to 100%. The higher the quality, the larger the output file size. Note that this option is only available if you select the JPEG image format.
- Output
Output File: Specify the file path and name for the PDF document.
Advanced Tab
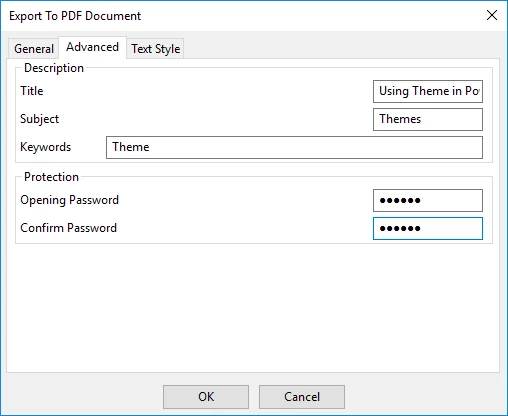
- Description
This section contains PDF document-related options.
- Title: Title of the PDF document (e.g. using_theme_powerpoint.pdf).
When you open the PDF in a viewer, this name appears in the Windows Bar (or in the tab in the case of a tabbed PDF reader).
- Subject: Subject of the PDF document. This is one of PDF document properties that users can see in Document Properties in any PDF viewer.
- Keywords: Keywords defined in the PDF document.
- Protection
This section contains security password for opening the PDF document.
- Opening password: You can set a password for opening this PDF document
- Confirm password: Enter the password again manually (no copy-paste from the previous field).
Text Style Tab
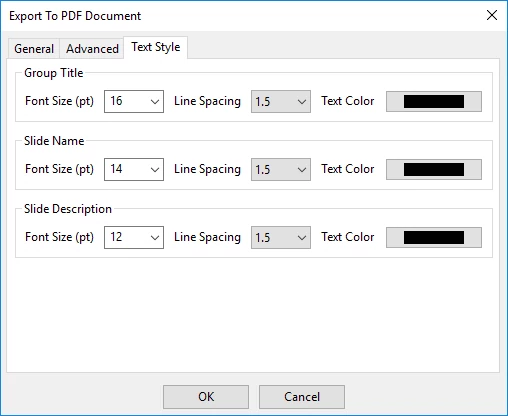
This tab controls the text in the generated PDF file. You can change the font size, line spacing, and text color for three different parts of the slide:
- Group Title: The group title is only exported in the Compact mode.
- Slide Name: The name of the slide which is entered in Slide Title box in the Slide Description section.
- Slide Description: The description of the slide which is entered in the Slide Description section.
Below is the screenshot of the PDF file output of the software simulation project. The output file has one slide per page with the landscape page orientation, etc.
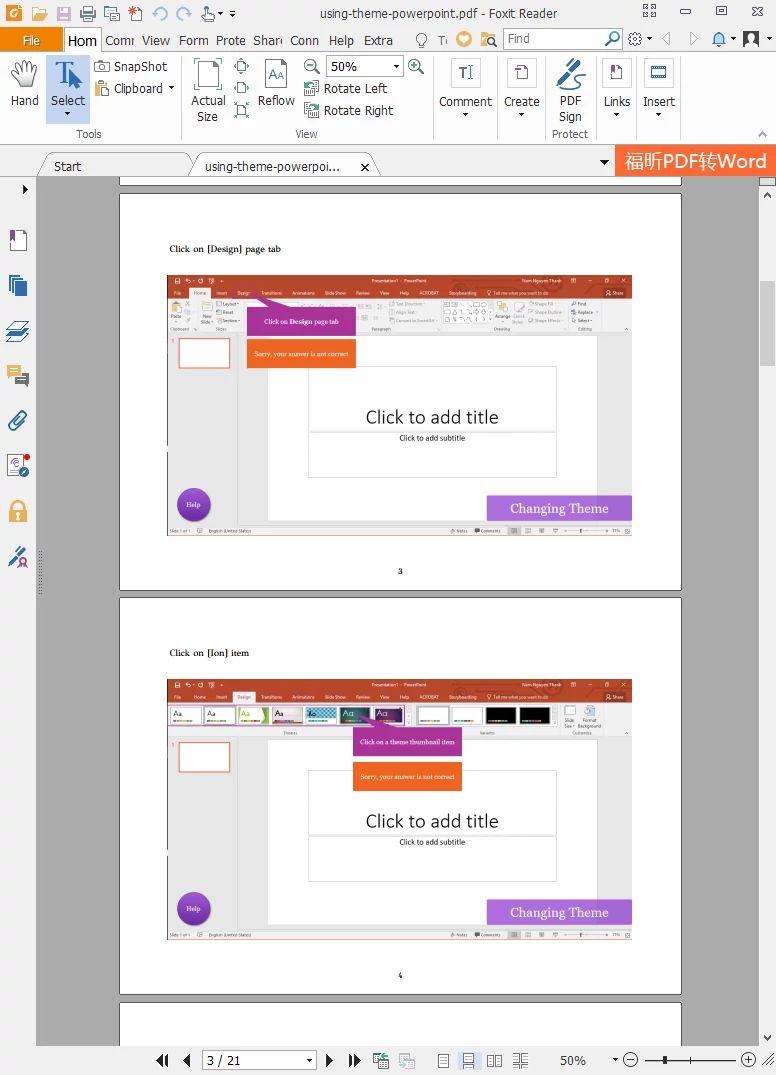
PDF file output
Export to Microsoft Word
The Export To Microsoft Word dialog has the General tab only. This tab has many properties which are in common with those of the Export To PDF Document dialog. See the General tab section above to know more.
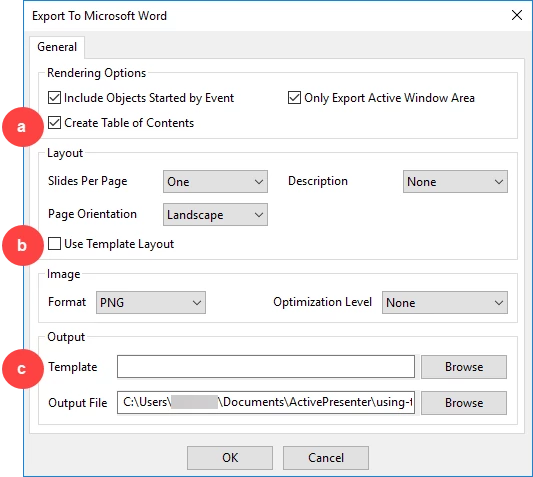
Below are some further options when exporting to Microsoft Word.
- Create Table of Contents (a): Add a table of contents to the exported document with hyperlinks to slides.
- Use Template Layout (b): Use the layout specified in the Word template.
Refer to Creating Custom Word Template section in the User Manual (Page. 242) to learn more about how to create a custom layout.
- Template (c): If you want the exported file to have a particular template, choose one from existing Word templates.
Export to Microsoft Excel
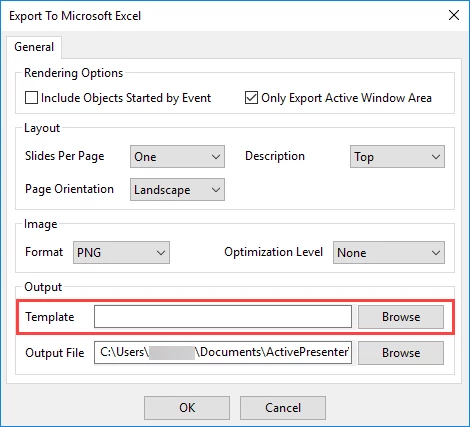
When it comes to exporting projects to Excel document, you will have the Export To Microsoft Excel dialog which also has the General tab only. This tab is similar to the General tab mentioned above, except for one option:
Template: Lets you choose one from existing Excel templates to use in the output file.
Note: When exporting to Microsoft Word or Microsoft Excel, slides will be converted into text, images, as well as objects and inserted into a Word or Excel file afterward. As a result, those objects are editable.
Export to HTML SlideShow
The Export To HTML SlideShow dialog also has the General tab only.
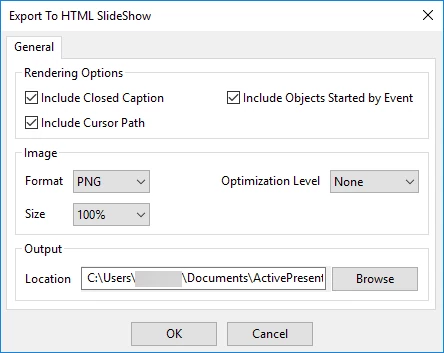
As you can see in the screenshot above, there are also many options when it comes to exporting projects to HTML SlideShow. Most of them are the same with the ones you have when exporting projects to other types of document format, except for:
- Include Closed Caption: Select this if you want the slideshow to contain the Closed Caption that you have inserted in.
- Include Cursor Path: The slideshow will include the cursor path that you have inserted.
Now you know how to convert projects to PDF, Microsoft Word, Microsoft Excel or HTML SlideShow document in ActivePresenter. If you have any obstacle in exporting projects, feel free to ask us in our community.