Have you ever been perfectly impressed with time-lapse videos on the Internet about human evolution, traffic movement, flower blossoming, an artist painting, clouds moving, etc.? Do you want to create the same one even if it seems beyond your ability as you are a novice? No worries! Because you have in hand a powerful design tool to create stunning HTML5 animations and interactive web content. With Saola Animate 3, you can do almost everything without a single line of code through a user-friendly interface and intuitive editor. In today’s blog post, let’s explore creating the growing tree animations in Saola Animate 3. And the result will surprise you for sure.
Let’s download Saola Animate and feel free to experience it!

Then, you can download and open the sample project.
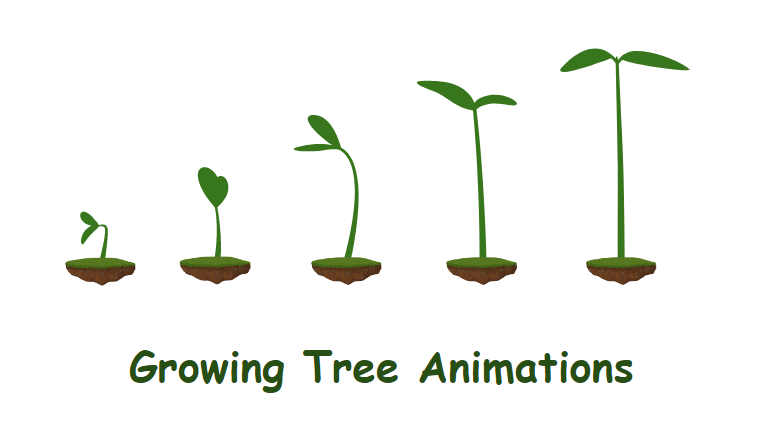
To create five stages of tree growth as the illustrating image, we need to use morph animations in Saola Animate 3. As you know, the morph is the smooth change from one shape/ freeform to another using computer animation. Therefore, with Saola Animate, creating the tree growth stages is just at your fingertips.
Now, we’ll find the answers to the three below questions in turn:
How about the Preparation Stage?
Before diving deeper into completing your work, we should draw a sprout initially. It is the first one in the tree growth stages.
At first, you can draw the sprout right in Saola Animate by choosing a freeform tool to perform. Alternatively, you can copy-paste SVG paths from other vector graphic editors (such as Adobe Illustrator, Inkscape) into the app as freeforms for further editing. In this example, let’s draw a sprout in an application, then copy and paste it directly into the Saola Animate Canvas. At once, it becomes a freeform and ready for morphing.
What are Steps to Create the Growing Tree Animations?
It’s time to explore the steps to morph a sprout into a tree in Saola Animate 3. Instead of adding keyframes manually, you can use Auto-Keyframe to achieve your results. Now, perform the following:
Step 1: Place the Playhead at the desired timestamp (00:03). Then, press the R hotkey to turn on the Auto-Keyframe Range feature.
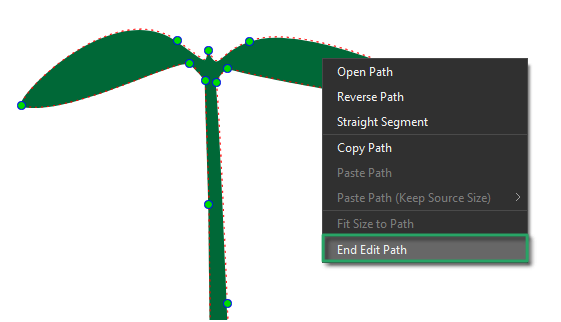
Step 2: Right-click the sprout freeform > Edit Path. Feel free to customize any anchor points, or control points to get a new sapling stage.

By doing so, a Shape Path animation is automatically generated in the Timeline pane. You can press the Play button to see the transition from the start keyframe to the end keyframe.
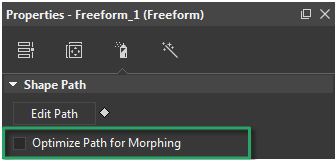
In this growing tree animations example, the shape path is adjusted manually therefore we’ll deselect the Optimize Path for Morphing check box (Properties pane > Styles tab > Shape Path section). This manipulation helps the freeform to be morphed exactly as you desire.
Note: Repeat Step 1 and Step 2 to create five stages of tree growth. Each growing stage is represented by a keyframe in the Timeline pane. For example, this is the third growth stage:

Tip: You can set any tree growth stages image as a background. Later, draw an element to fit the sprout border in the background. Reposition your drawn element to the next stage, follow Step 1 and Step 2 to get it done. Besides, using the Anchor Point Tool will help adjust anchor points effectively.
Step 3: Right-click the freeform on the Canvas > End Edit Path to finish editing.
Step 4: (Optional) Change the freeform color and set the background image to beautify your project.
- Change color: Freeform Properties pane > Styles tab > Fill section > Solid Fill.
- Set background image: Scene Properties pane > Style tab > Fill section > Image Fill.

How to Export the Project?
When finishing, you can preview your project to check the result. Just click the Preview button in the dockable toolbar. If you’re satisfied with the outcome, you can export the project to video formats or HTML5 depending on your needs.
So, it is the end of the article. Now you know how to create the growing tree animations with Saola Animate 3. Hopefully, it inspired you to create other engaging HTML5 animations and interactive web content. Feel free to contact us to share your ideas or any concerns. Have a nice time!

See also:


Follow us: